
- Product Types
- Prices Types
- Adding Products
- One Time Pricing
- Subscription Pricing
- Subscription Trials Setup
- Installment Pricing
- Donation / Pay What You Want
- Inventory Management
- Product Variants
- Variant Images
- Digital Downloads
- Change Product Availability
- Product Collections
- First-Time Payment Discounts
- Manage Product Access
- Create Product With Free Trials
- Charge Set Up Fee on Trials
- Product List
- Product Pages
- Product Content
- Custom Buy Links
- Product SEO
- Change Permalinks
- Custom Fields
- Related Products
- Price Boost
- Product Bundle
- Product Reviews
- Product review shortcodes
- Test Mode/Payments
- Edit & Customize Form
- Change Form Template
- Delete SureCart Forms
- Add Checkout Form
- Checkout Form With Gutenberg
- Checkout Form in Elementor
- Custom Thank You Page
- Create Donation Form
- Customize Confirmation Popup
- Include Coupons in URLs
- Pre-Fill Checkout Fields
- Change Checkout Texts
- Password Field in Checkout
- Default Country Code
- Add Terms to Checkout
- Conditional Block Checkouts
- Remove Coupon Field
- Hide Quantity Option
- Disable Quantity Editing
- Disable Item Removal
- Country Specific Purchases
- Update Store Details
- Dark Mode
- Orders & Receipts
- Manage Slide-out Cart
- Customers Section Overview
- Create Customer
- Delete Customer
- Update Customer Details
- Edit Invoice Details
- Create Shipping Profiles
- Manage Shipping
- Disable Payment Processor
- Manage Store Notifications
- Manage PayPal Branding
- Transfer Store
- How to Download SureCart Purchase Invoice
- Vault – Redeem & Manage Your SureCart Pro Plan
- Enhance Performance Settings
- Invite Team Members
- Enable Spam Protection
- Sync WP Users
- User Roles & Permissions
- Export Data
- Clear Test Data
- Manage Email Notifications
- Remove User Roles
- Remove Plugin Data
- Delete Store
- Delete Business & User Account
- Guest checkout
- Switching Store Currency
- Fix View Order Button
- Fix Express Payment Buttons
- How To Stop Sending WooCommerce Notifications via SureCart?
- Fix PayPal Test Connection
- Fix Sign-In Loop
- Fix Order Confirmation Redirect
- Fix Divi Bullet Point Issue
- Fix Customer Dashboard
- Fix JSON Response Error
- Failed Payment Behavior
- Fix Stripe Zip Code Error
- Fix "Product Can’t Be Blank"
- Troubleshooting Guide
- PayPal IPN Warning Emails
- Caching Configuration for SureCart
- Why iDEAL Might Not Appear in Your Checkout
- Compatibility Guide
- Troubleshooting Stripe Payment
- Fix – SureCart store disconnected
- Configuring LiteSpeed Cache for SureCart
- Webhook Troubleshooting
How to Set Up the Shippo Integration
This document explains how to connect a Shippo account to SureCart and configure the settings required to display live carrier shipping rates at checkout.
Requirements
- WordPress admin access
- SureCart installed and activated
- Shipping rates enabled in SureCart (WordPress Dashboard → SureCart → Settings → Shipping → Enable Shipping Rates)
- At least one physical product with a shipping weight set
Step 1: Create a Shippo Account
- Go to goshippo.com and select Sign Up.
- Choose a plan. The API plan is suited to this integration, as it is intended for connecting through an API rather than working inside the Shippo dashboard.
- Complete the signup process.
Step 2: Generate an API Token
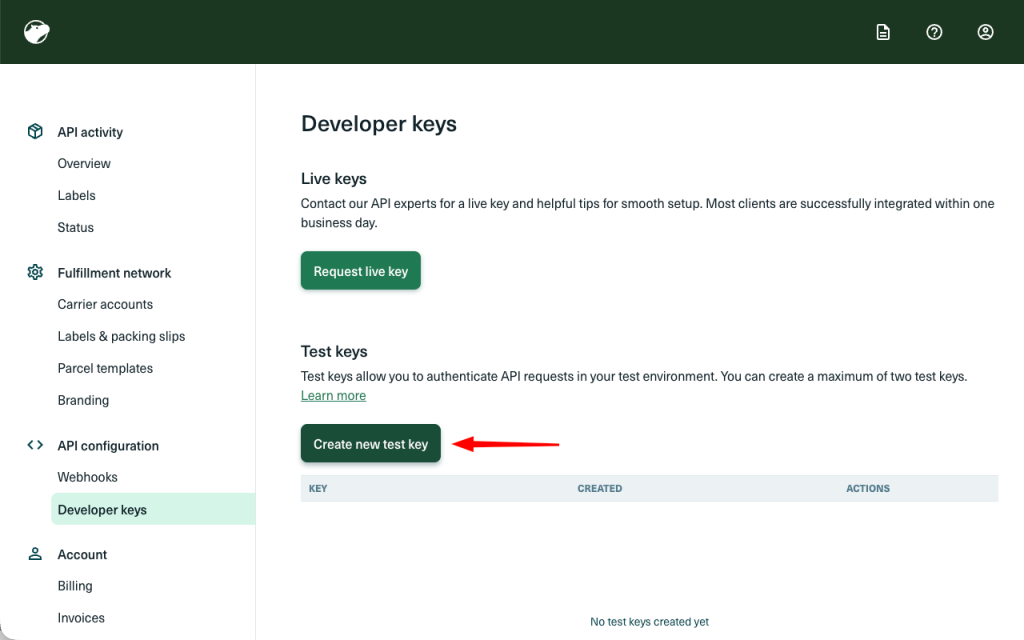
- In the Shippo portal, go to API configuration → Developer keys.
- Under Test keys, select Create new test key.
- Copy the generated token.
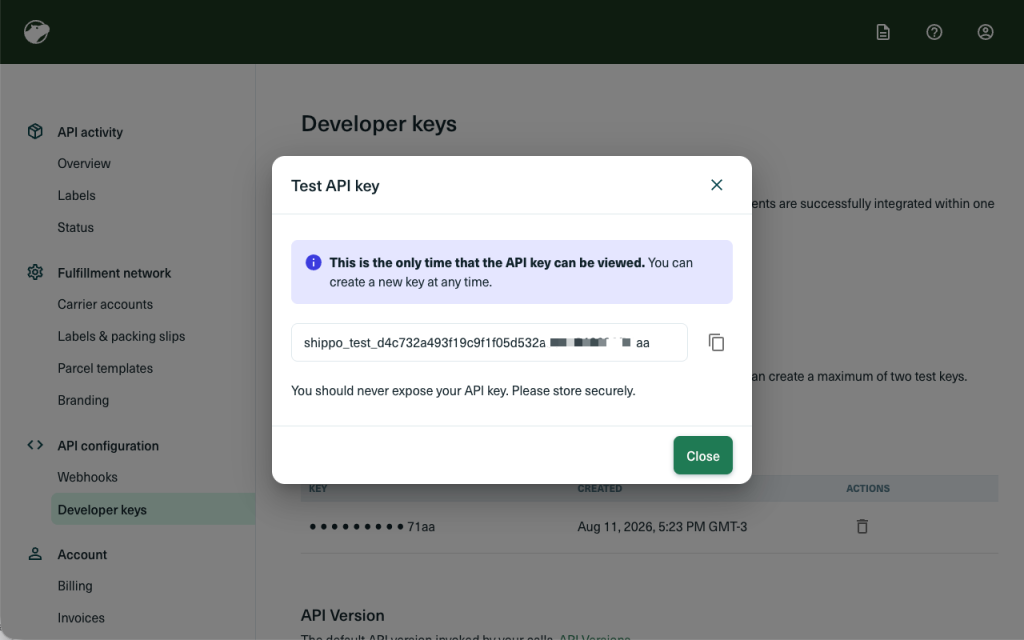
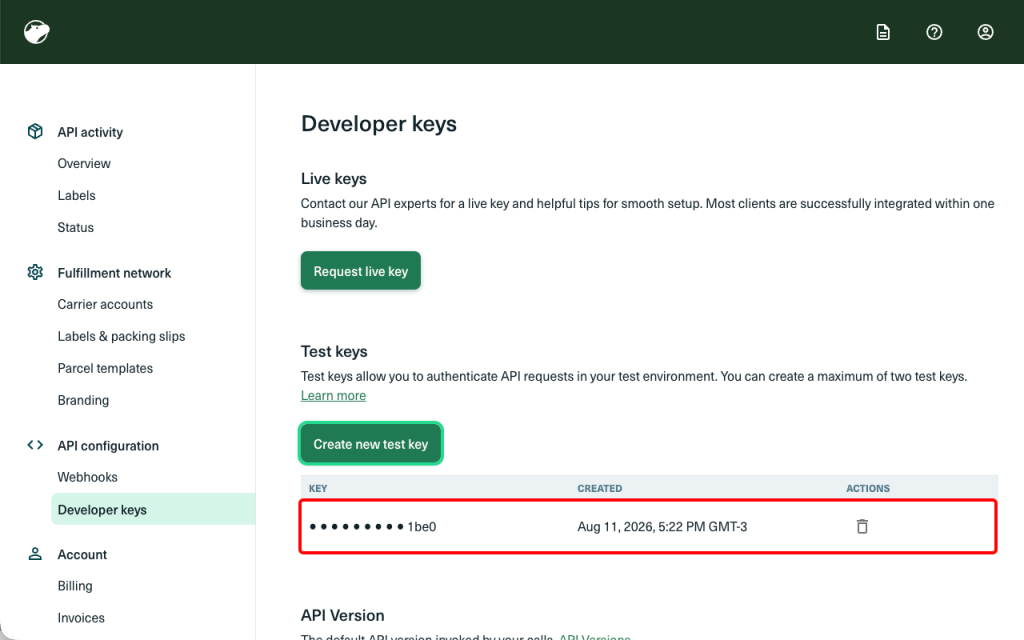
Test keys allow the integration to be configured and tested without purchasing real labels or incurring charges. Live keys are covered in the Notes and Limitations section below.
Step 3: Connect Shippo to SureCart
- Go to WordPress Dashboard → SureCart → Settings → Shipping.
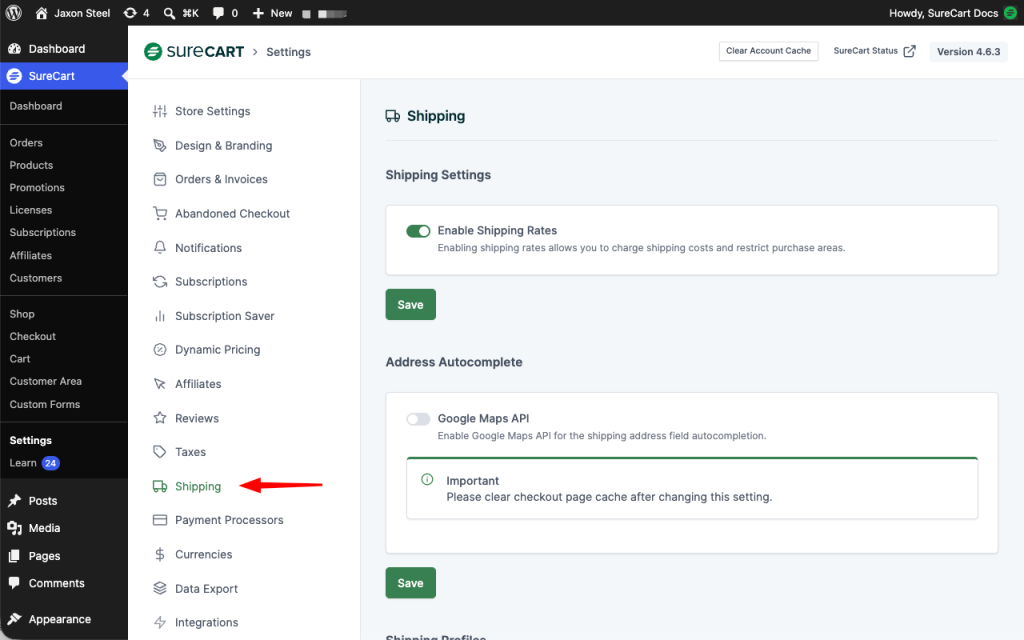
- Under Shipping Providers, select Shippo.
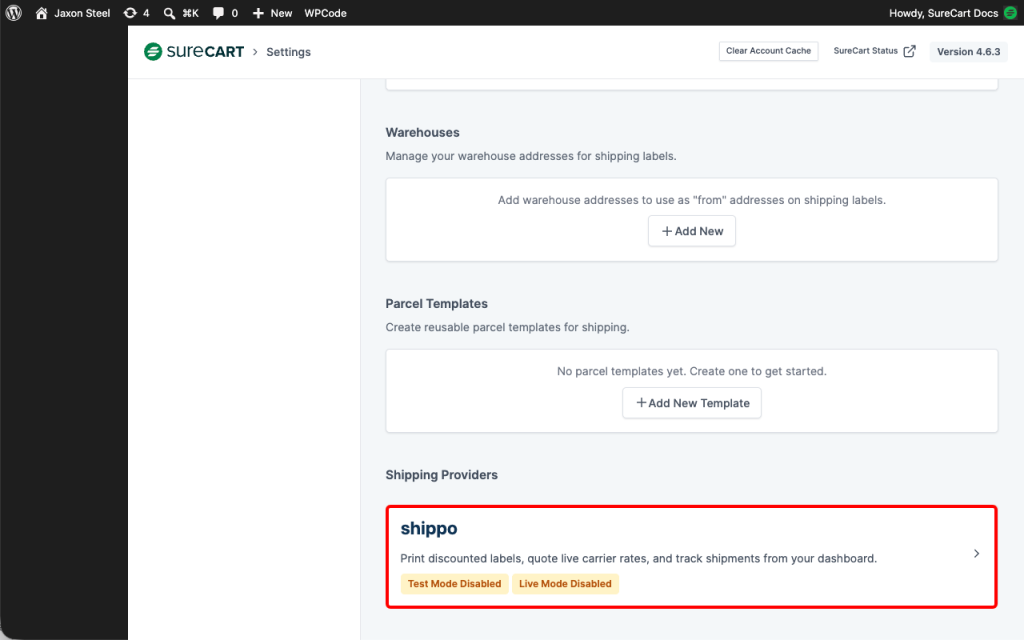
- Select + Connect → Test Mode.
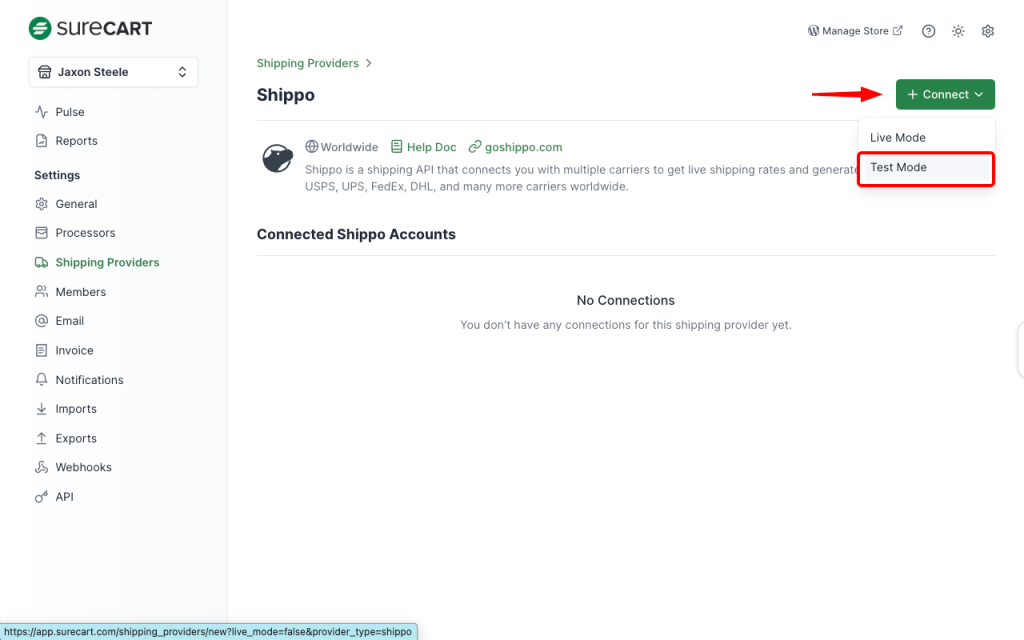
- Paste the API token into the Shippo API Token field.
- Select Create.
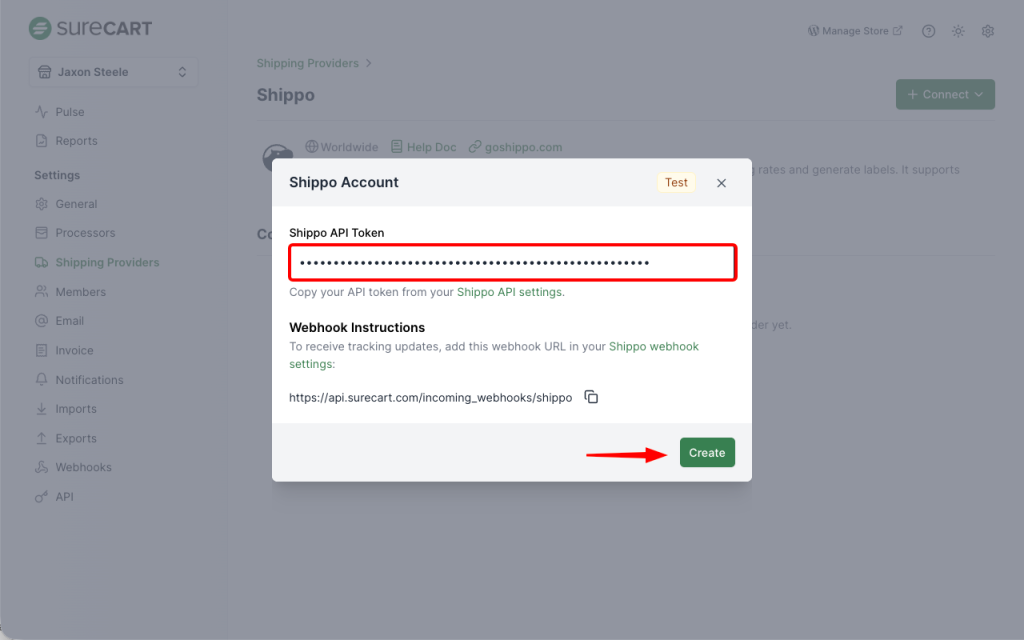
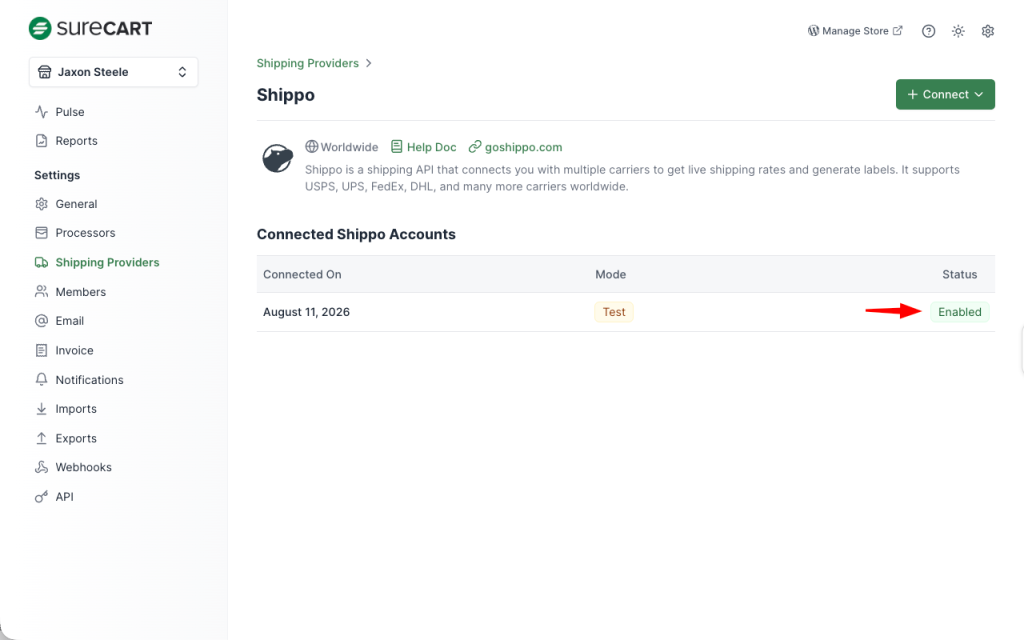
The connection appears in the Connected Shippo Accounts list with the mode and a status of Enabled.
Step 4: Add the Webhook URL in Shippo
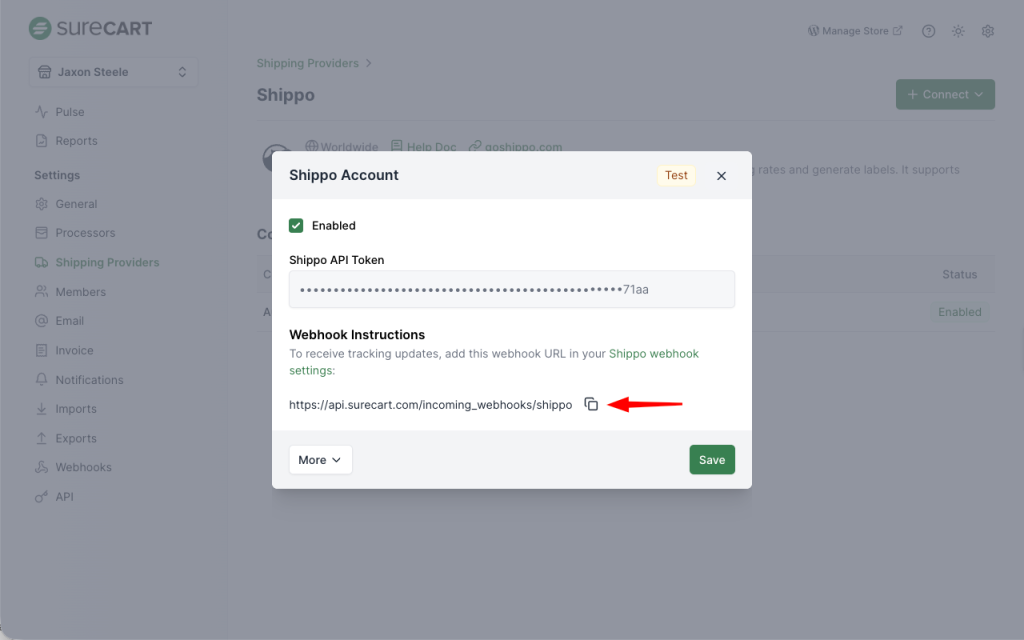
Tracking updates are sent from Shippo to SureCart through a webhook. Without it, shipment statuses will not update automatically.
- Copy the webhook URL shown in the Shippo Account modal in SureCart.
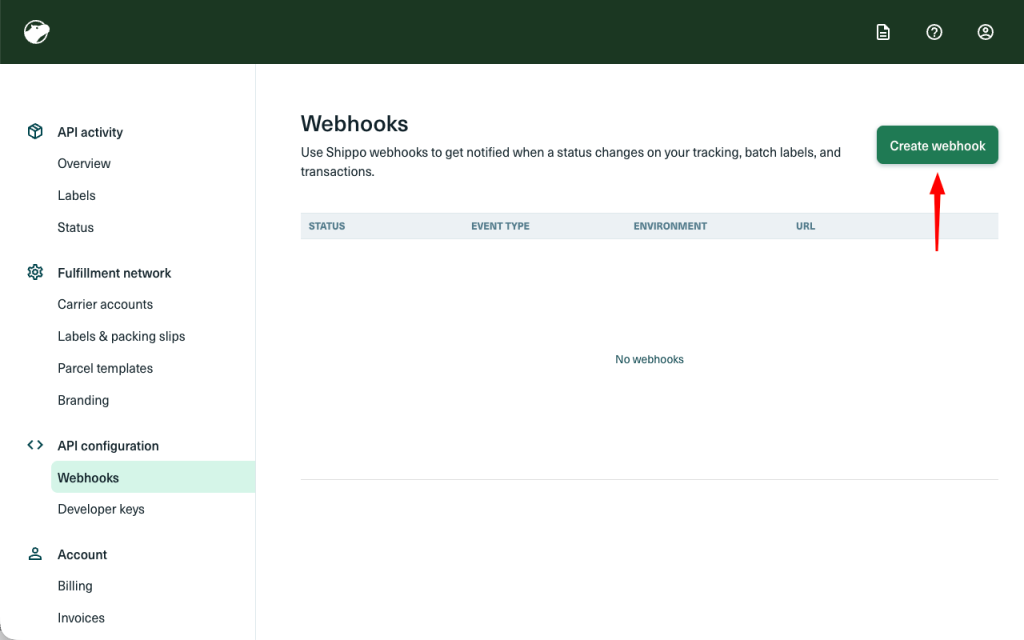
- In the Shippo portal, go to API configuration → Webhooks → Create webhook.
- Set Event Type to Track Updated.
- Set Environment to match the connection mode used in Step 3.
- Paste the webhook URL into the URL field.
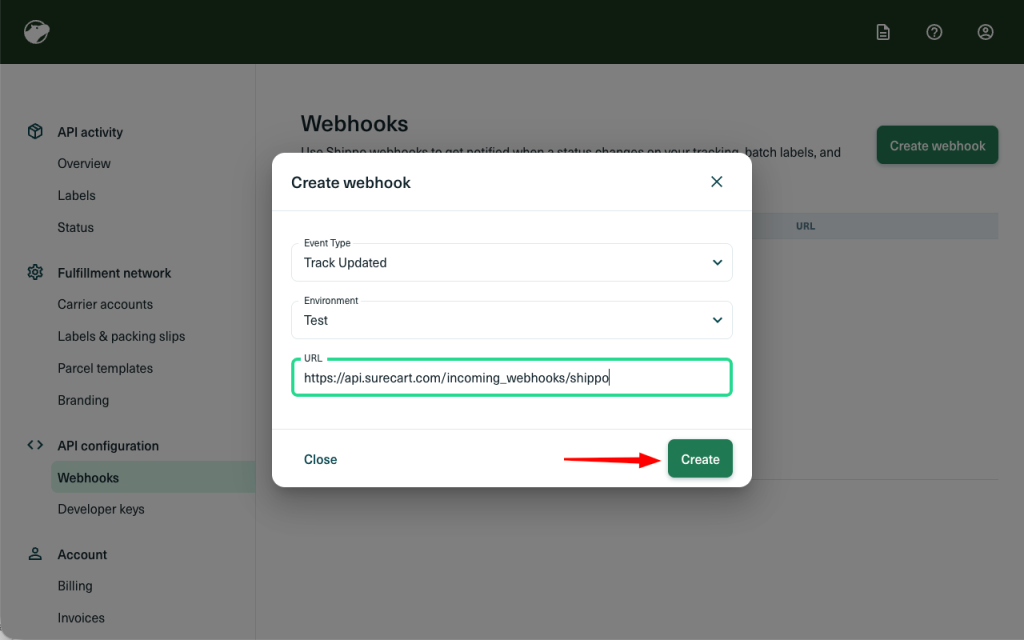
- Select Create.
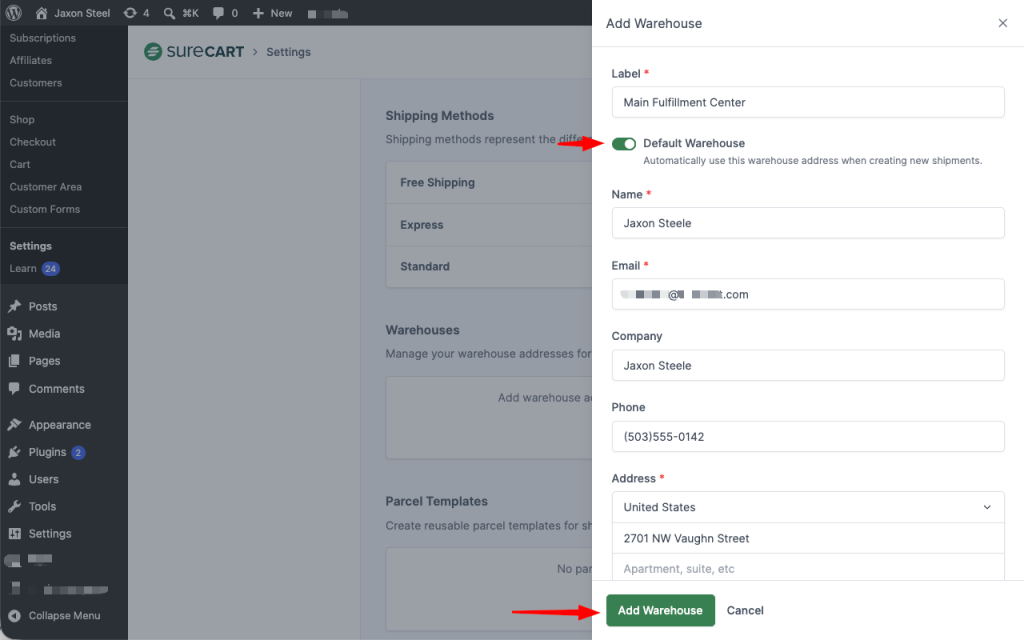
Step 5: Add a Warehouse
The warehouse is the origin address packages ship from. Carriers cannot calculate rates without it.
- Go to WordPress Dashboard → SureCart → Settings → Shipping.
- Under Warehouses, select + Add New.
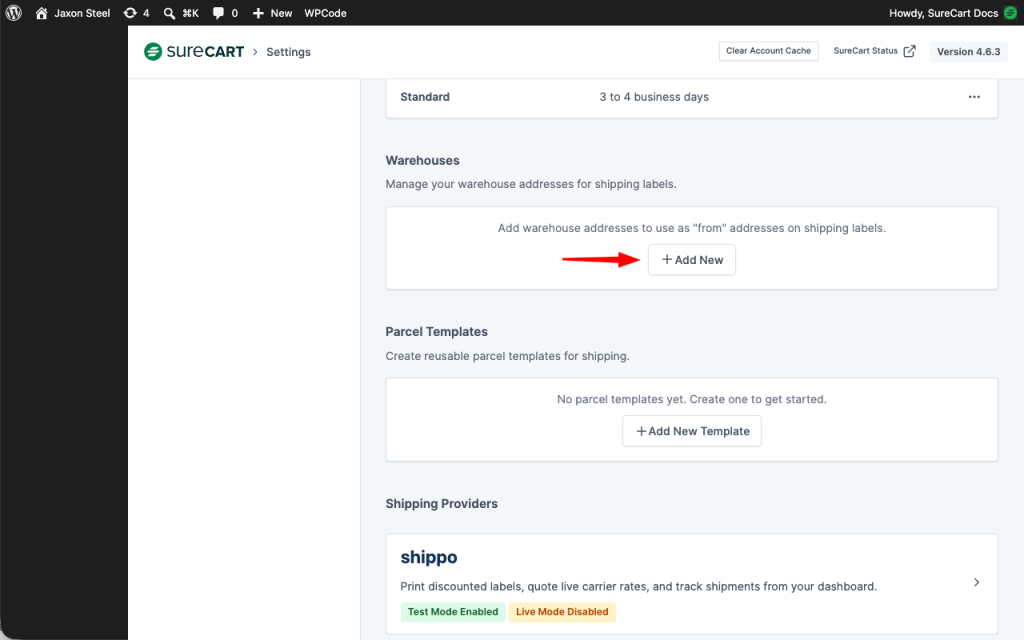
- Complete the required fields: Label, Name, Email, and the full Address.
- Enable Default Warehouse to use this address automatically for new shipments.
- Select Add Warehouse.
Step 6: Create a Parcel Template
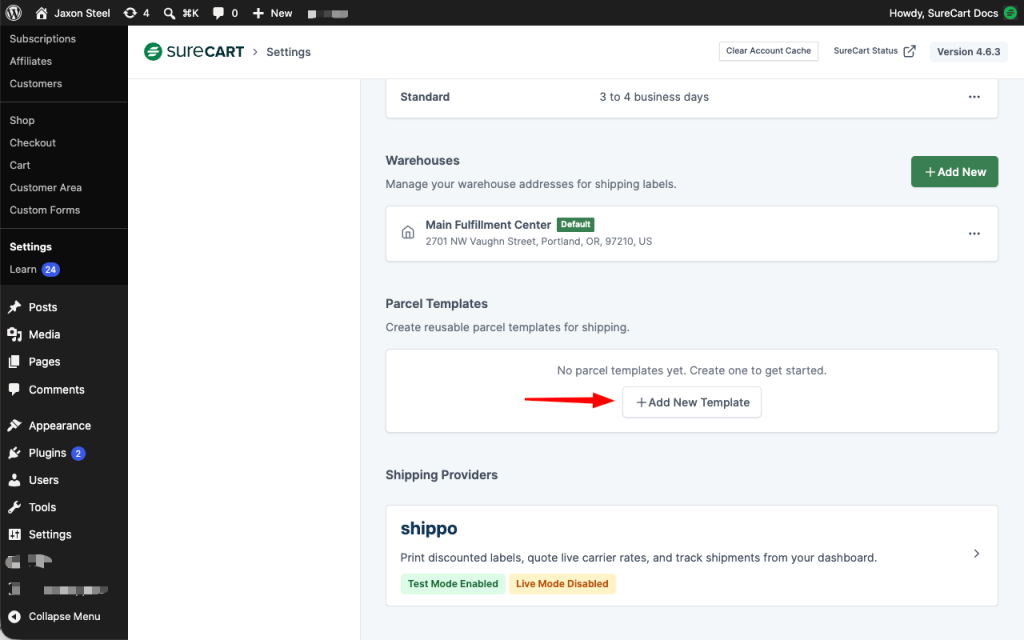
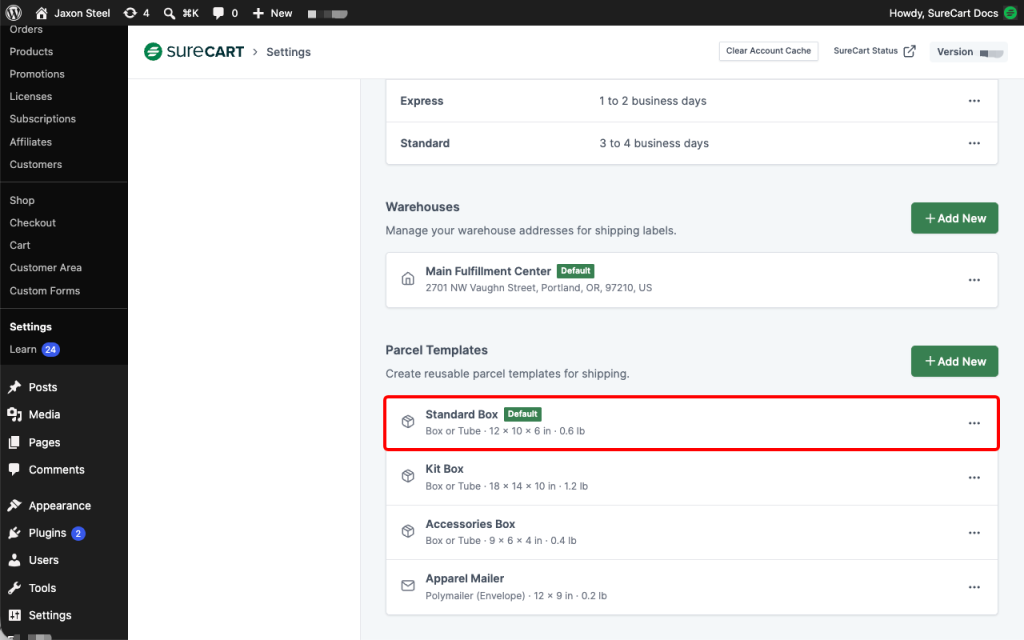
Parcel templates are reusable package sizes selected when fulfilling an order. Dimensions and weight affect the rates carriers return.
- Go to WordPress Dashboard → SureCart → Settings → Shipping.
- Under Parcel Templates, select + Add New.
- Choose one of the three package types described below.
- Enter the Length, Width, Height and Weight, and select the unit of measurement.
- Enter a Name. The name must be unique across parcel templates.
- Enable Default Template to preselect it when creating new shipments.
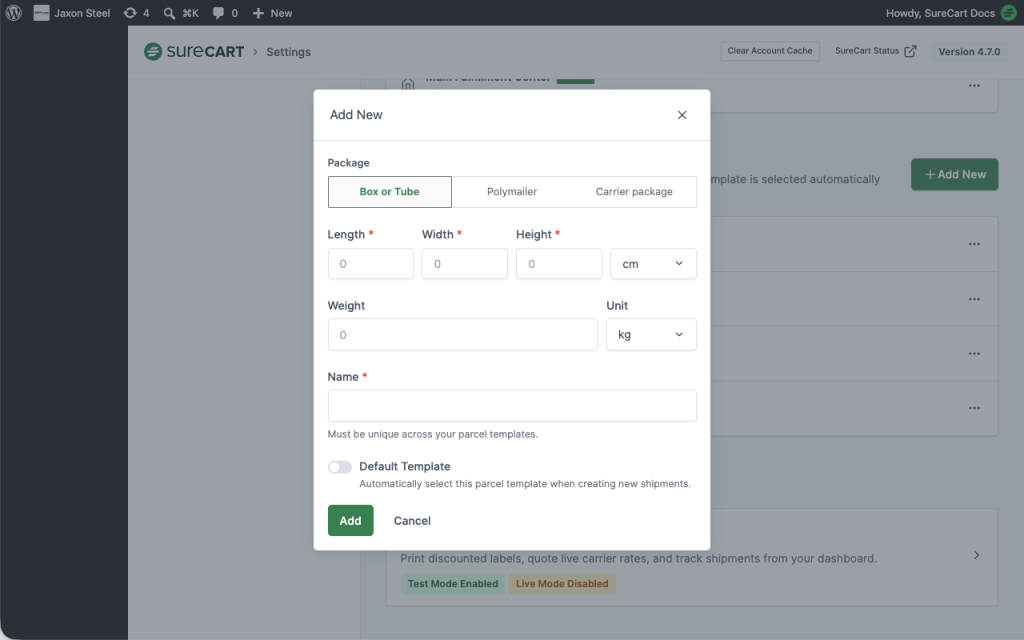
- Select Add.
Box or Tube
A package with custom dimensions. Enter the Length, Width and Height, select the unit of measurement, and optionally enter the empty Weight of the packaging.
Polymailer
An envelope or mailer with custom dimensions. The fields are the same as Box or Tube.
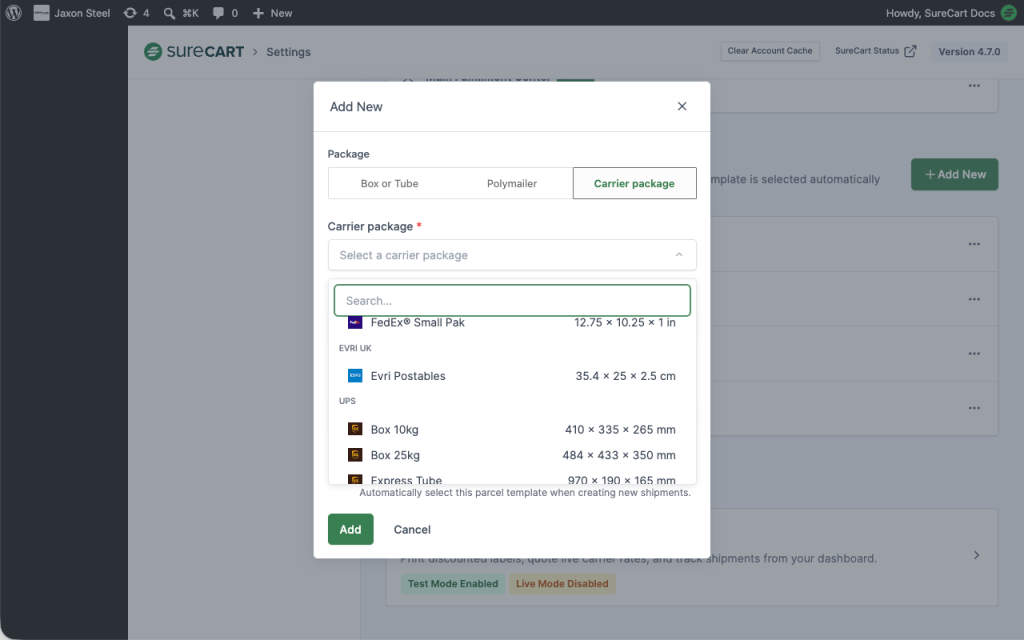
Carrier package
A predefined package offered by a carrier, such as a flat rate box, envelope or satchel. Select Select a carrier package and choose from the list, which is grouped by carrier and pulled from the connected Shippo account. The search field can be used to filter the list.
Dimensions are supplied by the carrier and cannot be edited. This option is only available when a Shippo provider is connected.
Step 7: Create a Shipping Zone
Skip this step if a zone already covers the destination countries.
- Go to WordPress Dashboard → SureCart → Settings → Shipping.
- Under Shipping Zones & Rates, select + Create Zone.
- Enter a zone name and select the countries it covers.
- Save the zone.
Step 8: Add a Live Carrier Rate
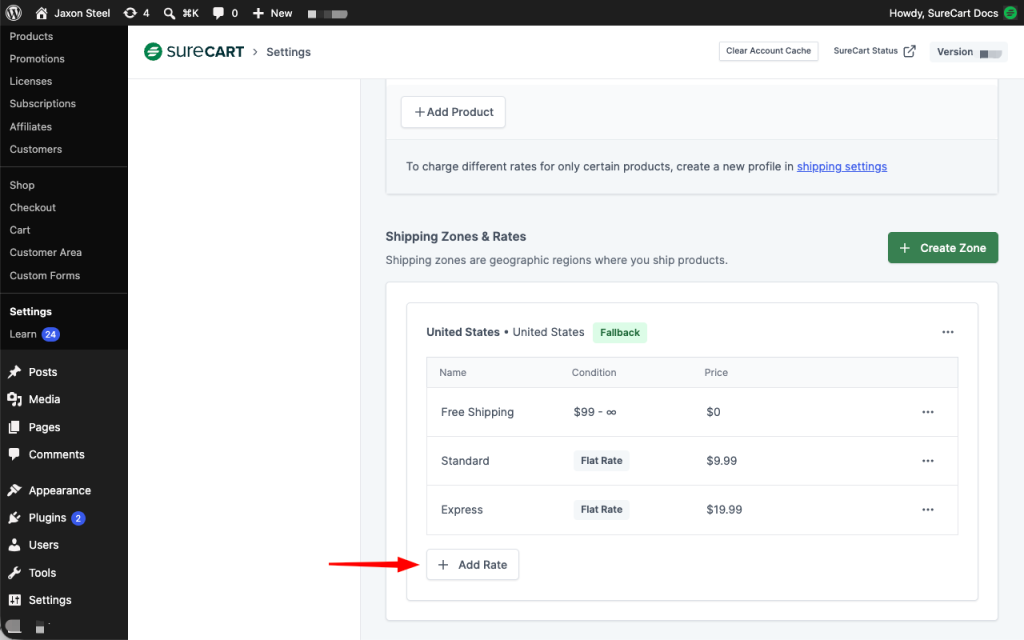
- Open the shipping zone and select + Add Rate.
- Select a Shipping Method.
- Under Rate type, select Live carrier rates.
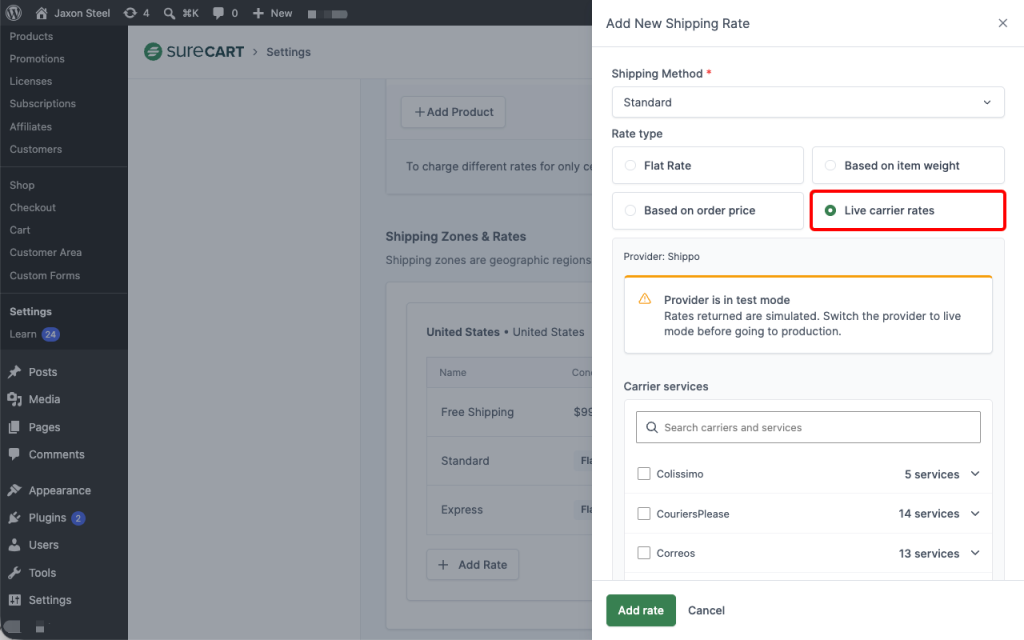
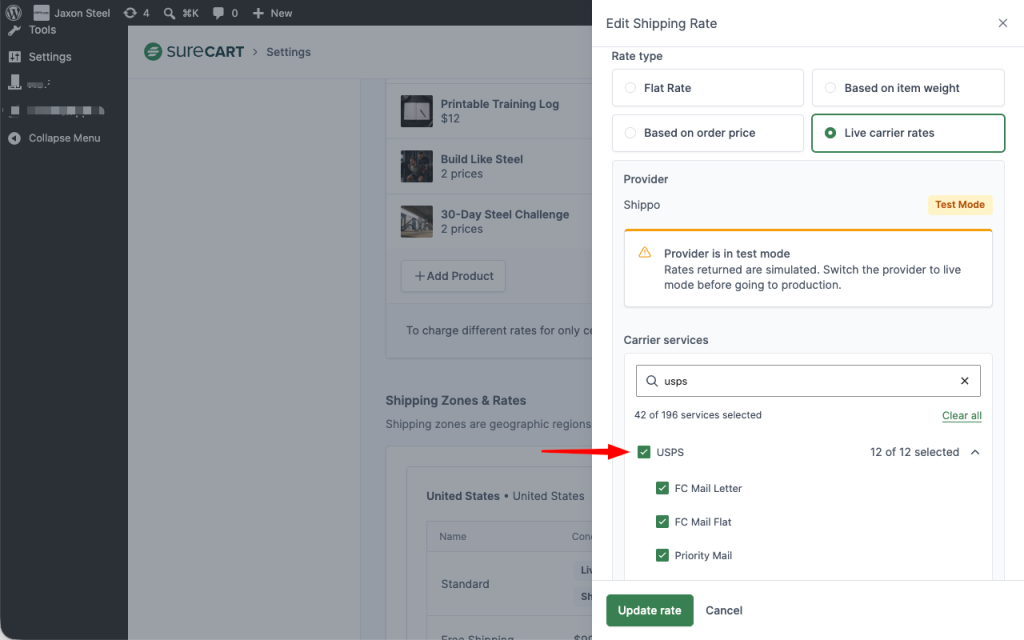
- Under Carrier services, select the carriers and services to offer at checkout.
- Optionally, enter a Handling markup to add a flat amount or percentage to the carrier’s rate.
- Select Add rate.
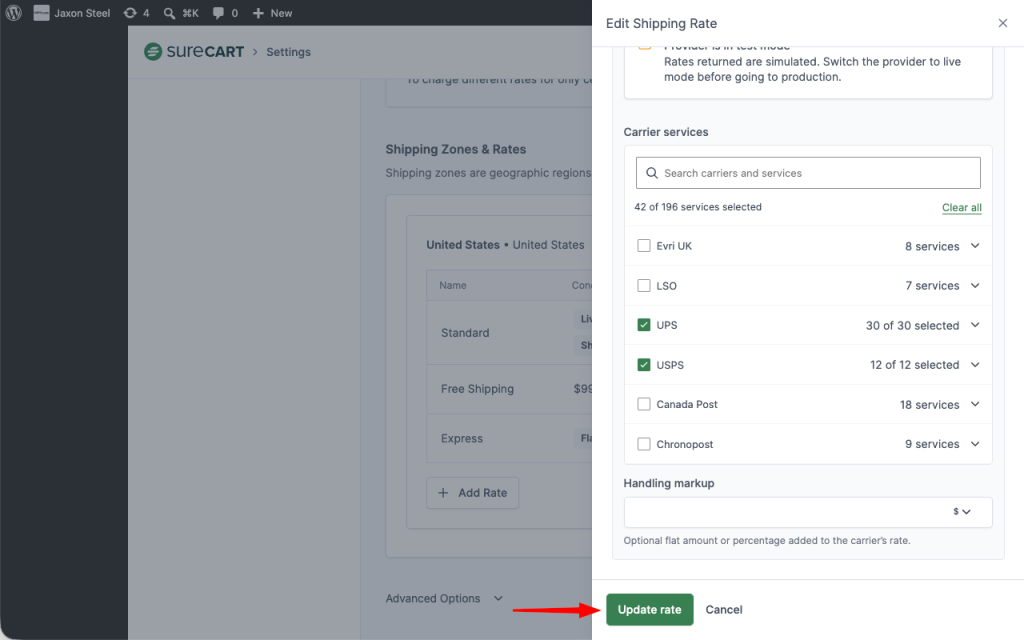
While the provider is connected in test mode, a notice indicates that returned rates are simulated.
Expected Outcome
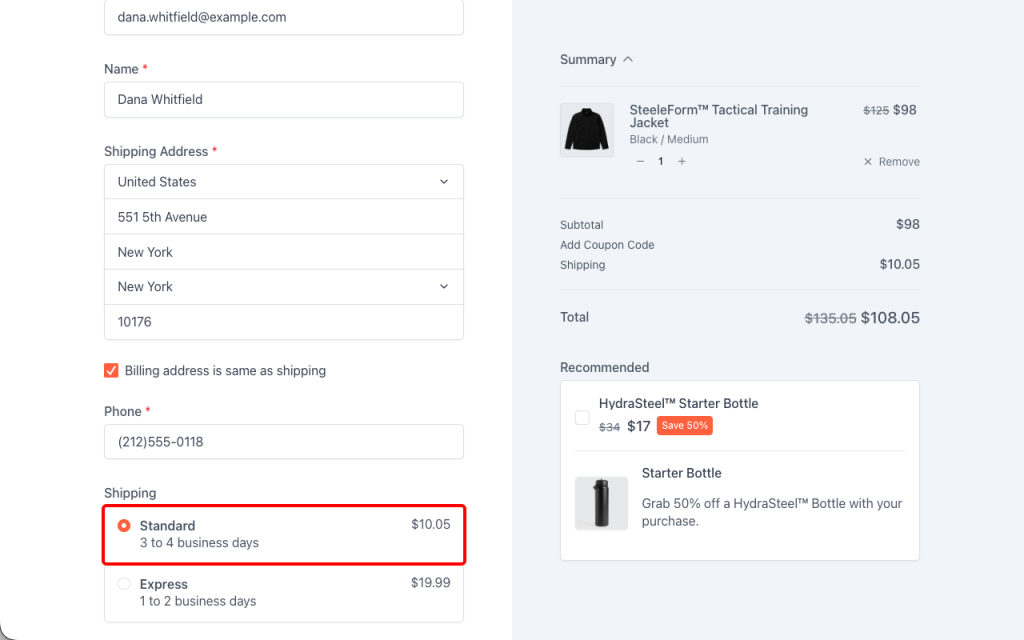
When a customer enters a valid shipping address at checkout for an order containing a physical product, calculated shipping options are returned by the selected carriers and displayed as selectable rates.
Notes and Limitations
Live mode requires a request to Shippo
On the API plan, live keys are not generated from the Shippo dashboard. They must be requested from Shippo directly. Test mode is available immediately.
Rates are not offered when the provider isn’t active
If the shipping provider connected to a rate is disabled or disconnected, that rate will not be offered at checkout. The Shipping Zones & Rates screen displays a warning on the affected zone, and the rate itself is marked accordingly. Reconnecting or re-enabling the provider under Shipping Providers restores the rate.
Carriers with pending terms still return rates
Some carrier accounts start in a pending state until the required carrier terms are accepted in the Shippo portal. Carriers in this state still return rates at checkout, but label purchase will fail until the terms are accepted. It’s recommended to review the carrier list in the Shippo portal and accept any pending terms before going live.
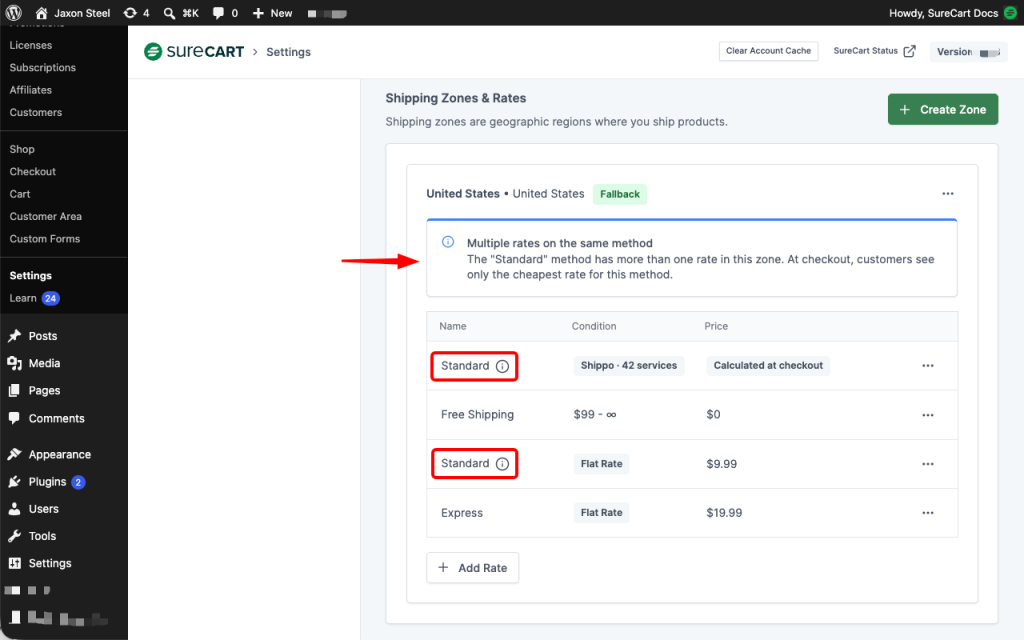
Only one rate per shipping method is shown per zone
If two rates are assigned to the same shipping method within the same zone, only the cheapest one appears at checkout. A notice on the Shipping Zones & Rates screen indicates when a method has more than one rate.
A shipping weight is required
Products without a shipping weight cannot be rated accurately. Set the weight on each physical product under the Shipping section of the product edit screen.
Tracking updates are not simulated in test mode
Tracking events are only received in live mode, through the webhook configured in Step 4.
Related Documentation
Frequently Asked Questions
We don't respond to the article feedback, we use it to improve our support content.