- Product Types
- Prices Types
- Adding Products
- One Time Pricing
- Subscription Pricing
- Subscription Trials Setup
- Installment Pricing
- Donation / Pay What You Want
- Inventory Management
- Product Variants
- Variant Images
- Digital Downloads
- Change Product Availability
- Product Collections
- First-Time Payment Discounts
- Manage Product Access
- Create Product With Free Trials
- Charge Set Up Fee on Trials
- Product List
- Product Pages
- Product Content
- Custom Buy Links
- Product SEO
- Change Permalinks
- Custom Fields
- Related Products
- Price Boost
- Test Mode/Payments
- Edit & Customize Form
- Change Form Template
- Delete SureCart Forms
- Add Checkout Form
- Checkout Form With Gutenberg
- Checkout Form in Elementor
- Custom Thank You Page
- Create Donation Form
- Customize Confirmation Popup
- Include Coupons in URLs
- Pre-Fill Checkout Fields
- Change Checkout Texts
- Password Field in Checkout
- Default Country Code
- Add Terms to Checkout
- Conditional Block Checkouts
- Remove Coupon Field
- Hide Quantity Option
- Disable Quantity Editing
- Disable Item Removal
- Country Specific Purchases
- Update Store Details
- Dark Mode
- Orders & Receipts
- Manage Slide-out Cart
- Customers Section Overview
- Create Customer
- Delete Customer
- Update Customer Details
- Edit Invoice Details
- Create Shipping Profiles
- Manage Shipping
- Disable Payment Processor
- Manage Store Notifications
- Manage PayPal Branding
- Transfer Store
- How to Download SureCart Purchase Invoice
- Fix View Order Button
- Fix Express Payment Buttons
- How To Stop Sending WooCommerce Notifications via SureCart?
- Fix PayPal Test Connection
- Fix Sign-In Loop
- Fix Order Confirmation Redirect
- Fix Divi Bullet Point Issue
- Fix Customer Dashboard
- Fix JSON Response Error
- Failed Payment Behavior
- Fix Stripe Zip Code Error
- Fix "Product Can’t Be Blank"
- Troubleshooting Guide
- PayPal IPN Warning Emails
- Caching Configuration for SureCart
- Why iDEAL Might Not Appear in Your Checkout
- Compatibility Guide
- Fix – SureCart store disconnected
How to Connect Paystack Payment Processor
If you’re considering using Paystack to accept payments while selling on SureCart, this article is for you.
But if you haven’t heard of Paystack before, it is a service that helps businesses in Nigeria, Ghana, and South Africa securely receive payments from customers worldwide.
In this article, we’ll guide you through the process of connecting Paystack and SureCart, so you can effortlessly collect payments from your customers while selling on SureCart.
Let’s get started!
Know This Before You Connect Paystack with SureCart
Paystack and Stripe don’t work well together.
If you have Stripe and Paystack both active in SureCart, customers will only see the Stripe payment option during checkout.
To ensure a smooth payment process with Paystack, we suggest you disable Stripe before connecting your PayStack account.
If you’re not sure how to disable a payment gateway, check out this article.
How to Begin The Setup
When you’re ready to connect SureCart and Paystack together, simply login to your WordPress admin area and follow these easy steps:
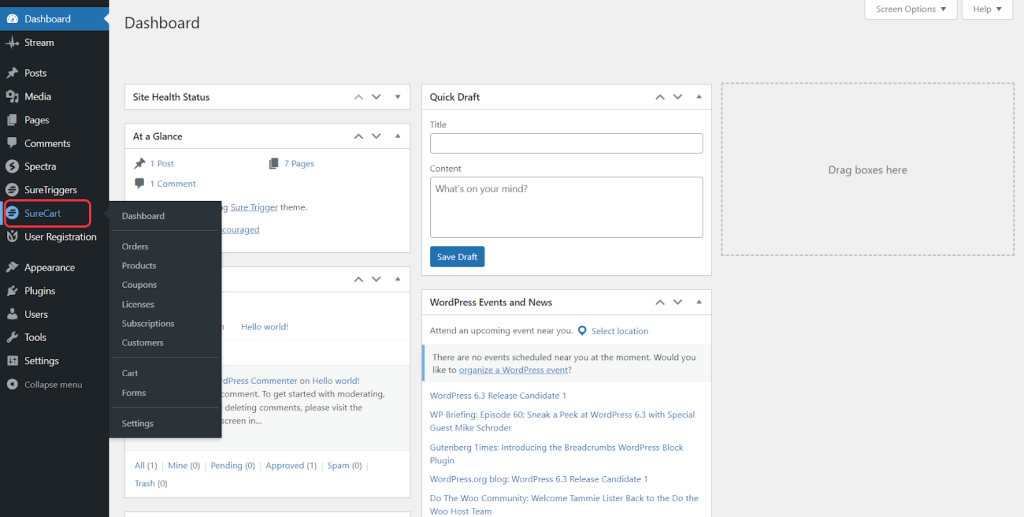
- Go to the WordPress admin area and click on the SureCart dashboard.
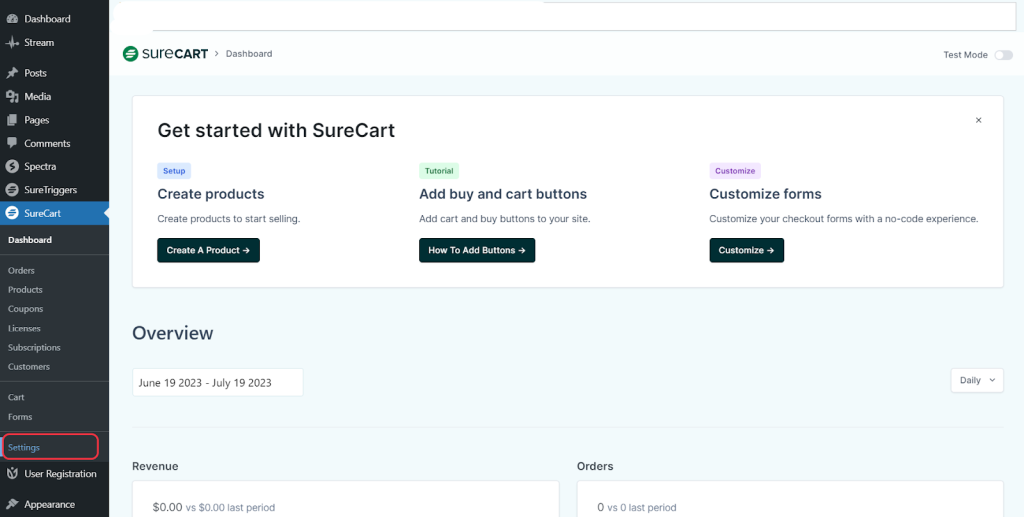
- Click on the Settings menu under SureCart settings that you see on the WordPress sidebar.
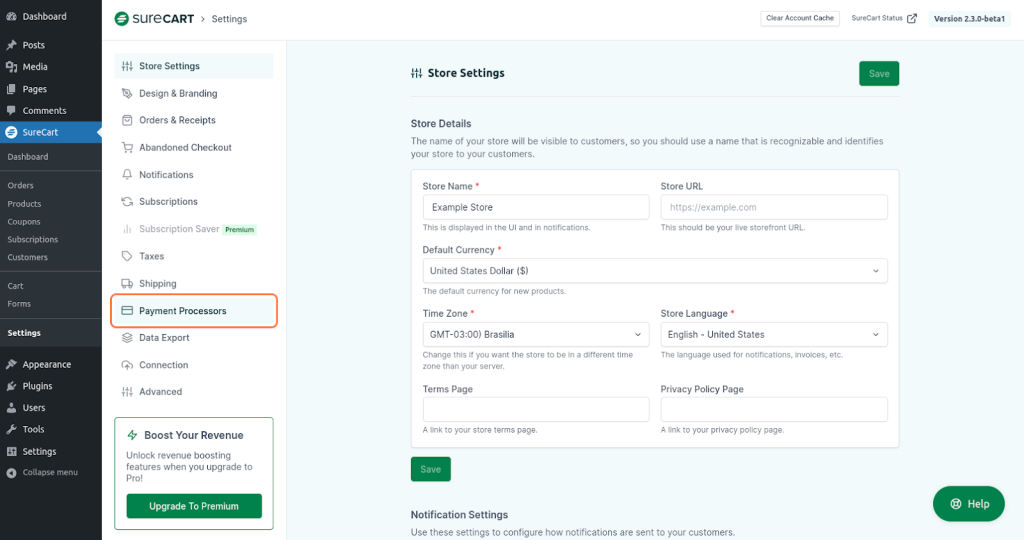
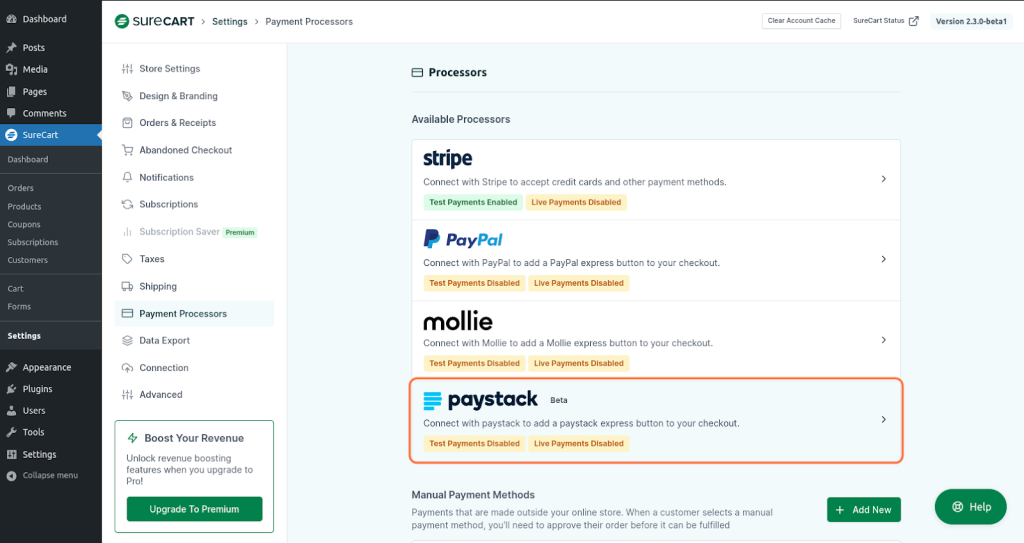
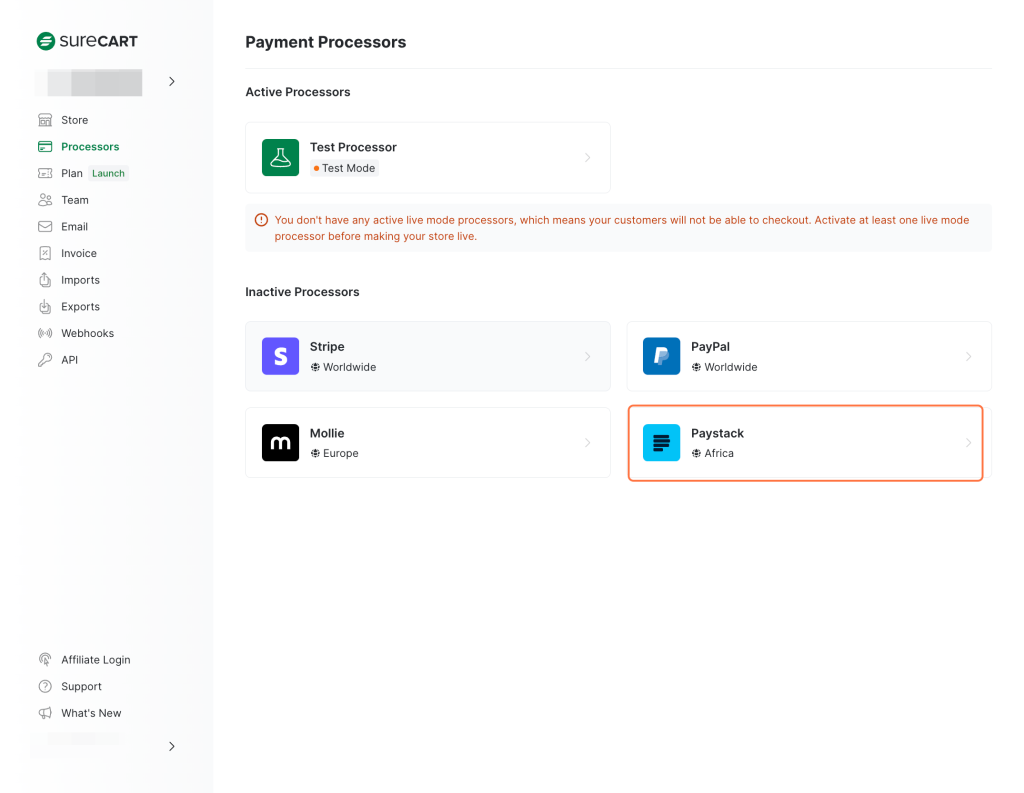
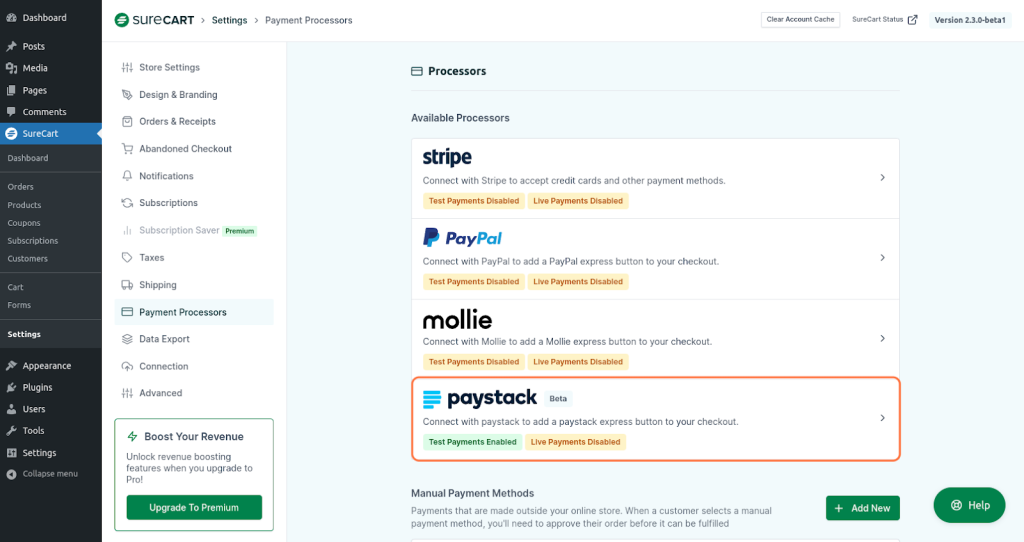
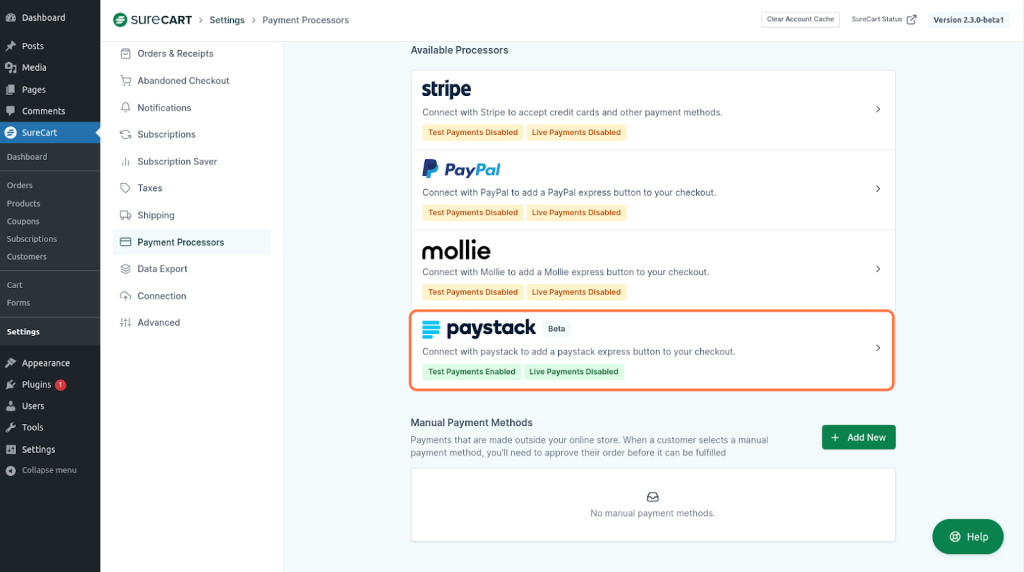
- Click on Payment Processors in SureCart settings and you will see the Paystack listed as one of the payment processors.
Connecting Paystack in Test Mode
Before you connect the live Paystack payment processor, you can connect Paystack in test mode. This allows you to set up the payment processor in a safe testing environment.
Once you’ve tested the setup, you can proceed to connect a Paystack in live mode. We’ve explained further in this article how to connect a Paystack in Live Mode.
For now, to connect the test payment, simply follow these steps:
- Click on the Paystack option.
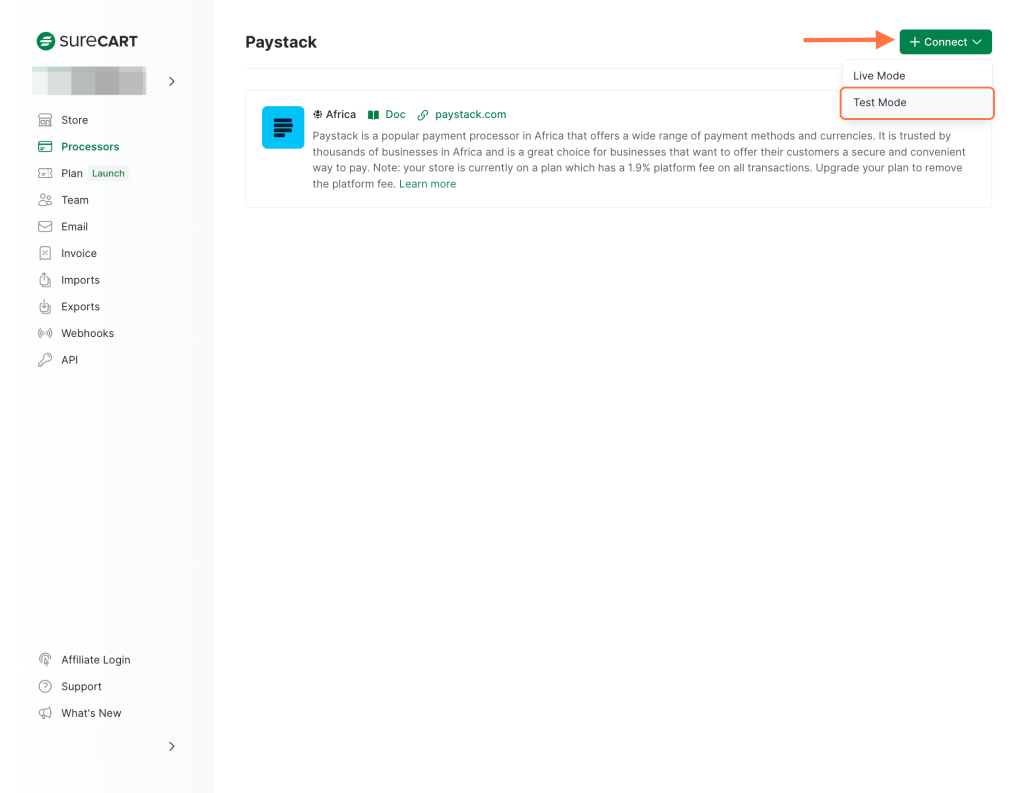
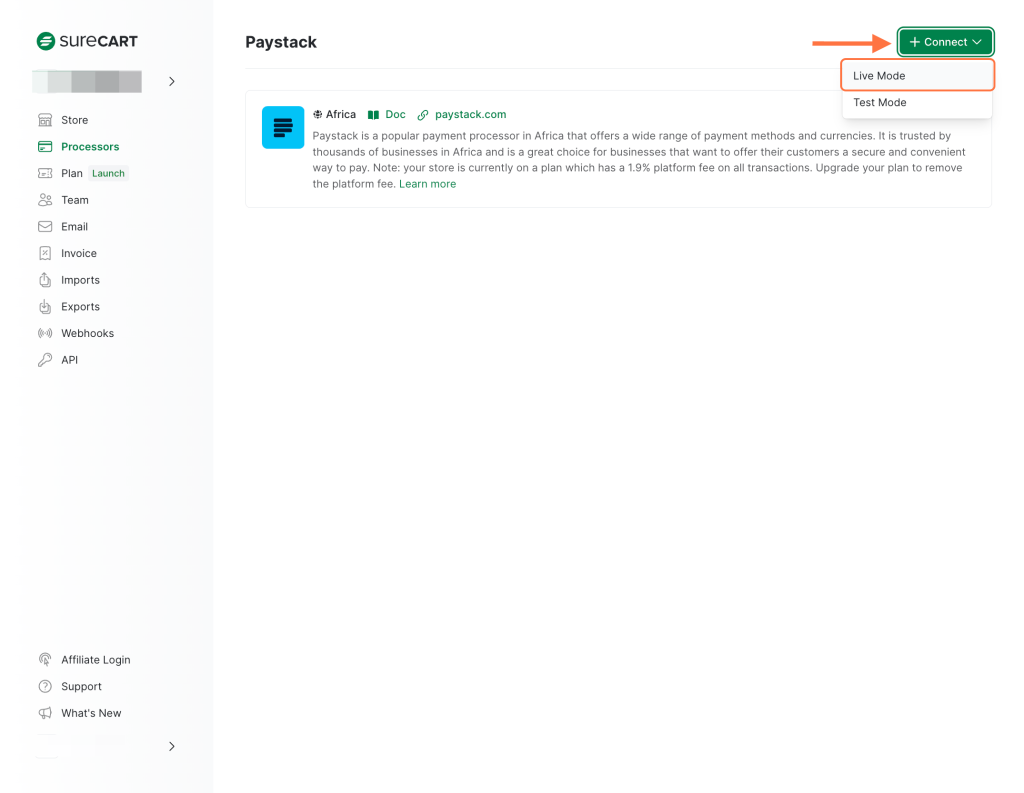
- Click the “Paystack” tab.
- Select “Test Mode” from the Connect button dropdown.
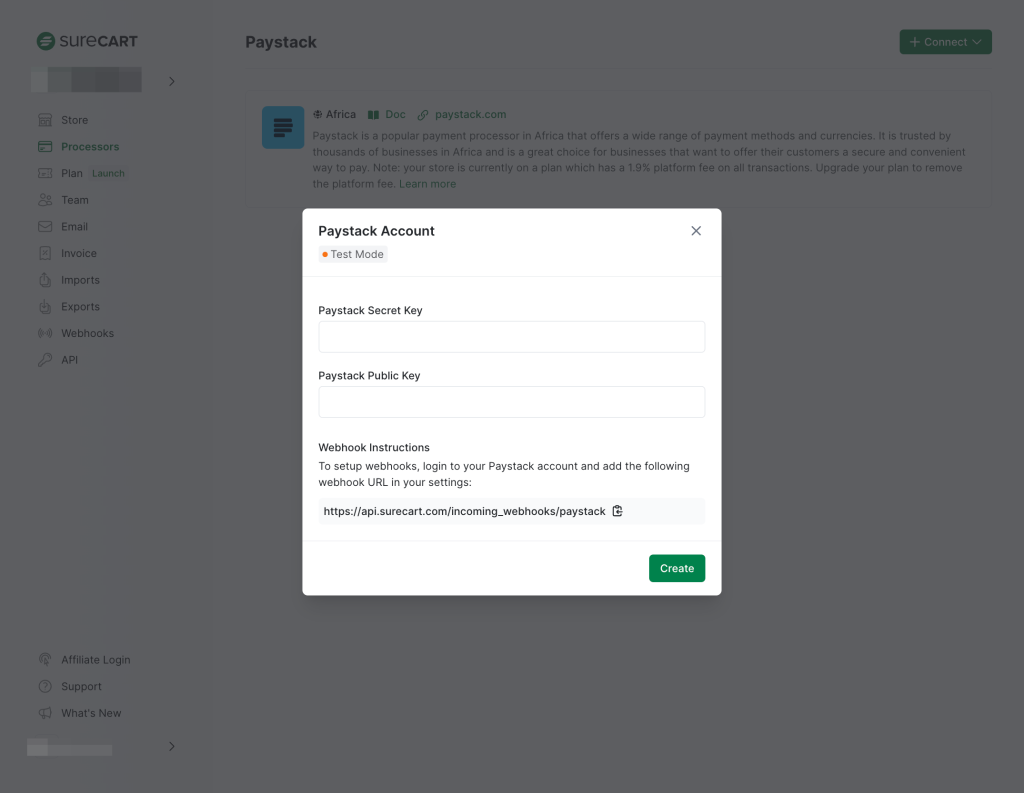
- A pop-up window will appear as shown in the screenshot below.
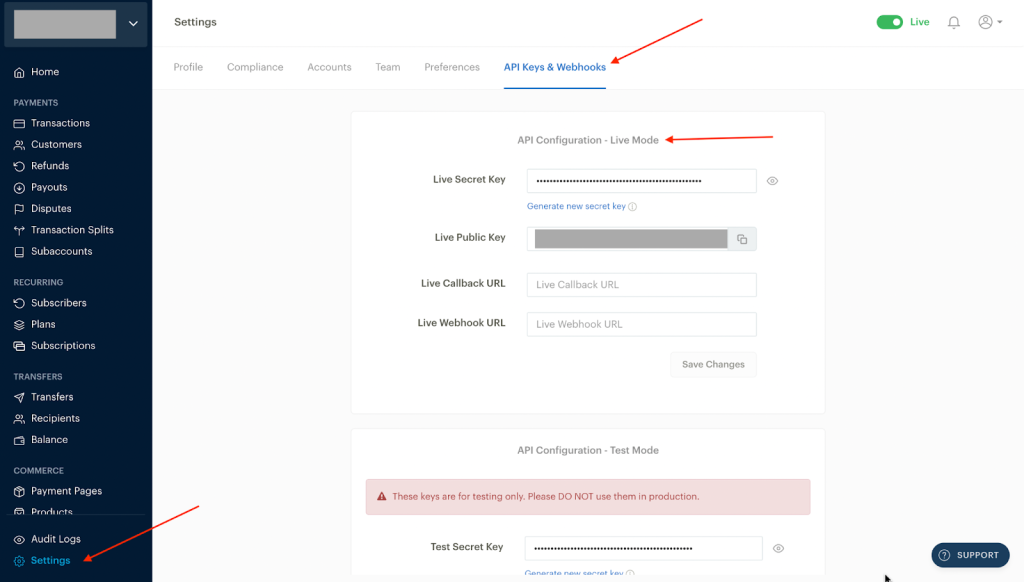
- To get your Test API Keys, open a new tab. Simply go to your Paystack dashboard settings and click on the API Keys & Webhooks tab.
- Scroll to where it says “API Configuration – Test Mode”, here you will find your Test Secret Key and Test Public Key. Please copy these keys and keep them in a notepad.
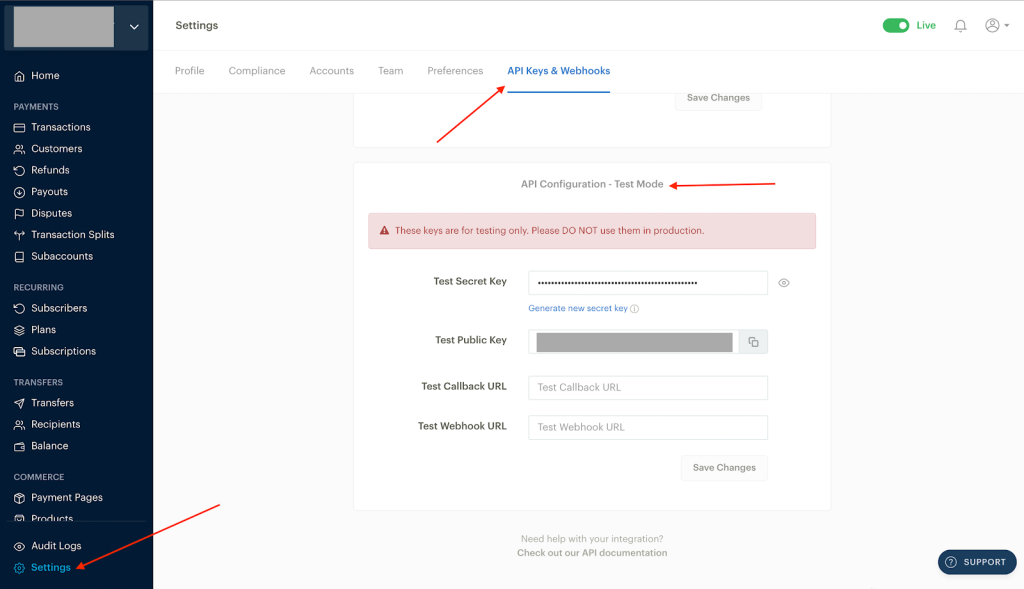
Note: Keep this tab open. We will return here later to add the webhook URL generated by SureCart.
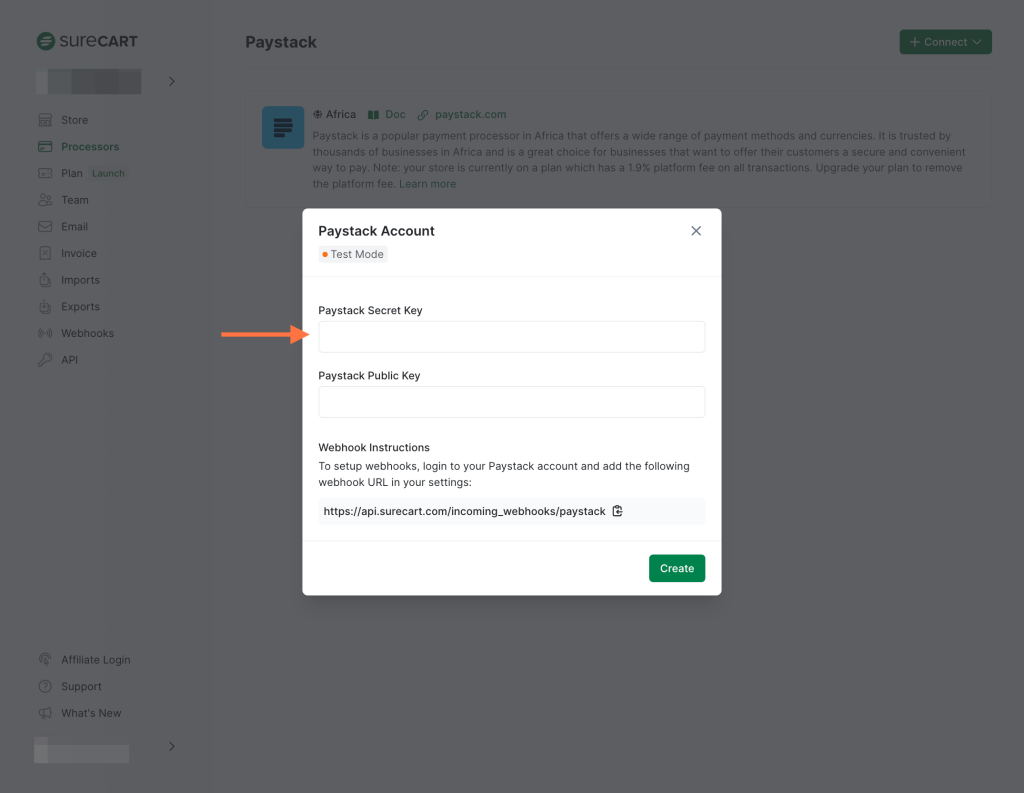
- Now, go back to the SureCart screen as shown in Step 3, and paste your Paystack Secret Key in the corresponding field.
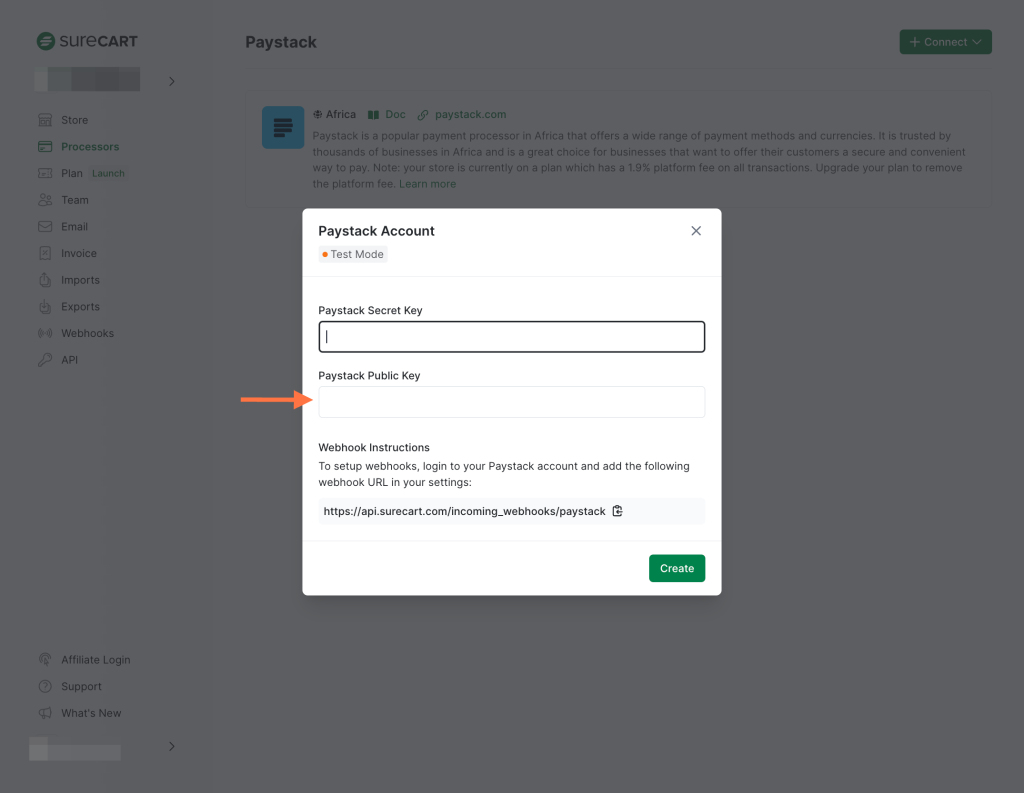
- Similarly, paste your Paystack Public Key in the corresponding field.
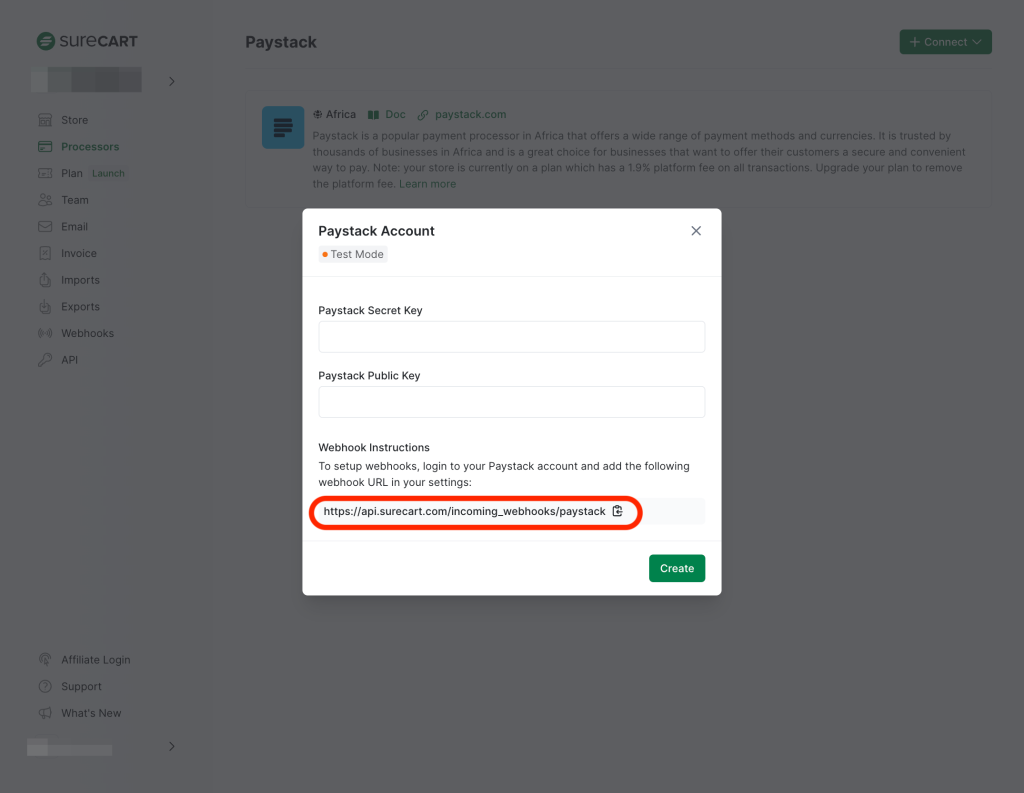
- Copy the Webhook URL from the “Webhook Instructions” section, and then click on the “Create” button.
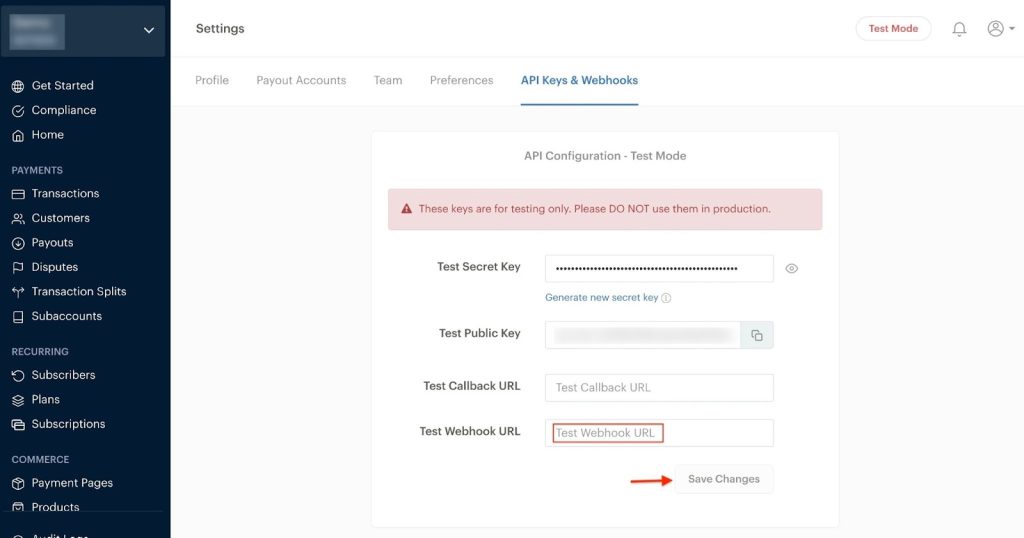
- Return to your Paystack tab and paste your webhook URL in the corresponding field.
Once you’ve followed these steps, You will have Paystack connected with SureCart in the test mode.
Now, you can make test purchases with Paystack and see if it works as expected.
And once you have tested the payment flow, you can connect your live account by simply following the instructions below.
How to Connect Paystack in Live Mode
After successfully setting up Paystack in test mode and ensuring a smooth payment process, it’s time to move on to the live payment integration.
Let’s get started!
- Click on the Paystack option. It will open a new tab on app.surecart.com
- Select the “Paystack” tab.

- From the Connect dropdown, select “Live Mode”.
- To get your Live API Keys, open a new tab. Simply go to your Paystack dashboard settings and click on the API Keys & Webhooks tab.
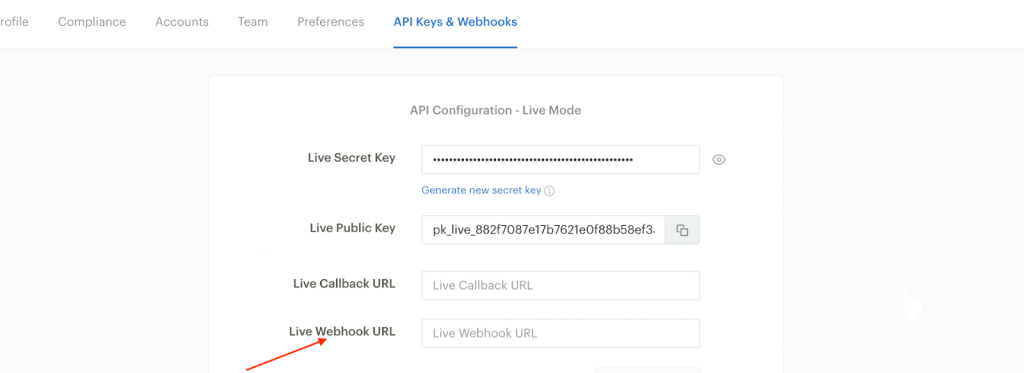
- Scroll to where it says “API Configuration – Live Mode”, here you will find your Live Secret Key and Live Public Key as captured below:
- Now, go back to the SureCart tab in Step 3 and paste your Paystack Secret Key in the corresponding field.
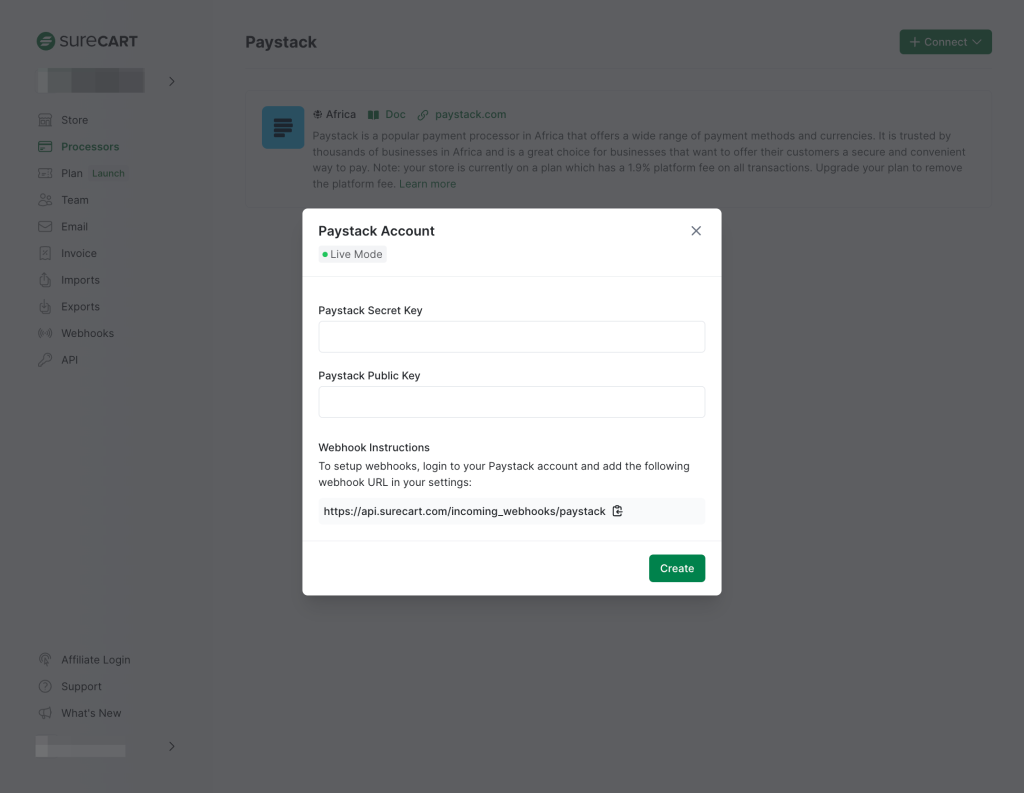
- Follow the same steps as above, but this time, paste your Paystack Public Key.
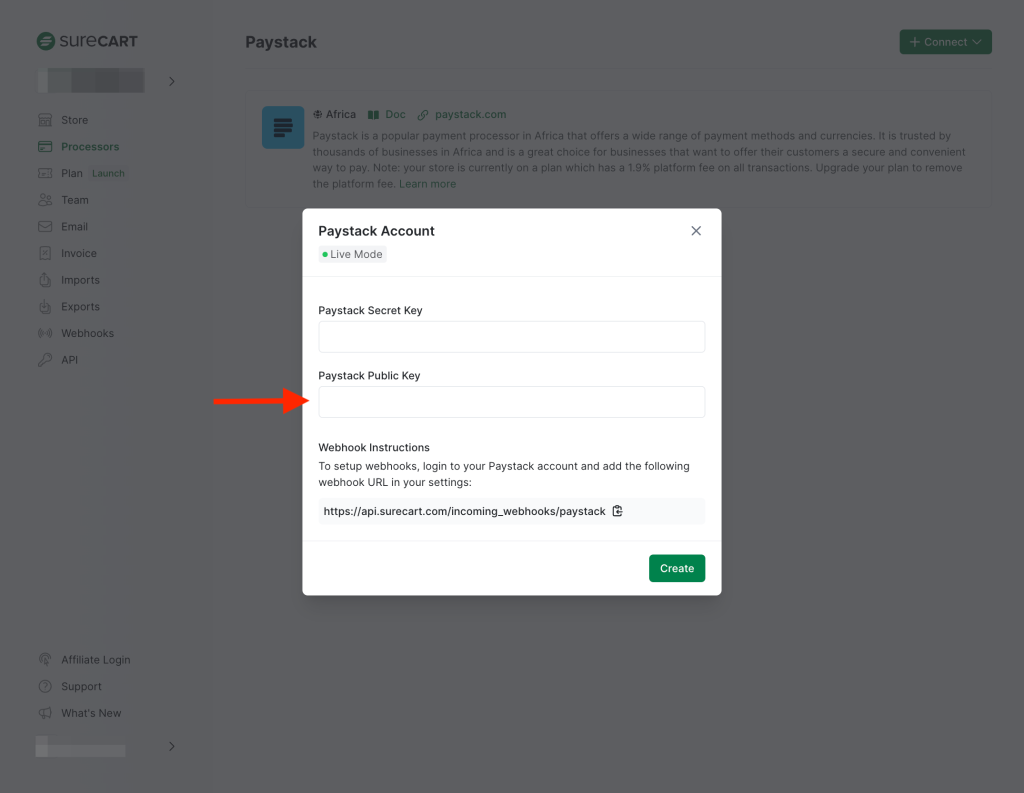
- Copy the Webhook URL from the “Webhook Instructions” section, and then click on the “Create” button.
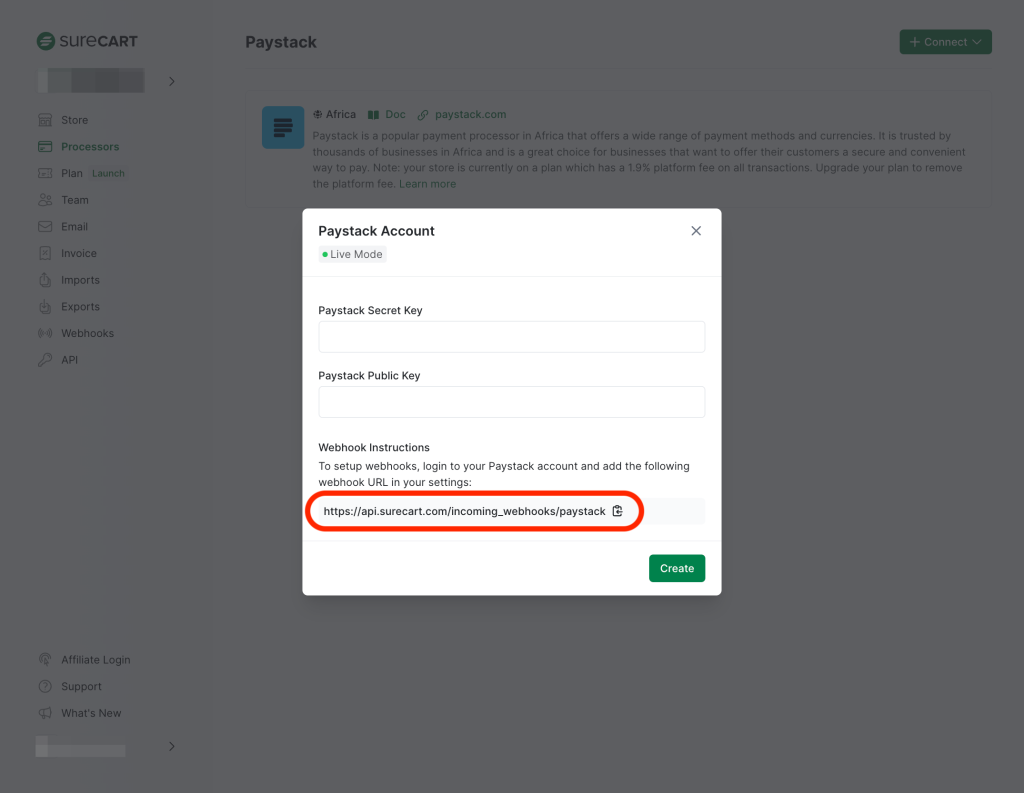
- Return to your Paystack tab and paste your webhook URL in the corresponding field.
Once you have completed these steps, you will have successfully set up Paystack as your payment processor in live mode, and you can start accepting payments in Paystack via SureCart.
That covers everything that you need to know to connect Paystack with OttoKit but if you still have questions in mind, don’t hesitate to contact us.
We’ll be glad to help you with any questions or issues you may have.
We don't respond to the article feedback, we use it to improve our support content.