- Product Types
- Prices Types
- Adding Products
- One Time Pricing
- Subscription Pricing
- Subscription Trials Setup
- Installment Pricing
- Donation / Pay What You Want
- Inventory Management
- Product Variants
- Variant Images
- Digital Downloads
- Change Product Availability
- Product Collections
- First-Time Payment Discounts
- Manage Product Access
- Create Product With Free Trials
- Charge Set Up Fee on Trials
- Product List
- Product Pages
- Product Content
- Custom Buy Links
- Product SEO
- Change Permalinks
- Custom Fields
- Related Products
- Price Boost
- Test Mode/Payments
- Edit & Customize Form
- Change Form Template
- Delete SureCart Forms
- Add Checkout Form
- Checkout Form With Gutenberg
- Checkout Form in Elementor
- Custom Thank You Page
- Create Donation Form
- Customize Confirmation Popup
- Include Coupons in URLs
- Pre-Fill Checkout Fields
- Change Checkout Texts
- Password Field in Checkout
- Default Country Code
- Add Terms to Checkout
- Conditional Block Checkouts
- Remove Coupon Field
- Hide Quantity Option
- Disable Quantity Editing
- Disable Item Removal
- Country Specific Purchases
- Update Store Details
- Dark Mode
- Orders & Receipts
- Manage Slide-out Cart
- Customers Section Overview
- Create Customer
- Delete Customer
- Update Customer Details
- Edit Invoice Details
- Create Shipping Profiles
- Manage Shipping
- Disable Payment Processor
- Manage Store Notifications
- Manage PayPal Branding
- Transfer Store
- How to Download SureCart Purchase Invoice
- Vault – Redeem & Manage Your SureCart Pro Plan
- Enhance Performance Settings
- Invite Team Members
- Enable Spam Protection
- Sync WP Users
- User Roles & Permissions
- Export Data
- Clear Test Data
- Manage Email Notifications
- Remove User Roles
- Remove Plugin Data
- Delete Store
- Delete Business & User Account
- Guest checkout
- Switching Store Currency
- Fix View Order Button
- Fix Express Payment Buttons
- How To Stop Sending WooCommerce Notifications via SureCart?
- Fix PayPal Test Connection
- Fix Sign-In Loop
- Fix Order Confirmation Redirect
- Fix Divi Bullet Point Issue
- Fix Customer Dashboard
- Fix JSON Response Error
- Failed Payment Behavior
- Fix Stripe Zip Code Error
- Fix "Product Can’t Be Blank"
- Troubleshooting Guide
- PayPal IPN Warning Emails
- Caching Configuration for SureCart
- Why iDEAL Might Not Appear in Your Checkout
- Compatibility Guide
- Fix – SureCart store disconnected
- Configuring LiteSpeed Cache for SureCart
Related Products
This guide will explore the settings for related products in the block editor (Bricks users can create these using query loops) and how to leverage them to achieve your desired design.
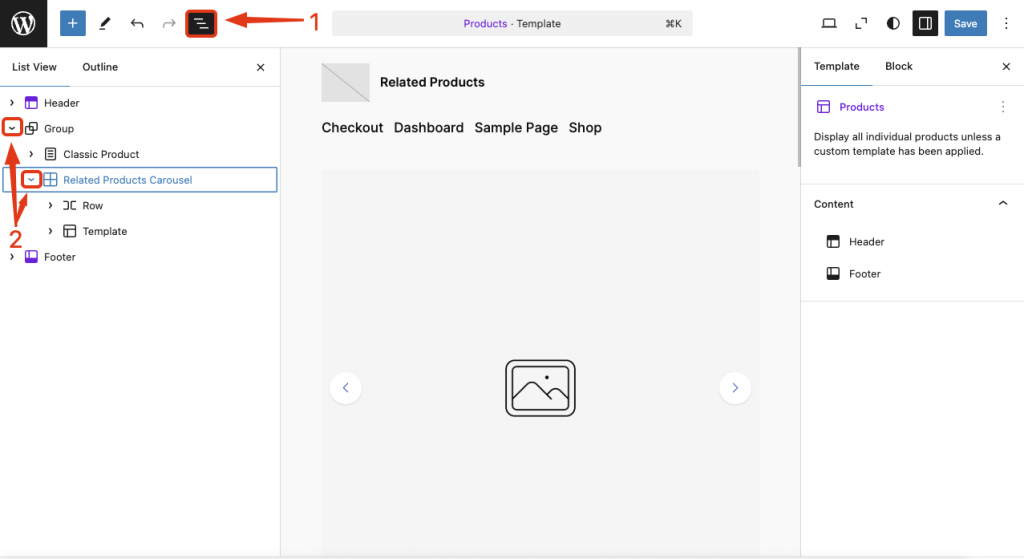
To begin you will want to edit the product template. Once there, click on Document Overview (1), then click on the arrows (2) to expand and reveal all components. This step helps you navigate the document structure and access specific elements for editing.
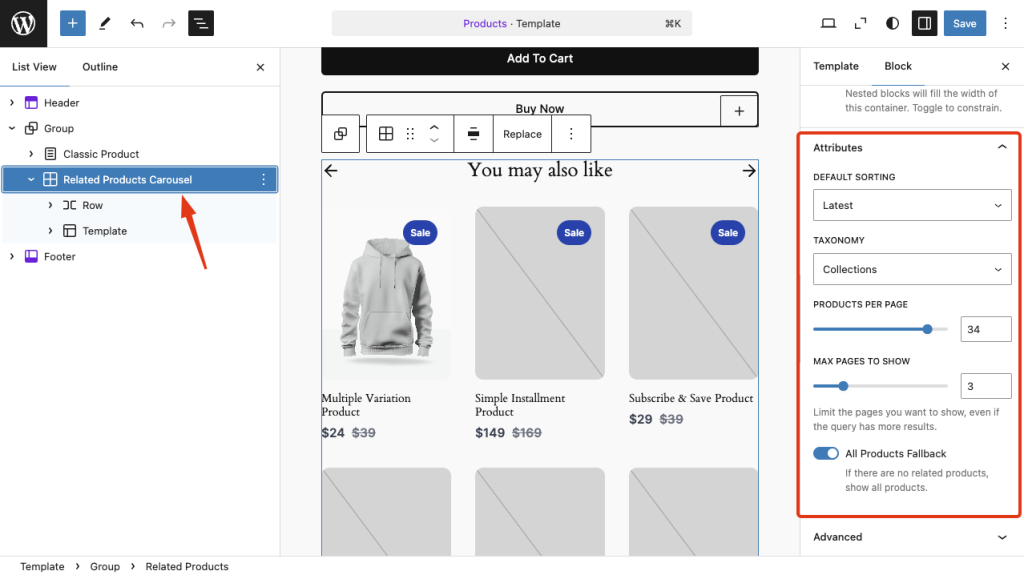
This allows you to customize attributes such as default sorting, taxonomy, and the number of products per page. You can also configure fallback options in case no related products are available.
Settings
You can adjust the sorting, taxonom, pagination, and fallback settings for related products from the related products block. Let’s take a look at each setting in detail.
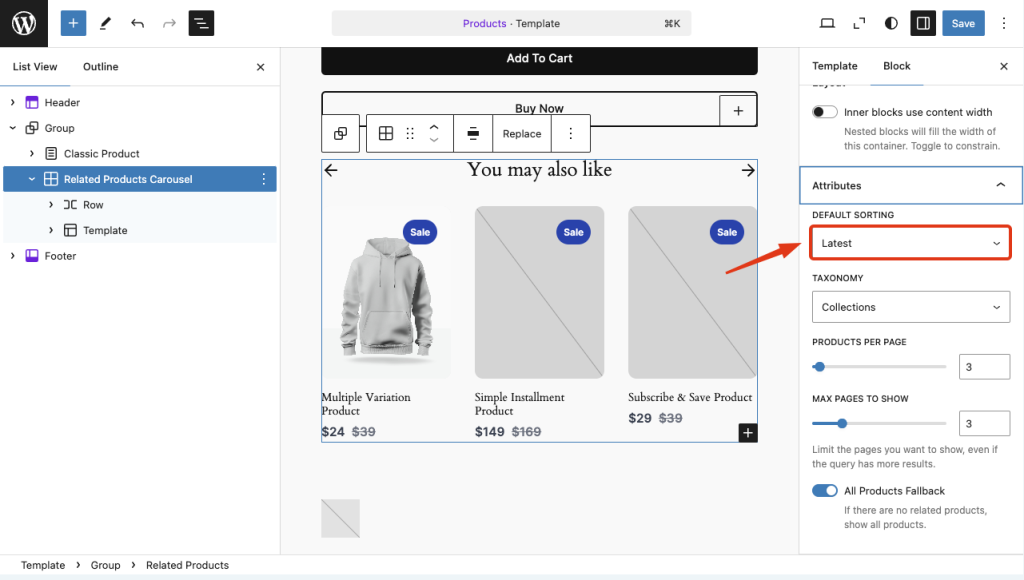
Default Sorting
This setting uses the same sorting options from the product list block. It determines the default order in which your products will be displayed.
However, for this block, we’ve added a new Random option, which displays products in a randomized order. Each time a user refreshes the page, the products appear in a different sequence.
Keep in mind, selecting Random order means:
- Pagination cannot be used (since it would just display random items paging back and forth)
- If you are caching this page, each user won’t get a random order, but it will change whenever cache is purged.
Taxonomy
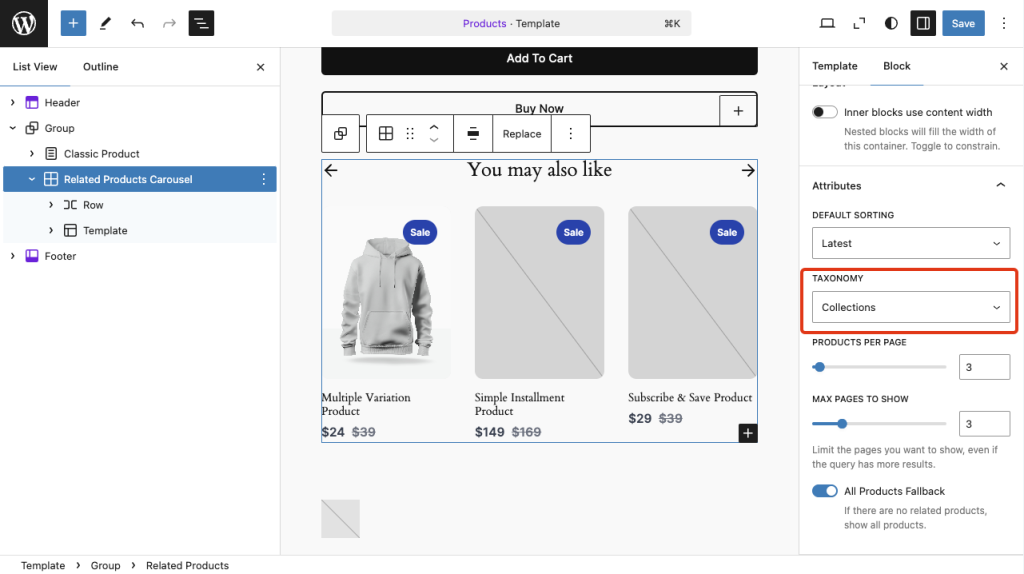
You can display products based on a specific taxonomy. By default, the store includes only the collection taxonomy, but you can add your own taxonomy and display products accordingly.
For example, if you create a taxonomy called “Style” and assign styles to your products, you can use this setting to display only products that share the same style taxonomy terms. This gives you control over filtering and organizing the products shown.
Related products will display any products that have any of matching terms in the same taxonomy.
Products Per Page
This setting allows you to limit the number of products displayed at the same time without pagination. For example, if you set this value to 3, only three products will appear on the carousel at once, providing a clean and organized layout for your users. Adjusting this setting ensures a user-friendly experience by preventing overcrowding.

Max Pages to Show
If you have a large number of related products, multiple paginations will be generated based on your settings. This option allows you to limit the number of pages shown in the pagination system.
For example, setting this value to 2 restricts the display to two pages, even if more products are available. This helps control how much content users can browse through at one time while keeping the design clean and user-friendly.

All Products Fallback
If a product has no related items, you can enable this setting to display non-related products from your store instead.
This option ensures that your carousel always features products, even when there are no direct matches, providing users with a continuous shopping experience and maximizing the visibility of your inventory.

Layout
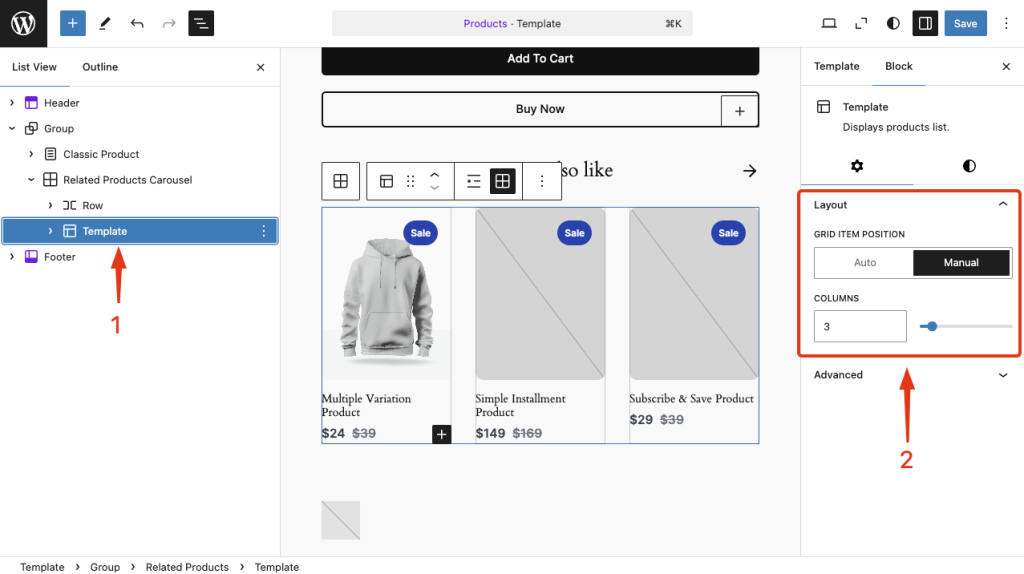
To control how many columns of products are displayed, click on the Template Element (1) and adjust the layout settings (2). From here you can drag and drop blocks, reorder, or style any of the elements in related posts. You can also set the number of columns in two ways:
Manual
This option displays the exact number of columns you set. For example, if you select 3, you will see 3 products per row on Desktop devices (mobile devices will always display stacked).
Auto
This option adjusts the number of columns based on the column width and the page’s dimensions. You can set a minimum column width, and the number of products shown per row will dynamically adjust (showing fewer or more) depending on the screen size. This provides more responsive control.
That’s it! If you have any suggestions or feedback, feel free to let us know here.
We don't respond to the article feedback, we use it to improve our support content.