- Product Types
- Prices Types
- Adding Products
- One Time Pricing
- Subscription Pricing
- Subscription Trials Setup
- Installment Pricing
- Donation / Pay What You Want
- Inventory Management
- Product Variants
- Variant Images
- Digital Downloads
- Change Product Availability
- Product Collections
- First-Time Payment Discounts
- Manage Product Access
- Create Product With Free Trials
- Charge Set Up Fee on Trials
- Product List
- Product Pages
- Product Content
- Custom Buy Links
- Product SEO
- Change Permalinks
- Custom Fields
- Related Products
- Price Boost
- Test Mode/Payments
- Edit & Customize Form
- Change Form Template
- Delete SureCart Forms
- Add Checkout Form
- Checkout Form With Gutenberg
- Checkout Form in Elementor
- Custom Thank You Page
- Create Donation Form
- Customize Confirmation Popup
- Include Coupons in URLs
- Pre-Fill Checkout Fields
- Change Checkout Texts
- Password Field in Checkout
- Default Country Code
- Add Terms to Checkout
- Conditional Block Checkouts
- Remove Coupon Field
- Hide Quantity Option
- Disable Quantity Editing
- Disable Item Removal
- Country Specific Purchases
- Update Store Details
- Dark Mode
- Orders & Receipts
- Manage Slide-out Cart
- Customers Section Overview
- Create Customer
- Delete Customer
- Update Customer Details
- Edit Invoice Details
- Create Shipping Profiles
- Manage Shipping
- Disable Payment Processor
- Manage Store Notifications
- Manage PayPal Branding
- Transfer Store
- How to Download SureCart Purchase Invoice
- Vault – Redeem & Manage Your SureCart Pro Plan
- Enhance Performance Settings
- Invite Team Members
- Enable Spam Protection
- Sync WP Users
- User Roles & Permissions
- Export Data
- Clear Test Data
- Manage Email Notifications
- Remove User Roles
- Remove Plugin Data
- Delete Store
- Delete Business & User Account
- Guest checkout
- Switching Store Currency
- Fix View Order Button
- Fix Express Payment Buttons
- How To Stop Sending WooCommerce Notifications via SureCart?
- Fix PayPal Test Connection
- Fix Sign-In Loop
- Fix Order Confirmation Redirect
- Fix Divi Bullet Point Issue
- Fix Customer Dashboard
- Fix JSON Response Error
- Failed Payment Behavior
- Fix Stripe Zip Code Error
- Fix "Product Can’t Be Blank"
- Troubleshooting Guide
- PayPal IPN Warning Emails
- Caching Configuration for SureCart
- Why iDEAL Might Not Appear in Your Checkout
- Compatibility Guide
- Fix – SureCart store disconnected
- Configuring LiteSpeed Cache for SureCart
Getting Started with SureCart
You’ve heard about SureCart and decided to give it a try. Now, you might be wondering where to begin. If that sounds like your situation, this documentation is for you!
In this guide, we’ll walk you through the process of making your first sale using SureCart.
Let’s get started!
Setting Up SureCart
The first step is to install SureCart. You will be prompted to create an account during the installation wizard process. Follow the instructions below to get started:
- Install the Plugin
- Go to the Plugins page in your WordPress dashboard.
- Search for SureCart, then click Install and Activate.
- Refer to Detailed Instructions
- For more detailed guidance, see the documentation titled “How to Install SureCart Plugin“.
- For more detailed guidance, see the documentation titled “How to Install SureCart Plugin“.
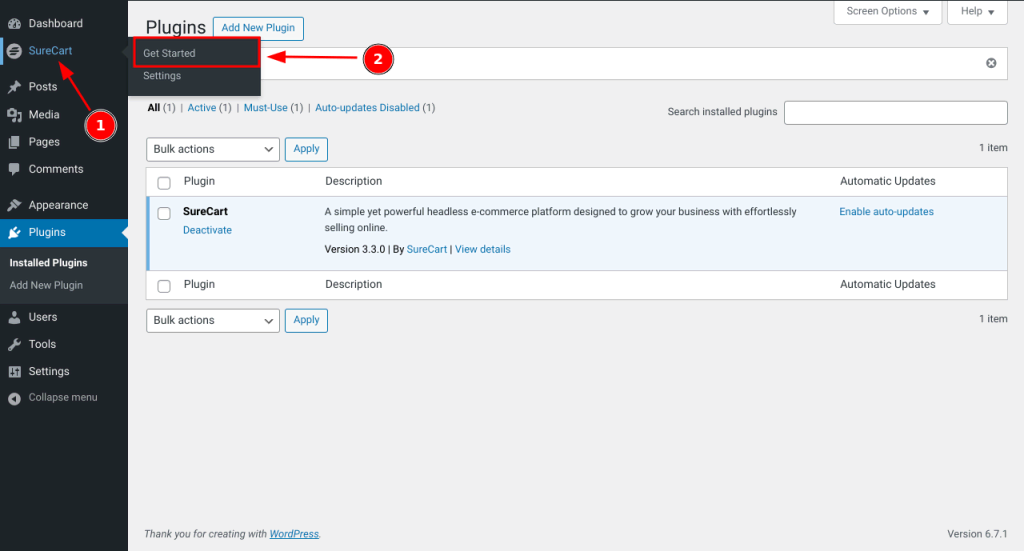
- Activate SureCart in WordPress
- Once the plugin is installed and activated, you will see the SureCart menu in the WordPress sidebar.
- Hover over the SureCart menu and click Get Started to continue.
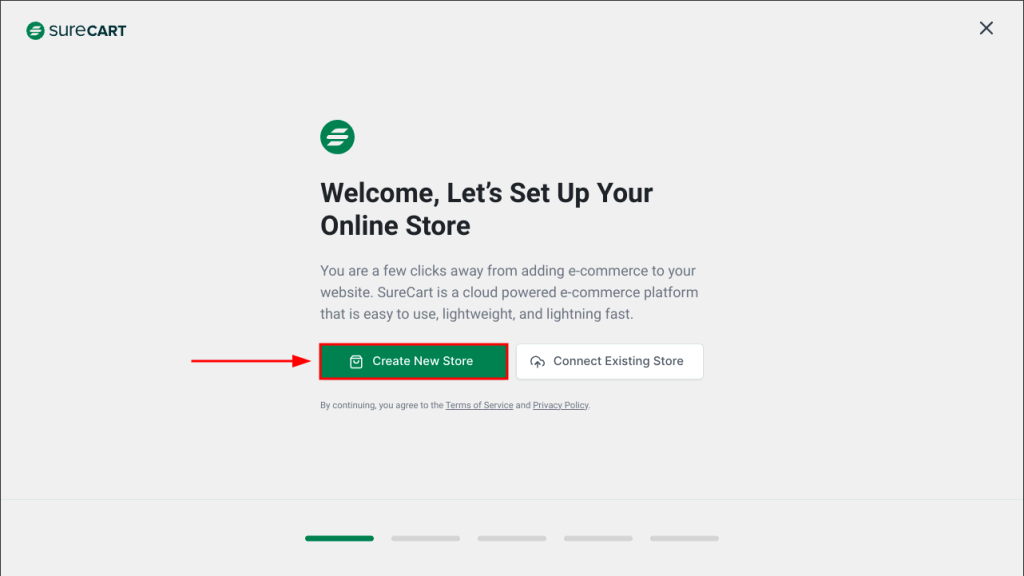
- On the setup screen, click the “Create New Store” button.
- This will start the process of setting up your new online store.
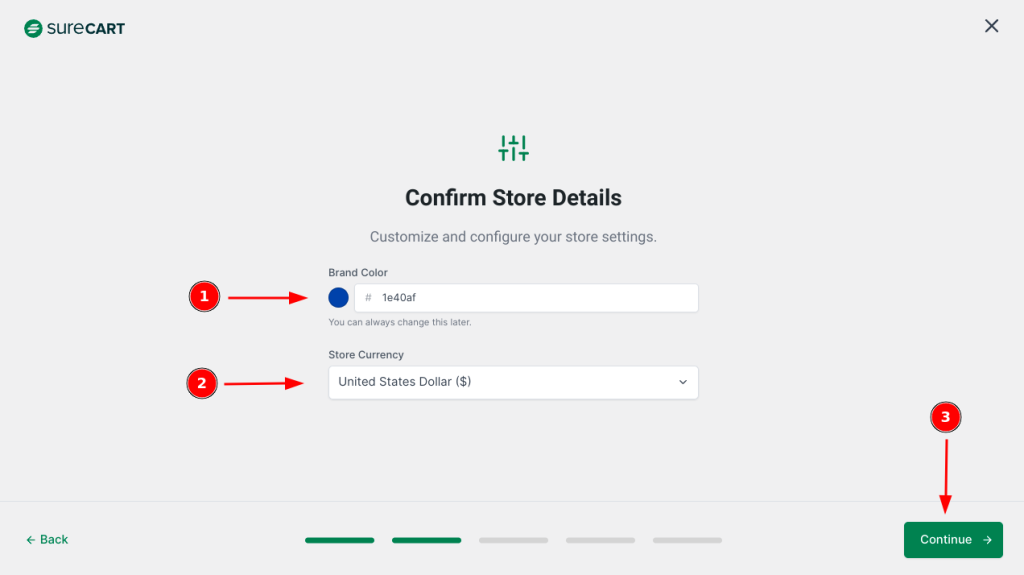
- Select Brand Color:
- Choose your primary brand color that will be used throughout your store’s design elements and email communications
- Note: You can modify this color later if needed
- Set Store Currency:
- Select the currency in which you want to process all transactions
- For example: United States Dollar ($), Euro (€), etc.
- Proceed to Next Step
- After configuring these settings, click the Continue button to move forward
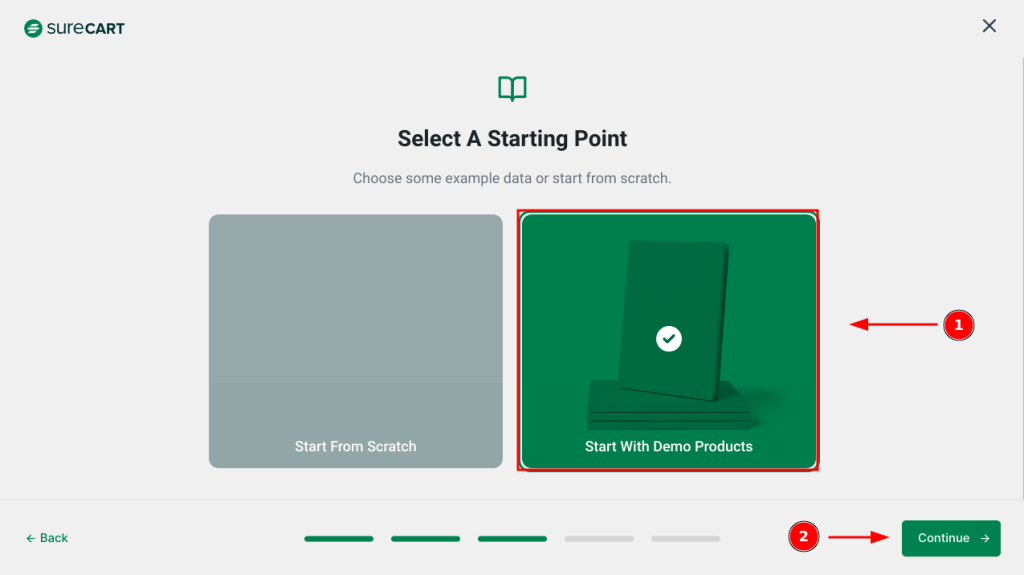
- To help you get started, we recommend choosing the “Start With Demo Products” option (1). This provides a quick introduction to using SureCart by adding sample data, which you can easily remove later if needed.
- Once selected, click the Continue button (2) to proceed.
- Enter a Valid and Proper Email Address
- It’s essential to provide a proper and active email address here because this email will be used to send important store notifications, such as receipts for customers, updates on new orders, payment issues, and other store-related alerts.
- Ensure the email you enter is not just for testing, but one you actively check, as it will be critical for smooth communication with buyers.
- Click “Continue”
- Once you’ve entered your email address, click the Continue button to proceed.

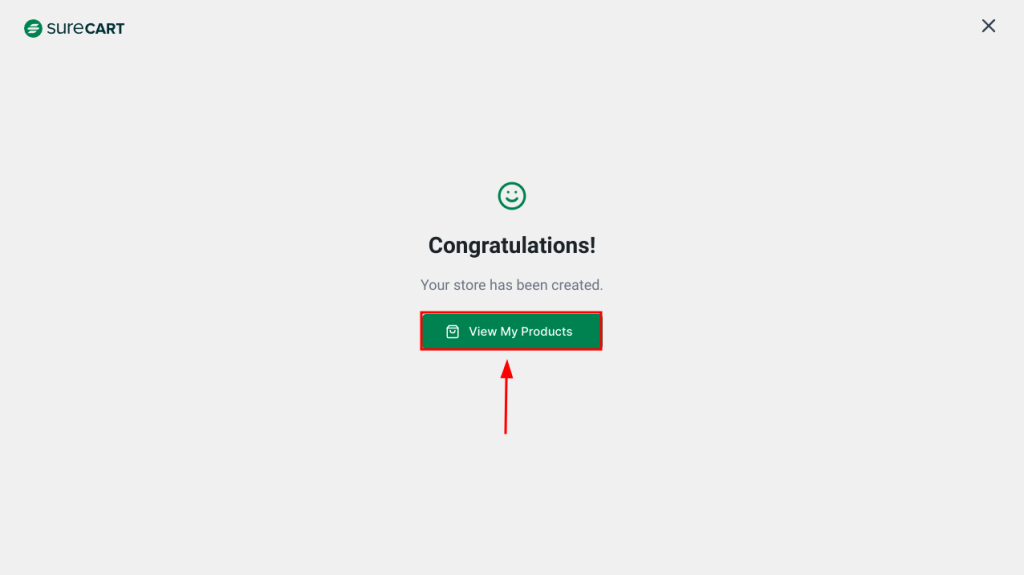
Your store has been successfully set up and is now ready to use.
- Click the “View My Products” button to access the backend and start managing your store’s products, settings, and features.
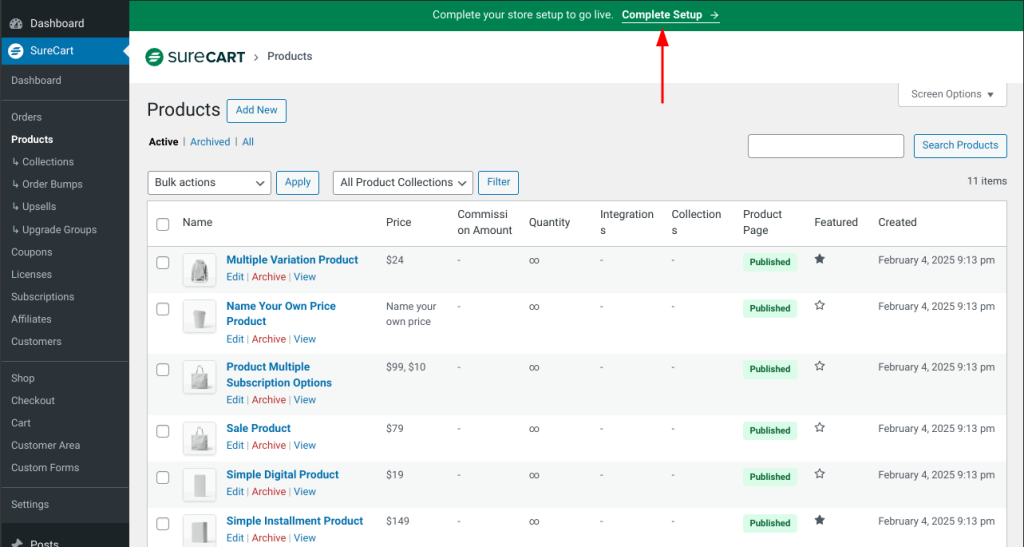
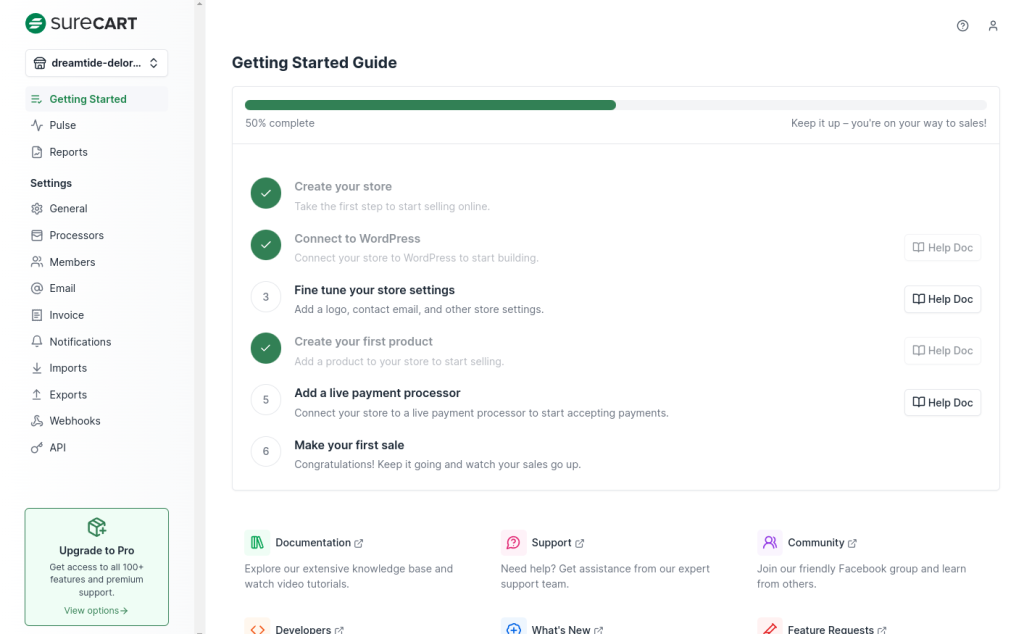
Once you’re in the backend, you’ll see the products list along with a green banner prompting you to complete your store setup. This step is crucial to ensure your store remains active and does not get deleted.
- To finalize and claim your store, click the “Complete Setup” button in the green header.
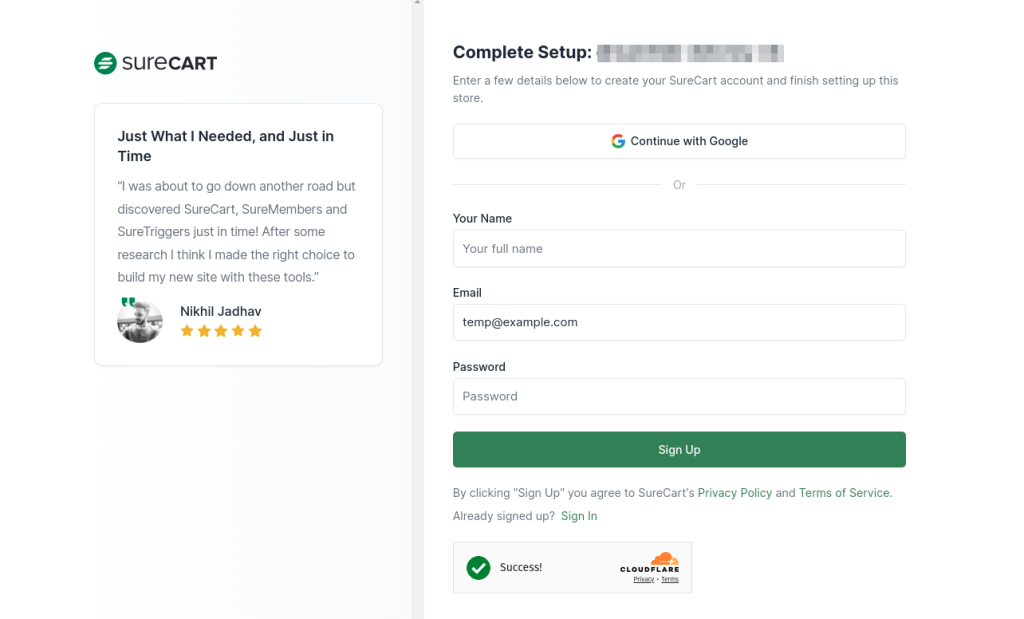
To complete your store setup, you’ll need to create a SureCart account. You can do this by choosing one of the following methods:
- Sign Up with Google
- Click the “Continue with Google” button to register using your Google account credentials.
- Click the “Continue with Google” button to register using your Google account credentials.
- Sign Up Manually
- Enter your Name, Email, and Password in the provided fields.
- Enter your Name, Email, and Password in the provided fields.
Once you’ve filled out the required details, click the “Sign Up” button to proceed.
By signing up, you agree to SureCart’s Privacy Policy and Terms of Service. If you already have an account, click Sign In instead.
After logging in, you’ll be redirected to the SureCart platform portal. Here, you can manage various features, such as viewing live sales metrics, customizing reports, designing email templates, and migrating data. For now, let’s focus on completing the account creation process.
You will notice an orange notification bar at the top prompting you to verify your email address. SureCart has sent a confirmation email to your registered email account.
- Look for an email with the subject “Please verify your email” in your inbox.
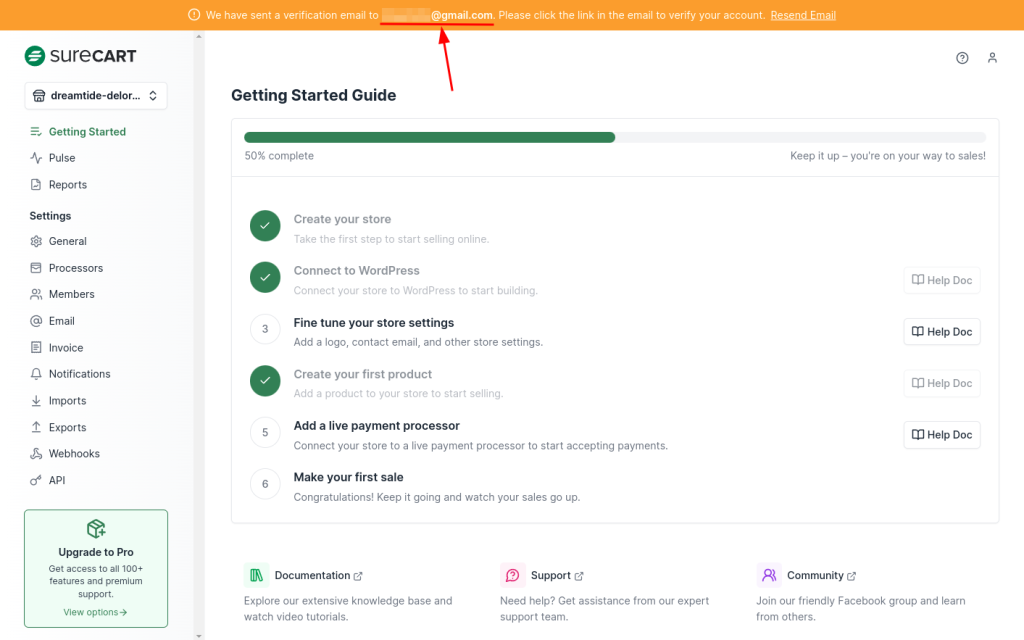
- Click the verification link in the email to confirm your account.
- If you don’t see the email, click Resend Email in the notification bar
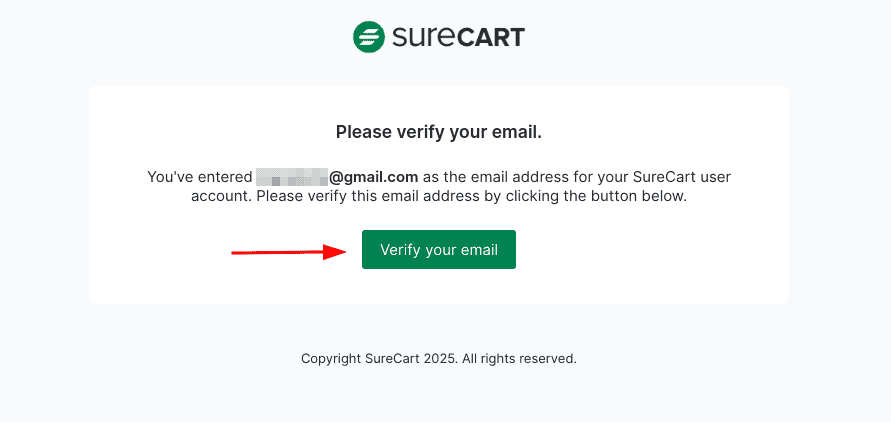
Once your email verification is successful, the orange notification bar will disappear, indicating that your account setup is complete.
At this point, you can return to your WordPress backend to continue managing your store or further refine your settings within the SureCart platform.
Updating Your Store Settings
Visit the Store Settings page to complete your business profile. It’s crucial to accurately fill out your Store Details, Notification Settings, and Contact Information. These details ensure your store complies with legal requirements and creates a professional impression.
Proper store configuration enhances customer communication and builds trust in your brand. Your business address will appear on receipts and transactional emails, while your notification settings determine how customers receive important updates about their purchases.

After updating your settings, click the Save button at the top of each section to ensure your changes are applied.
Taking the time to configure these settings before launching ensures your store operates smoothly, provides legal compliance, and offers a professional experience for your customers.
Making a first sale
Now, let’s focus on a quick and simple way to sell a product in SureCart to get you started and provide a smooth experience.
If you’d like to learn more about products, refer to the documentation “What Types of Products Can I Create in SureCart?” for additional details.
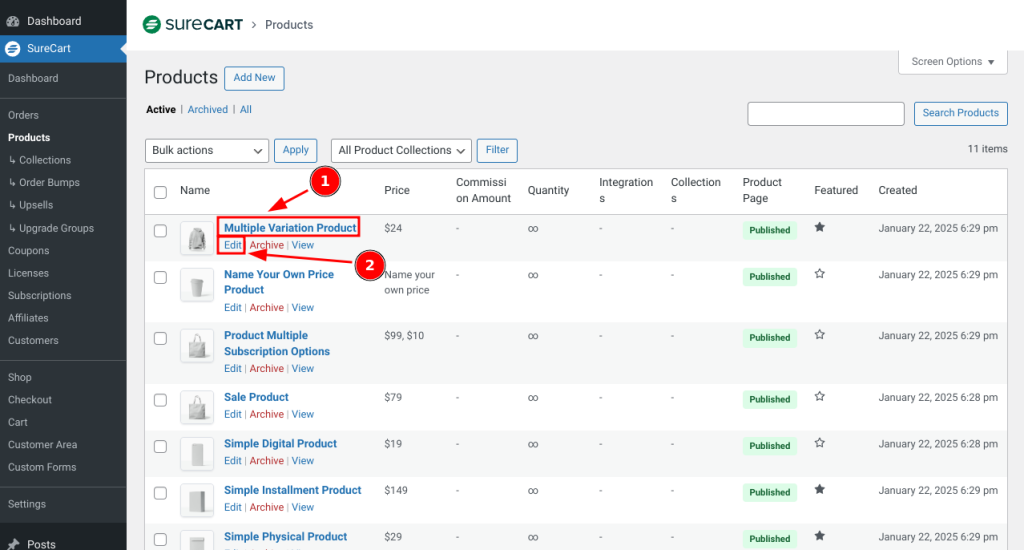
- Access Products:
- In the SureCart dashboard, go to Products.
- In the SureCart dashboard, go to Products.
- Select a Product to Edit:
- Click on the product name (1) or the Edit link (2) to open the product editor page.Go to SureCart, Products and Click in the product name (1) or in the Edit (2) link to open the edit product page.
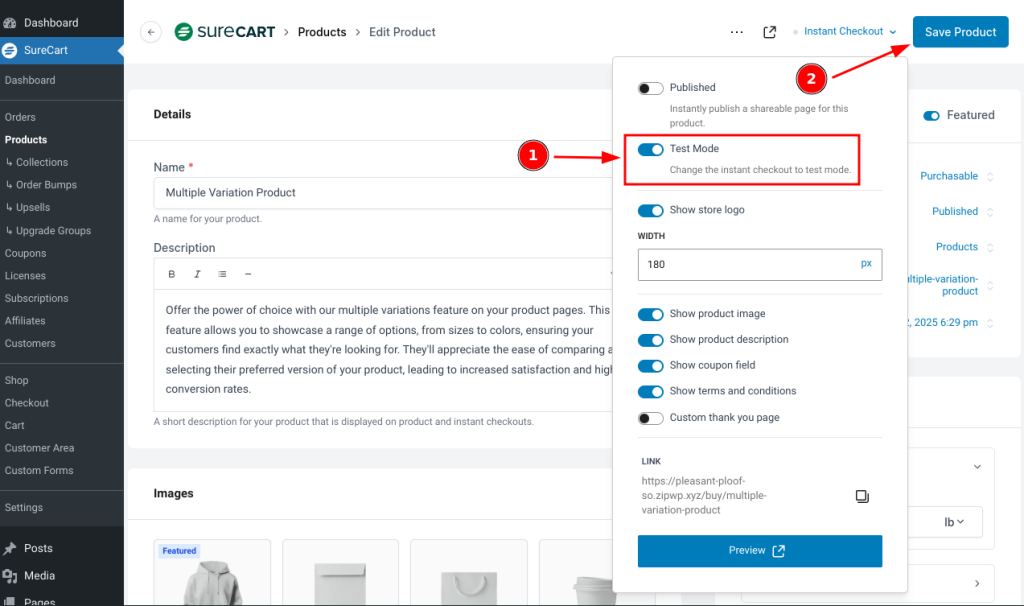
- Locate the “Instant Checkout” dropdown menu at the top-right corner of the product editing page.
- Click the menu to open it.
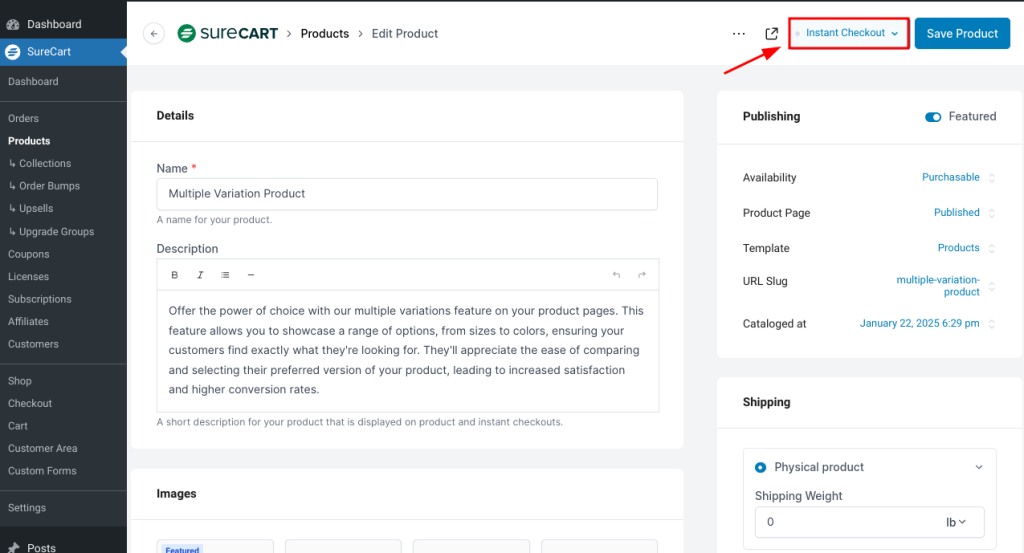
- Toggle the “Test Mode” option (1) to activate it.
- This allows you to test the instant checkout flow without processing real transactions.
- This allows you to test the instant checkout flow without processing real transactions.
- Once Test Mode is enabled, click “Save Product” (2) to save your changes.
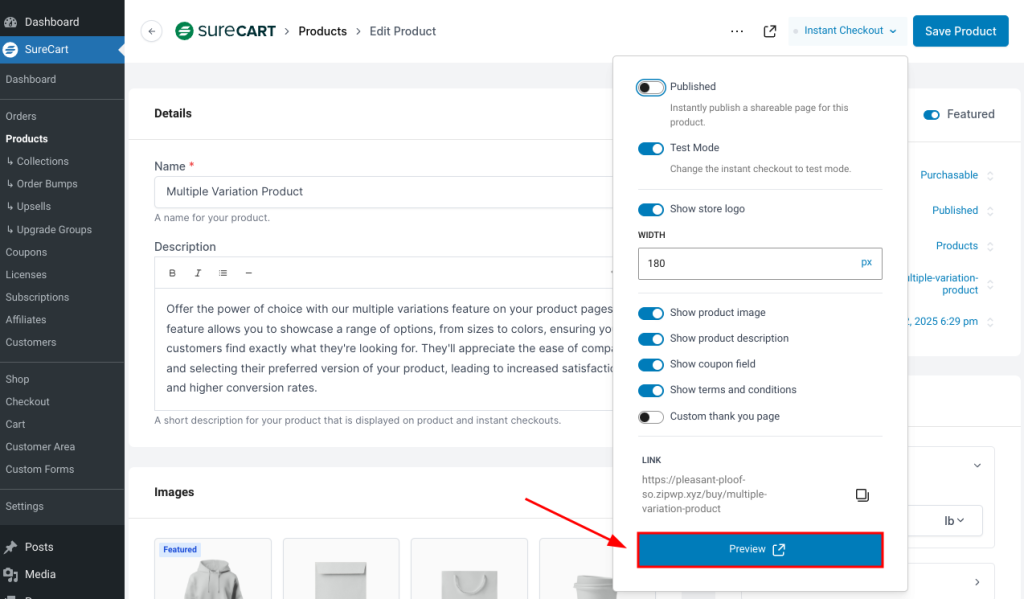
Test Mode ensures that your checkout features work as expected before launching your product to customers. After testing, you can disable Test Mode and publish the product for live sales.
- Open the “Instant Checkout” dropdown menu again by clicking on it.
- Click the “Preview” button at the bottom to view the Instant Checkout page.
This preview allows you to see how the checkout page will look and function, enabling you to verify its layout, product details, and overall user experience. Make any necessary adjustments to ensure it’s ready for your customers before going live!
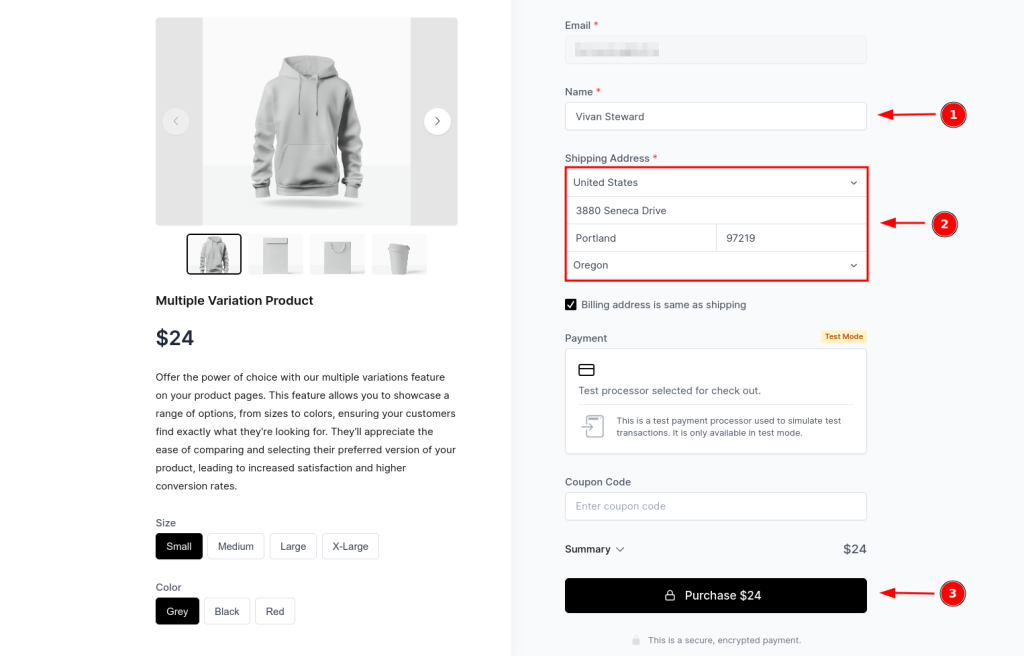
To complete a test order, follow these steps:
- Enter Name
- Fill in the Name field (1) with the customer’s full name.
- Fill in the Name field (1) with the customer’s full name.
- Provide Shipping Address
- Enter the required Shipping Address details (2), including the country, street address, city, state, and zip code.
- Enter the required Shipping Address details (2), including the country, street address, city, state, and zip code.
- Click “Purchase”
- Once the name and address are entered, click the “Purchase” button (3) to proceed.
This simulated transaction will allow you to verify the checkout process and ensure everything is functioning correctly in Test Mode. Once you’re satisfied, you can disable Test Mode to begin processing real orders!
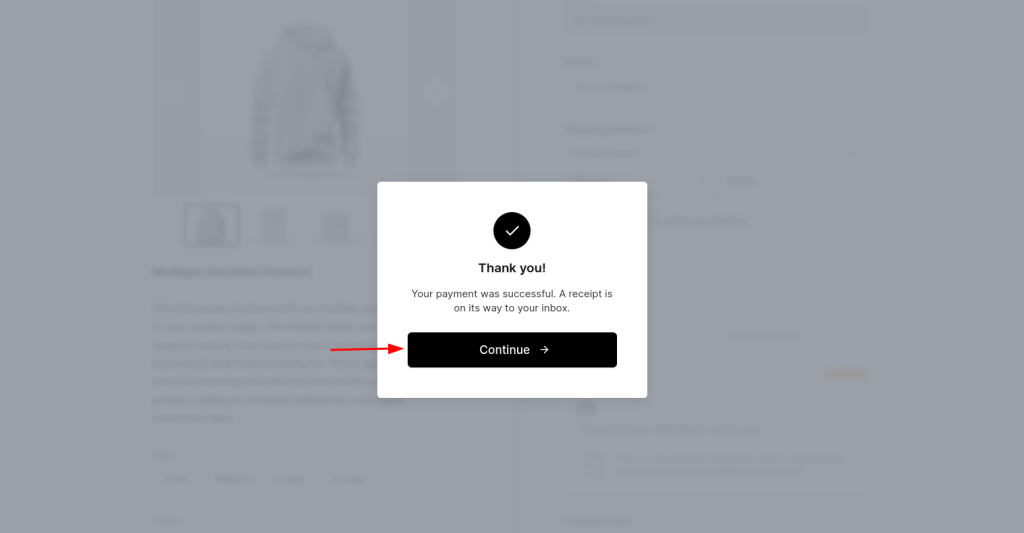
Congratulations! You’ve successfully made your first purchase using SureCart.
- To continue, click the “Continue” button to access the Customer Dashboard.
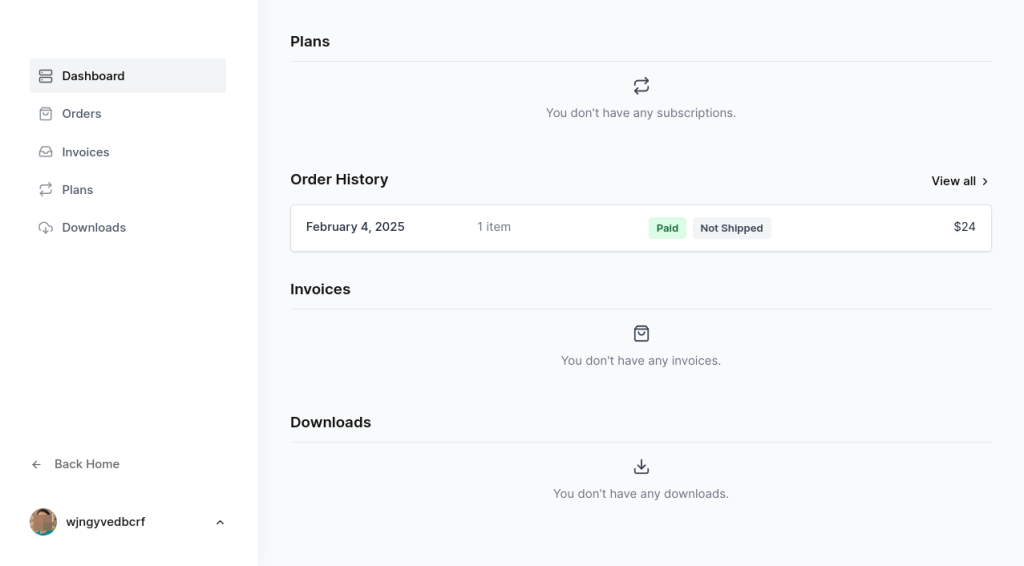
In the Customer Dashboard, you can view receipts, manage orders, and explore additional features. A receipt for your purchase has also been sent to your email inbox. You’re now ready to use SureCart to enhance your eCommerce experience!
The Customer Dashboard is where your customers can manage their purchases, subscriptions, downloads, and personal details. This includes updating their address, changing their password, downloading invoices, and more.
Navigate through the various menu options to get a comprehensive overview of the available features.
For a more detailed explanation, you can refer to the documentation “Overview of the Customer Dashboard” for a deeper understanding of its functionality.
This dashboard provides your customers with a seamless experience in managing their orders and account details!
Enable Live Payments
Okay, you have created a test order at this point. To make live transactions, you need to connect your payment processor.
If you’re considering Stripe, Paypal, or Mollie as your preferred payment processor for your SureCart store, they’re all super easy to connect with SureCart.
Here is a list of articles that guide setting up all the available payment processors in SureCart:
- How to Connect Stripe Payment Processor
- How to Connect PayPal Payment Processor
- How to Connect Mollie Payment Processor
SureCart offers both live and test modes, allowing you to experiment with testing data before going live.
With payment methods in place, you’re now ready to import your customer data. Learn how to do this in the next step of our migration journey.
Migration from other platforms
If you’re moving from another platform to SureCart but feel overwhelmed or worried it might be hard and take too much time, don’t worry! We have full documentation that covers how to import your customers, products, purchases, and subscriptions.
Follow the documentation “How to Migrate from Other Platforms to SureCart” to get step-by-step guidance.
If you encounter any issues or have questions during the importing process, don’t hesitate to contact our support team. We are always ready to help and provide further guidance.
What’s Next?
SureCart is a comprehensive e-commerce platform designed for both physical and digital products. Depending on your needs, you may want to explore our shipping options for physical products, or if you’re a software developer, activate our licensing features.
To help maximize your sales potential, we offer powerful features including:
- Subscription management
- Cart Abandonment Recovery
- Order Bumps
- Upsells
- Early Payoff Installments
- Affiliate Portal
- And much more!
No matter where you are in your journey, we provide:
- Detailed documentation
- Responsive customer support
- An active Facebook community
Remember, you’re never alone on this journey to growing your online business!
Happy selling! 🚀
We don't respond to the article feedback, we use it to improve our support content.