An unused shipping label can still cost you money. Whether you’re charged before the label is used, and whether you can recover the cost of an unused label, depends on the carrier and how you bought it. The deadline for requesting a refund may also differ from the period in which the label can be used.
This guide shows how to print shipping labels for an online store without redoing the same work for every order. The bigger drain is the repeated work: opening each order, typing a box size, comparing rates, buying, downloading, and printing, then doing it all again for the next package.
You’ll get a five-stage routine that works on any platform first. Then you’ll see the exact steps in SureCart, where you buy labels through a connected Shippo account.
Quick answer: To print shipping labels efficiently, save your ship-from address and box sizes once, buy labels for several orders in one session, choose a label format that matches your printer and paper, and reprint labels that print badly instead of voiding them.
What a Shipping Label Workflow Covers
A shipping label workflow is every step between a paid order and a package the carrier has scanned. It covers picking a box and weight, comparing carrier rates, buying the label, printing it at the right size, and handling changes such as a wrong address or a canceled order.
Saving time means looking at the whole workflow. A label that prints perfectly still wastes time if you typed the box dimensions by hand to get it.
The Five-Stage Label Workflow at a Glance
Every label passes through the same five stages, whatever platform you sell on. The table pairs each stage with the habit that removes the most repeat work, plus where that stage lives in SureCart if that’s your setup.
| Stage | What you do | Habit that saves time | In SureCart |
|---|---|---|---|
| Set up once | Save ship-from addresses and box presets | Mark a default address and a default box | Settings > Shipping > Warehouses and Parcel Templates |
| Batch | Gather the orders waiting to ship | Buy labels for several orders in one session | Orders > Shipping Labels (select orders, then Ship selected) |
| Buy | Compare rates and purchase | Quote on the real package, not the checkout estimate | Order page > Fulfill Item > Fulfill & get rates |
| Download and print at the right size | Match the label format to your printer and paper once | Label file type before purchase, or Label format for a batch | |
| Fix | Void a wrong label and reship | Reprint print errors; void only labels with wrong details | Order page > Void Label > Cancel Fulfillment |
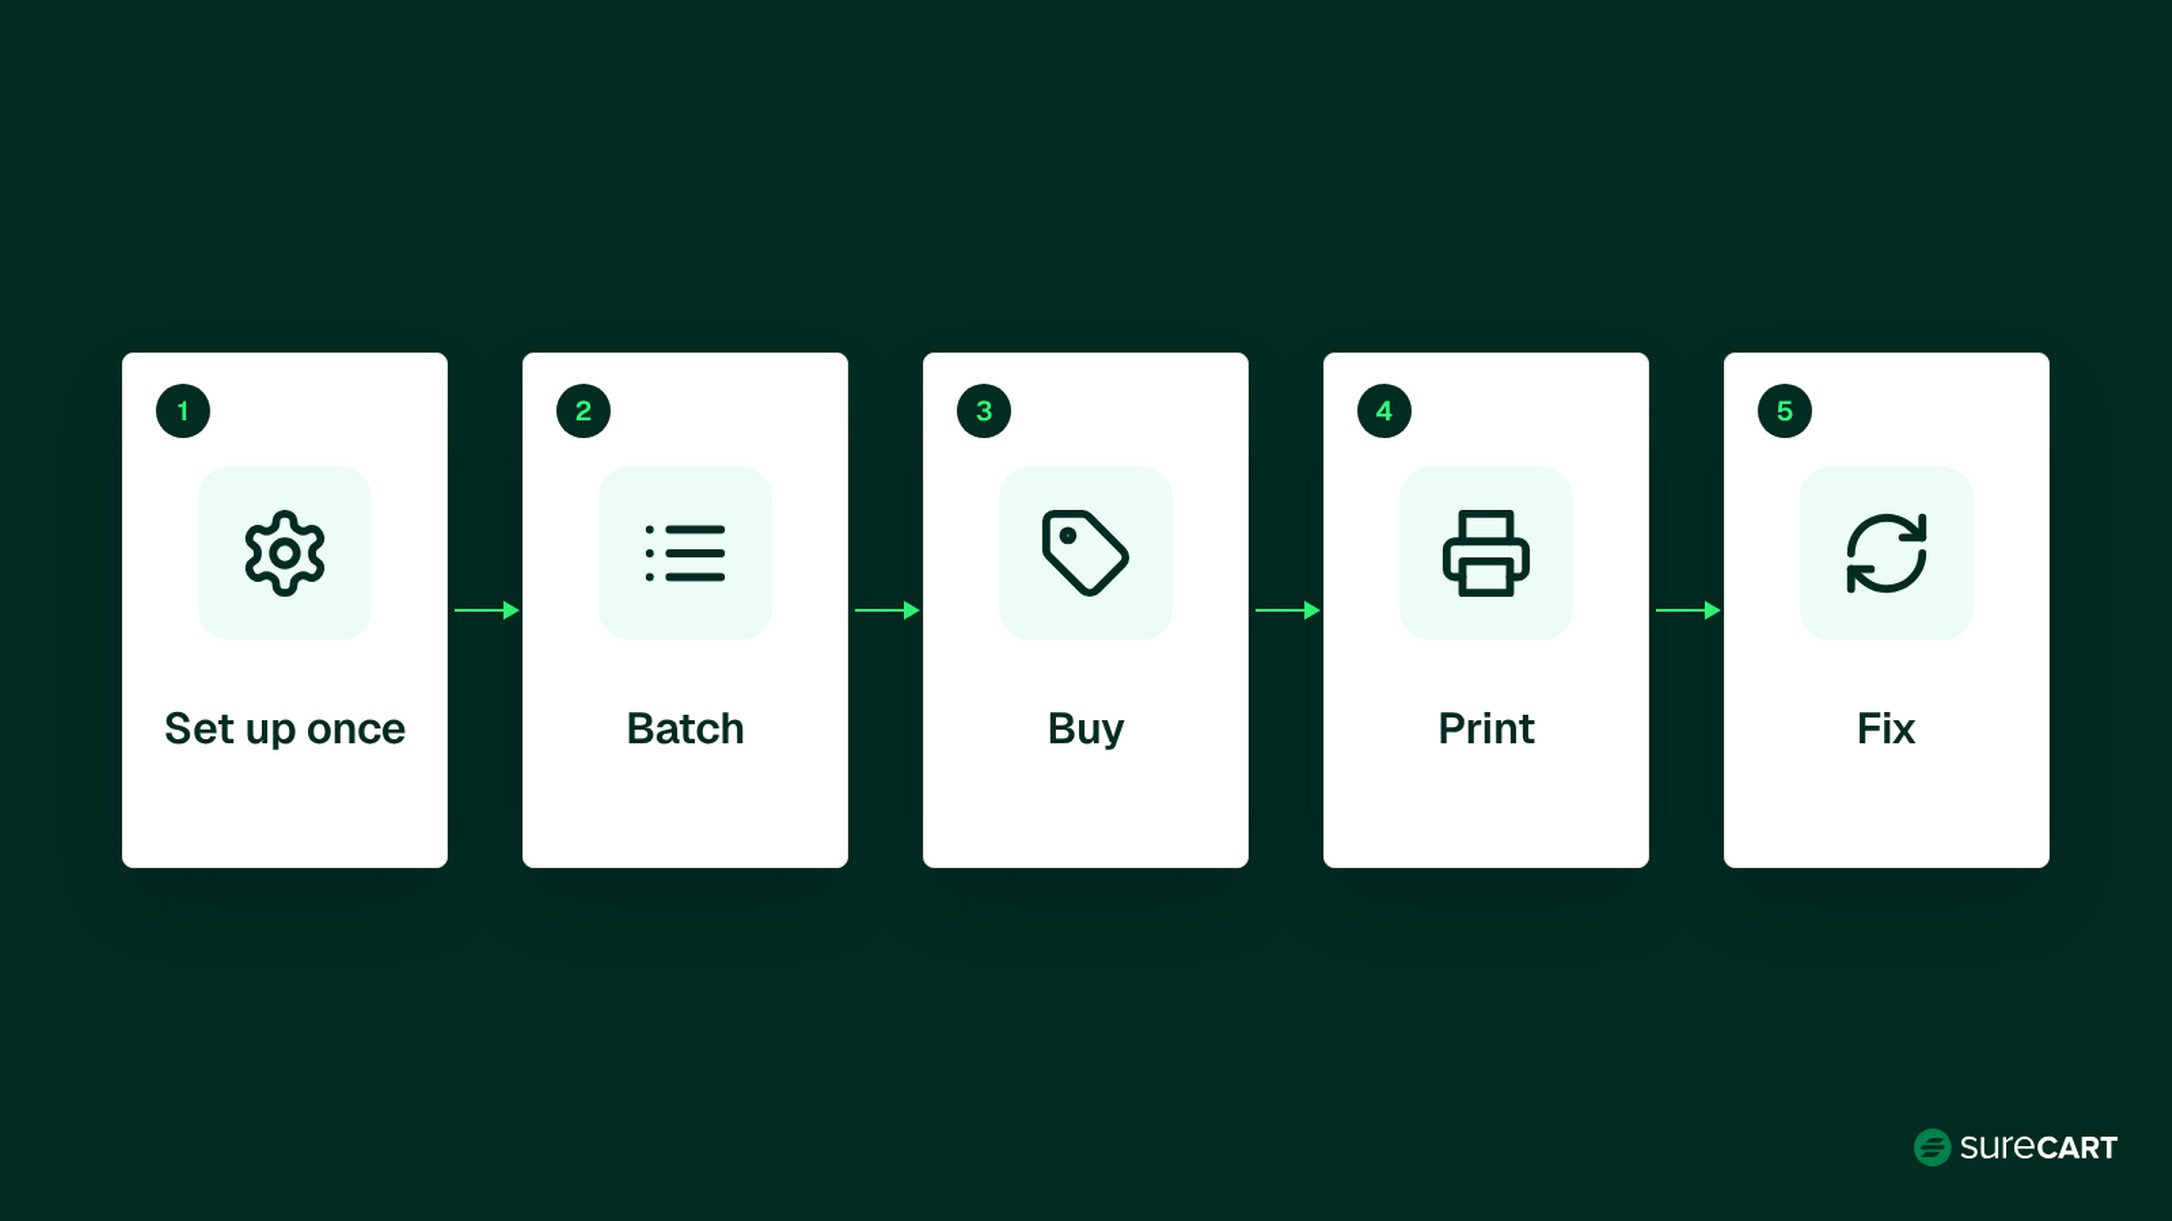
Start with setup. Saved addresses and parcel templates reduce repeat work, while batching purchases and standardizing printing make each shipping session easier.
Step 1: Set Up Once So Every Label Starts Prefilled
The fastest label is the one where the address, box, and weight are already filled in. Before you buy anything, set up the details that don’t change between orders: where you ship from, the boxes you ship in, and the weight of each product.
Take Megan, a made-up example. She runs a small candle shop on WordPress, buys about 400 shipping labels a month, and ships in three box sizes. She only needs to enter those boxes once.
Save Your Ship-From Addresses as Warehouses
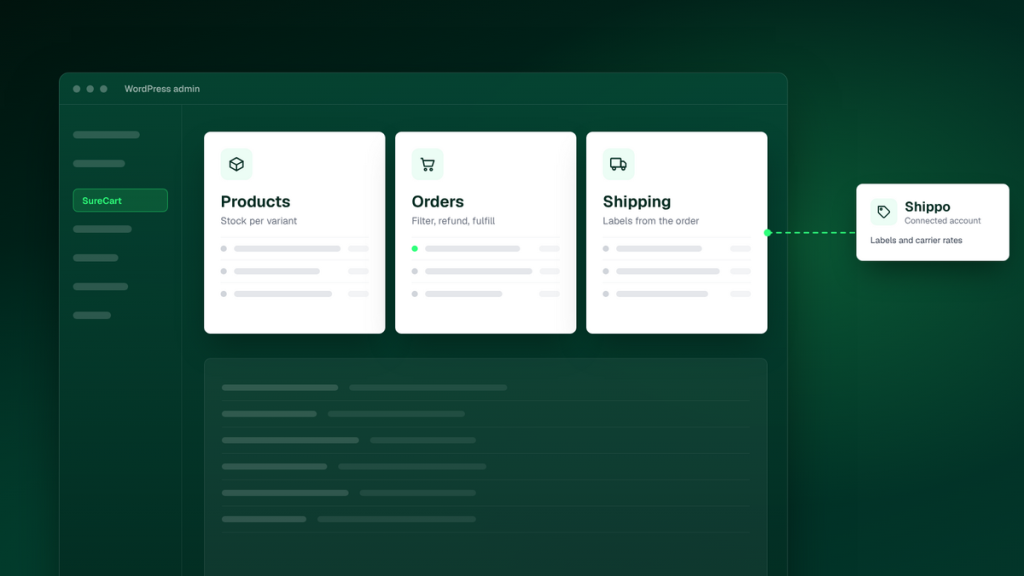
In SureCart, a ship-from address is called a warehouse. Go to SureCart > Settings > Shipping > Warehouses and click Add New. Fill in Label, Name, Email, Phone, and Address, then turn on Default Warehouse so it’s preselected when you fulfill orders. Add the phone number even though the form marks it optional, because label purchases fail without a ship-from phone. Set up a warehouse before you request shipping rates, so each shipment has a ship-from address.
Build Parcel Templates for the Boxes You Actually Use
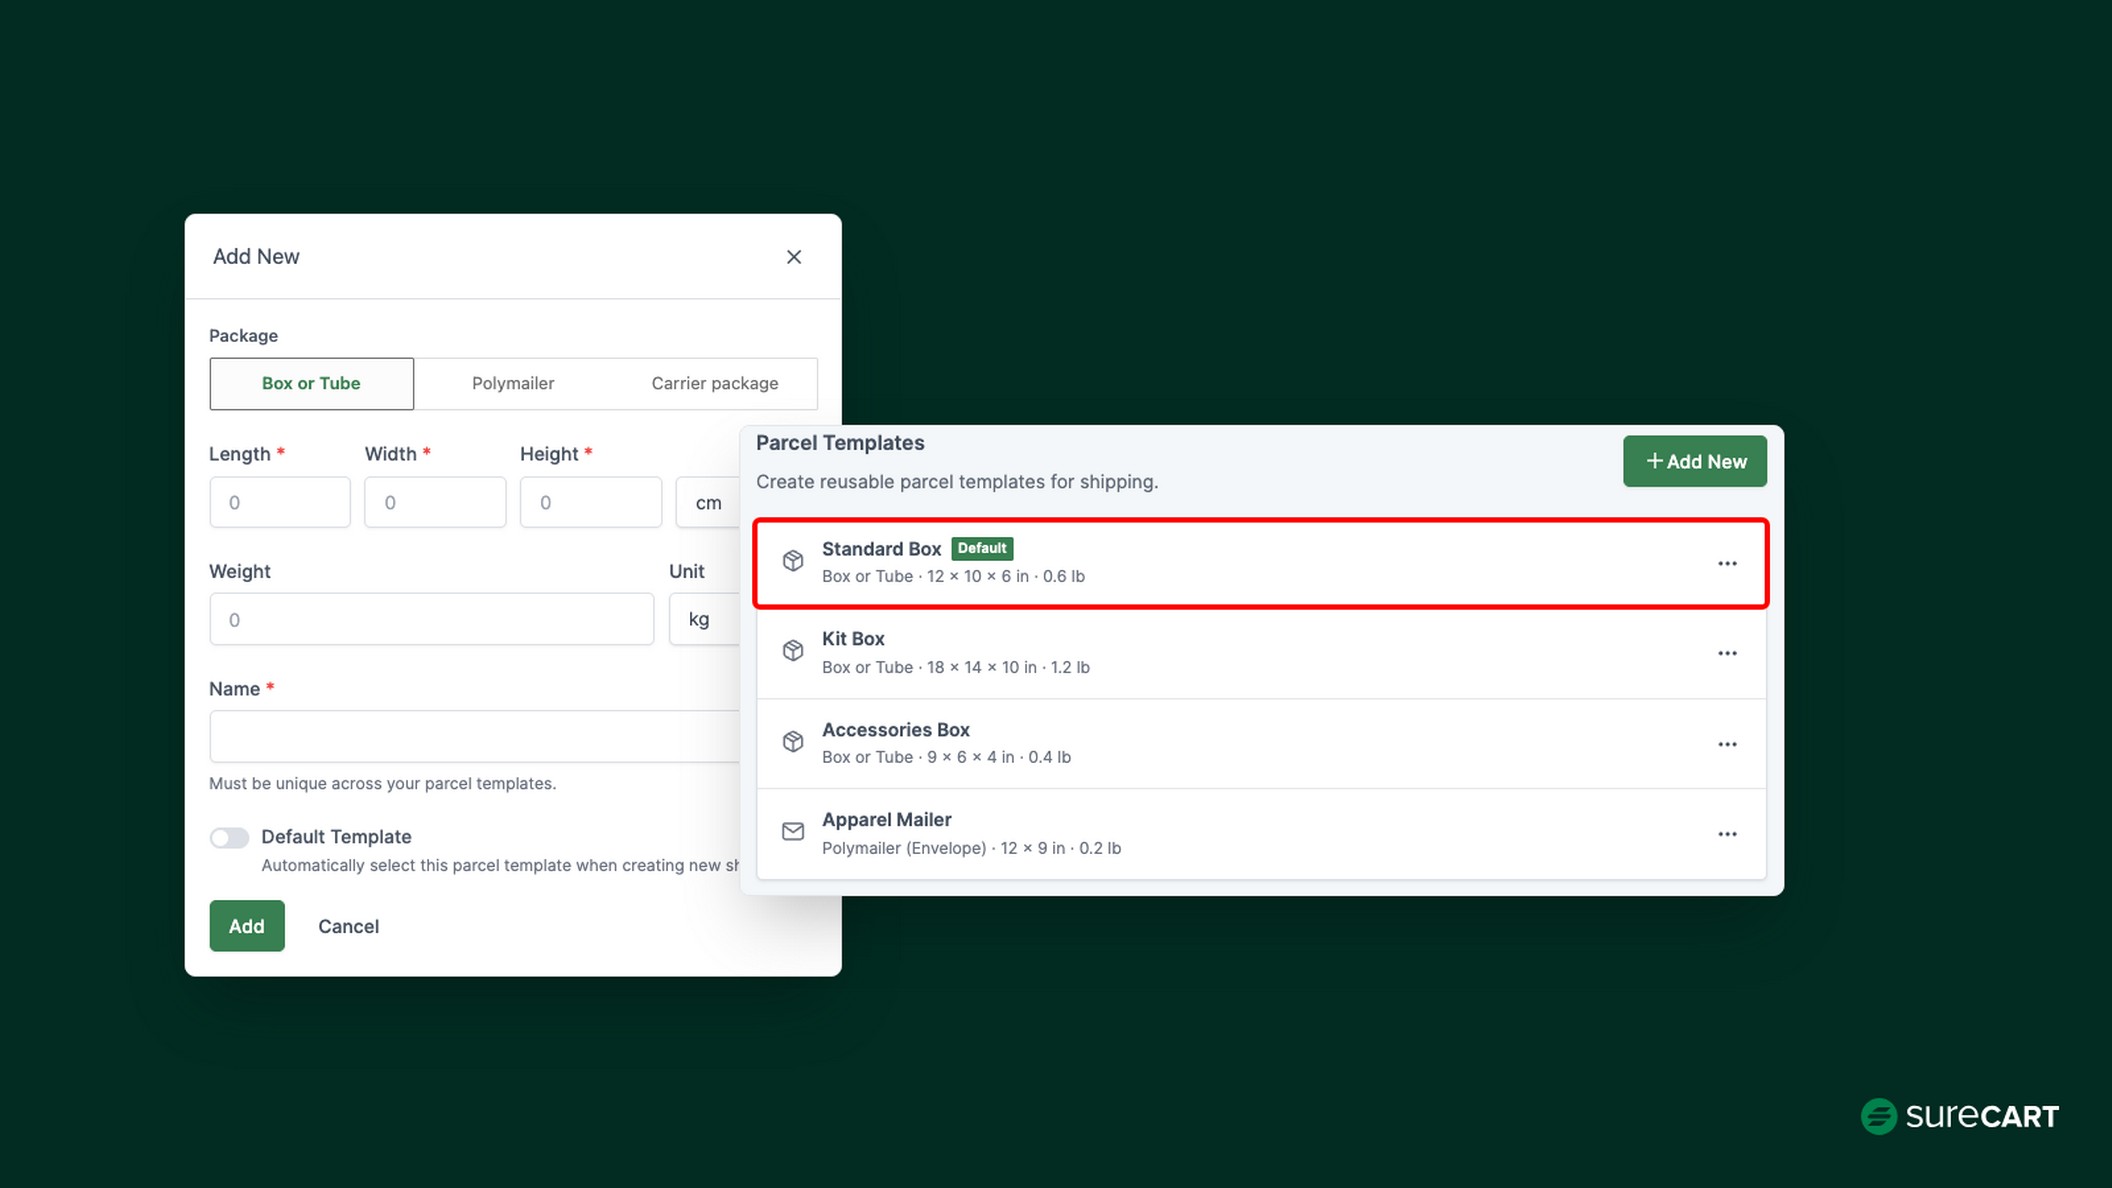
A parcel template is a saved box or mailer with its dimensions and weight. Under Settings > Shipping > Parcel Templates, click Add New, choose Box or Tube, Polymailer, or Carrier package, enter the dimensions and weight, and give it a unique name. Set the one you use most as the default.
Megan saves her three candle boxes and makes the medium one her default. When Use item weight is turned on in the fulfillment panel, SureCart works out the shipment weight from the products in the order and adds the template’s packaging weight.
Check Your Product Weights
Saved boxes only help if your product weights are right. With Use item weight turned on, SureCart builds the shipment weight from your product weights, so a missing or wrong weight can skew both the live rates at checkout and the rates you see when buying a label, even when your parcel templates are set up correctly. Weigh one of each product, compare it with the weight in its product settings, and fix any that are blank or out of date. Megan does this for each candle size before her first label run.
Get Ready to Buy Live Labels
Test mode lets you set everything up without buying real labels: rates come back simulated, and no tracking events arrive. Before you buy a real label through Shippo, check these five things:
- Get a live API key from Shippo. On Shippo’s API plan, live keys aren’t generated from the Shippo dashboard. You request them from Shippo directly, so ask early.
- Connect Shippo in live mode. Under SureCart > Settings > Shipping, add a live-mode Shippo connection with your live API token. SureCart holds one connection per mode, each with its own token.
- Add a live webhook. In Shippo, create a webhook with the Track Updated event type and set its environment to match your live connection. Tracking updates reach SureCart only in live mode, through that webhook.
- Accept pending carrier terms. Some carrier accounts start as pending in Shippo. A pending carrier still returns rates at checkout, but label purchases fail until you accept its terms in the Shippo portal.
- Keep the provider enabled. If the Shippo connection behind a rate is disabled or disconnected, that rate stops showing at checkout.
Carriers also need a recipient phone number to generate a label, so SureCart asks for one on orders that include a physical product.
For the full connection steps (API token, webhook, and shipping zones), follow the Shippo integration guide and our WordPress shipping setup walkthrough. If you haven’t set up where you ship yet, start with shipping zones, methods, and rates.
Start Selling for Free With SureCart Set up your store on WordPress with the free Launch plan. No credit card required. See plans
Step 2: Batch Orders Instead of Buying Labels One at a Time
Buying labels in one sitting, from one list, saves repeat work.
A simple habit works on any platform: set a daily label cutoff that fits your packing routine and carrier pickup schedule. Orders paid before the cutoff can go into that day’s shipping batch, while later orders wait for the next session. For Megan, that means one buying session each morning.
In SureCart, that list lives at Orders > Shipping Labels, a screen added in version 4.9.0. It shows the orders that still have items waiting to ship, and an order drops off the list once its label is bought. You can still buy a label from a single order page, which Step 3 covers, but this screen handles the whole batch at once. To see what each fulfillment status means, read the order fulfillment guide.
How to Buy Labels for Several Orders at Once
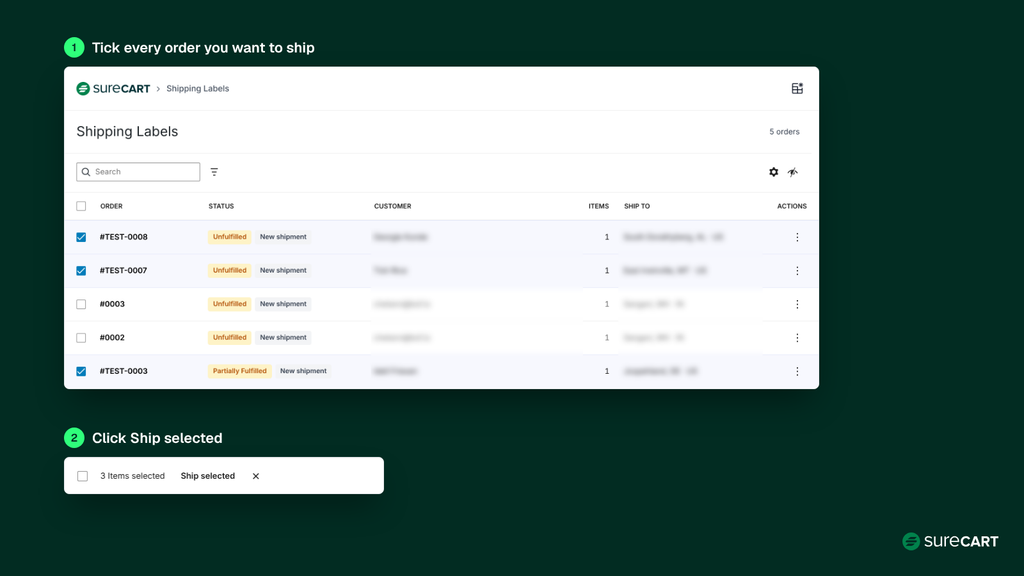
- Select the orders. Go to Orders > Shipping Labels, tick the box next to each order you want to ship, and click Ship selected in the bar at the bottom of the screen.
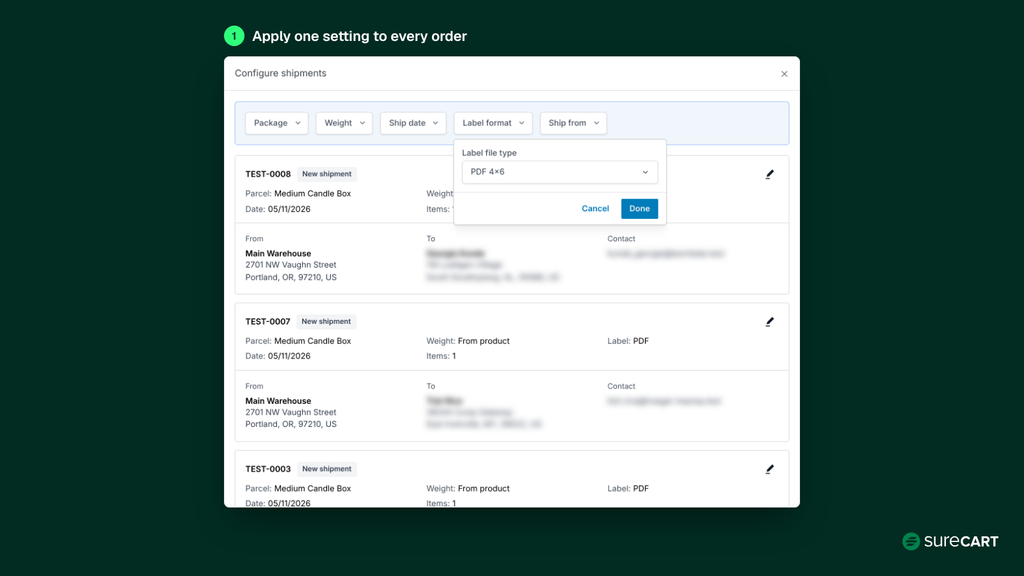
- Check the shipment details. The Configure shipments panel shows one card per order with its parcel, weight, ship date, label format, ship-from warehouse, and destination. Your default warehouse and default parcel template are already filled in. To change a setting for every order at once, use the buttons along the top: Package, Weight, Ship date, Label format, and Ship from. Megan sets Label format to PDF 4×6 once, and every order in the batch picks it up. To change one order, click the pencil on its card. Turn on Notify customer when their labels are created if you want SureCart to let buyers know.
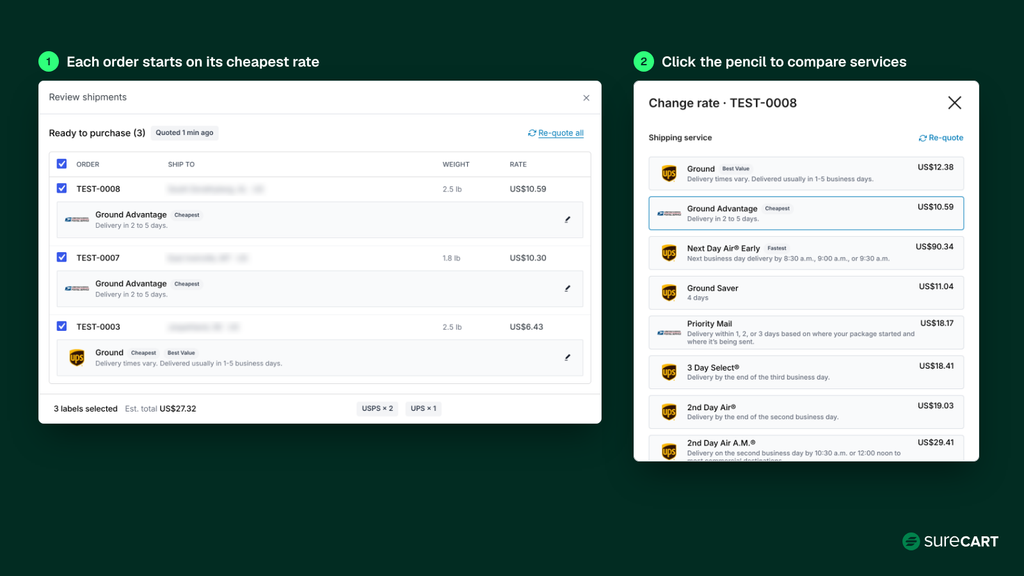
- Compare rates. Click Continue to rates. SureCart quotes carriers for each shipment, preselects the cheapest rate for every order, and tags options as Cheapest, Best Value, or Fastest. To choose a different service, click the pencil next to a rate. You’ll see every available service with its price and delivery estimate. The footer keeps a running estimated total and a count of labels per carrier.
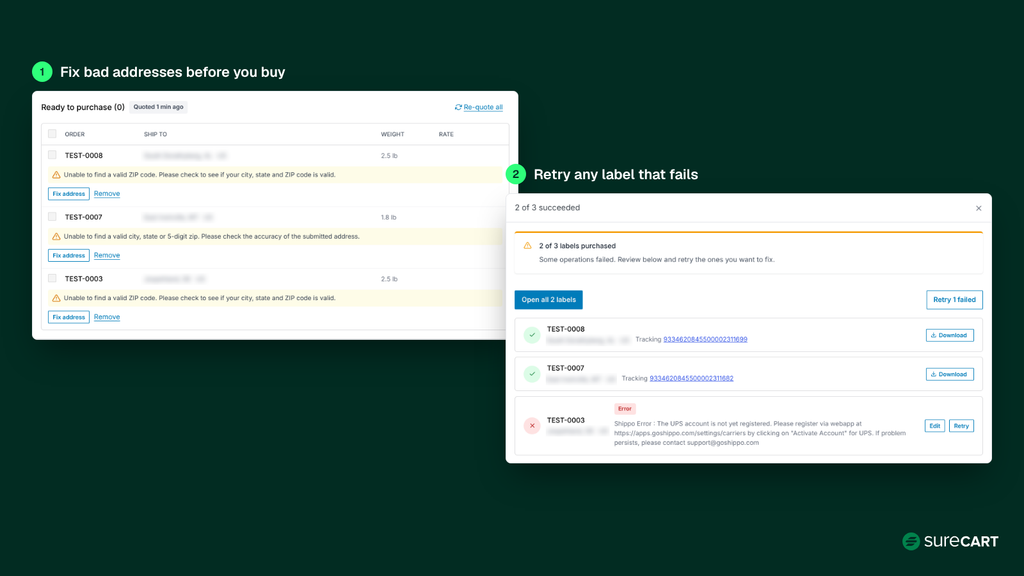
- Fix any orders that need attention. If a carrier can’t validate an address, that order shows the error and a Fix address button, and it stays out of the purchase until you fix it or remove it from the batch. Correct the address, save, and the order gets fresh rates.
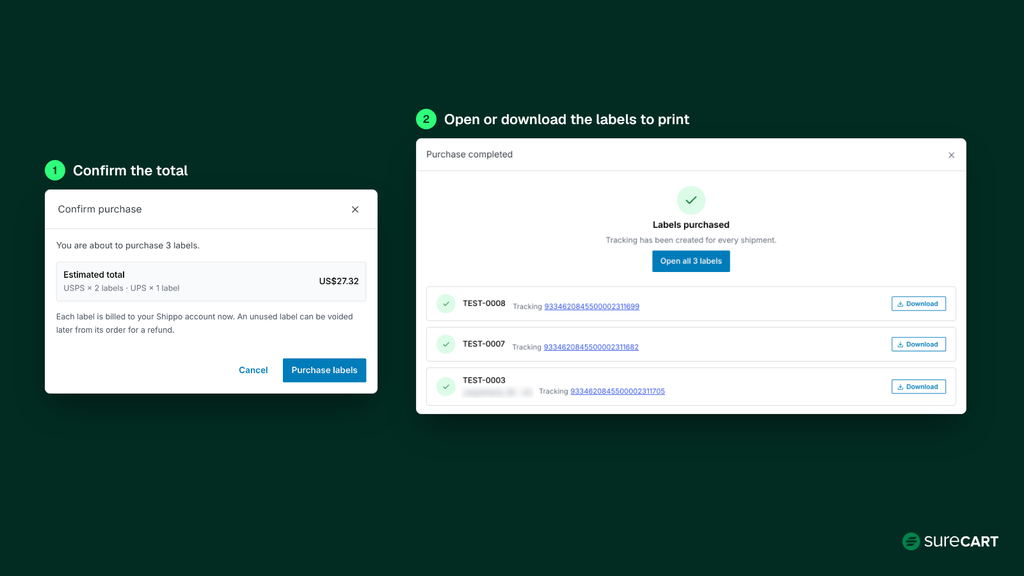
- Buy the labels. Click the Purchase button at the bottom of the panel (it shows how many labels you’re buying), check the estimated total in the confirmation window, and click Purchase labels. Each label is billed to your Shippo account at that point.
- Print them. The Purchase completed screen lists every order with its tracking number. Click Open all labels to open the label files in your browser for printing, or click Download next to an order to save just that label. If your browser blocks pop-ups, allow them for your site. Step 4 covers printing at the right size.
If some labels fail, the results screen tells you how many went through, keeps the labels that succeeded, and gives each failed order Edit and Retry buttons. For example, a UPS label fails with a “UPS account is not yet registered” error until that carrier account is activated in Shippo, the pending-terms issue from Step 1. Click Edit to choose another carrier’s rate, or activate the account in Shippo and click Retry.
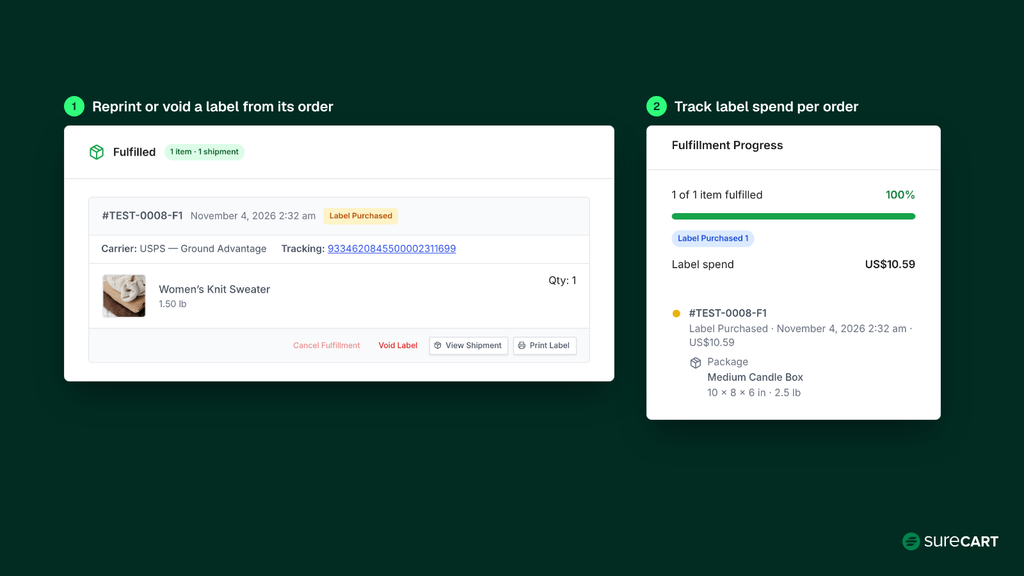
You don’t have to print everything straight away. Each label stays on its order, so you can open the order later and click Print Label to reprint it or Void Label to cancel an unused one (Step 5 covers voids and refunds). The order’s Fulfillment Progress panel also shows what you spent on its labels.
Step 3: Buy the Right Label at the Right Price
Compare live rates on the real package, not on what the customer paid at checkout. The shipping charge at checkout is set before anyone packs the order, whether it’s a flat rate or a live quote. The label price is calculated from the actual box, weight, origin, and destination, so the two numbers can differ.
The steps below cover buying a label from a single order. For several orders at once, use the Shipping Labels screen from Step 2.
Here’s how an individual purchase works in SureCart:
- Open the order from Orders. Items waiting to ship sit under Awaiting Fulfillment.
- Select the items for this shipment and click Fulfill Item. Use the Shippo tab to buy a label. The Custom tab is for entering your own tracking number instead.
- Set the Shipping date. SureCart asks for it before it quotes rates.
- Click Select a package and choose a saved template. SureCart can return rates from eligible configured carriers for that shipment, while a carrier-specific package restricts the available rates to that carrier.
- Click Fulfill & get rates, pick a rate, set the Label file type (more on that in Step 4), and click Purchase label.
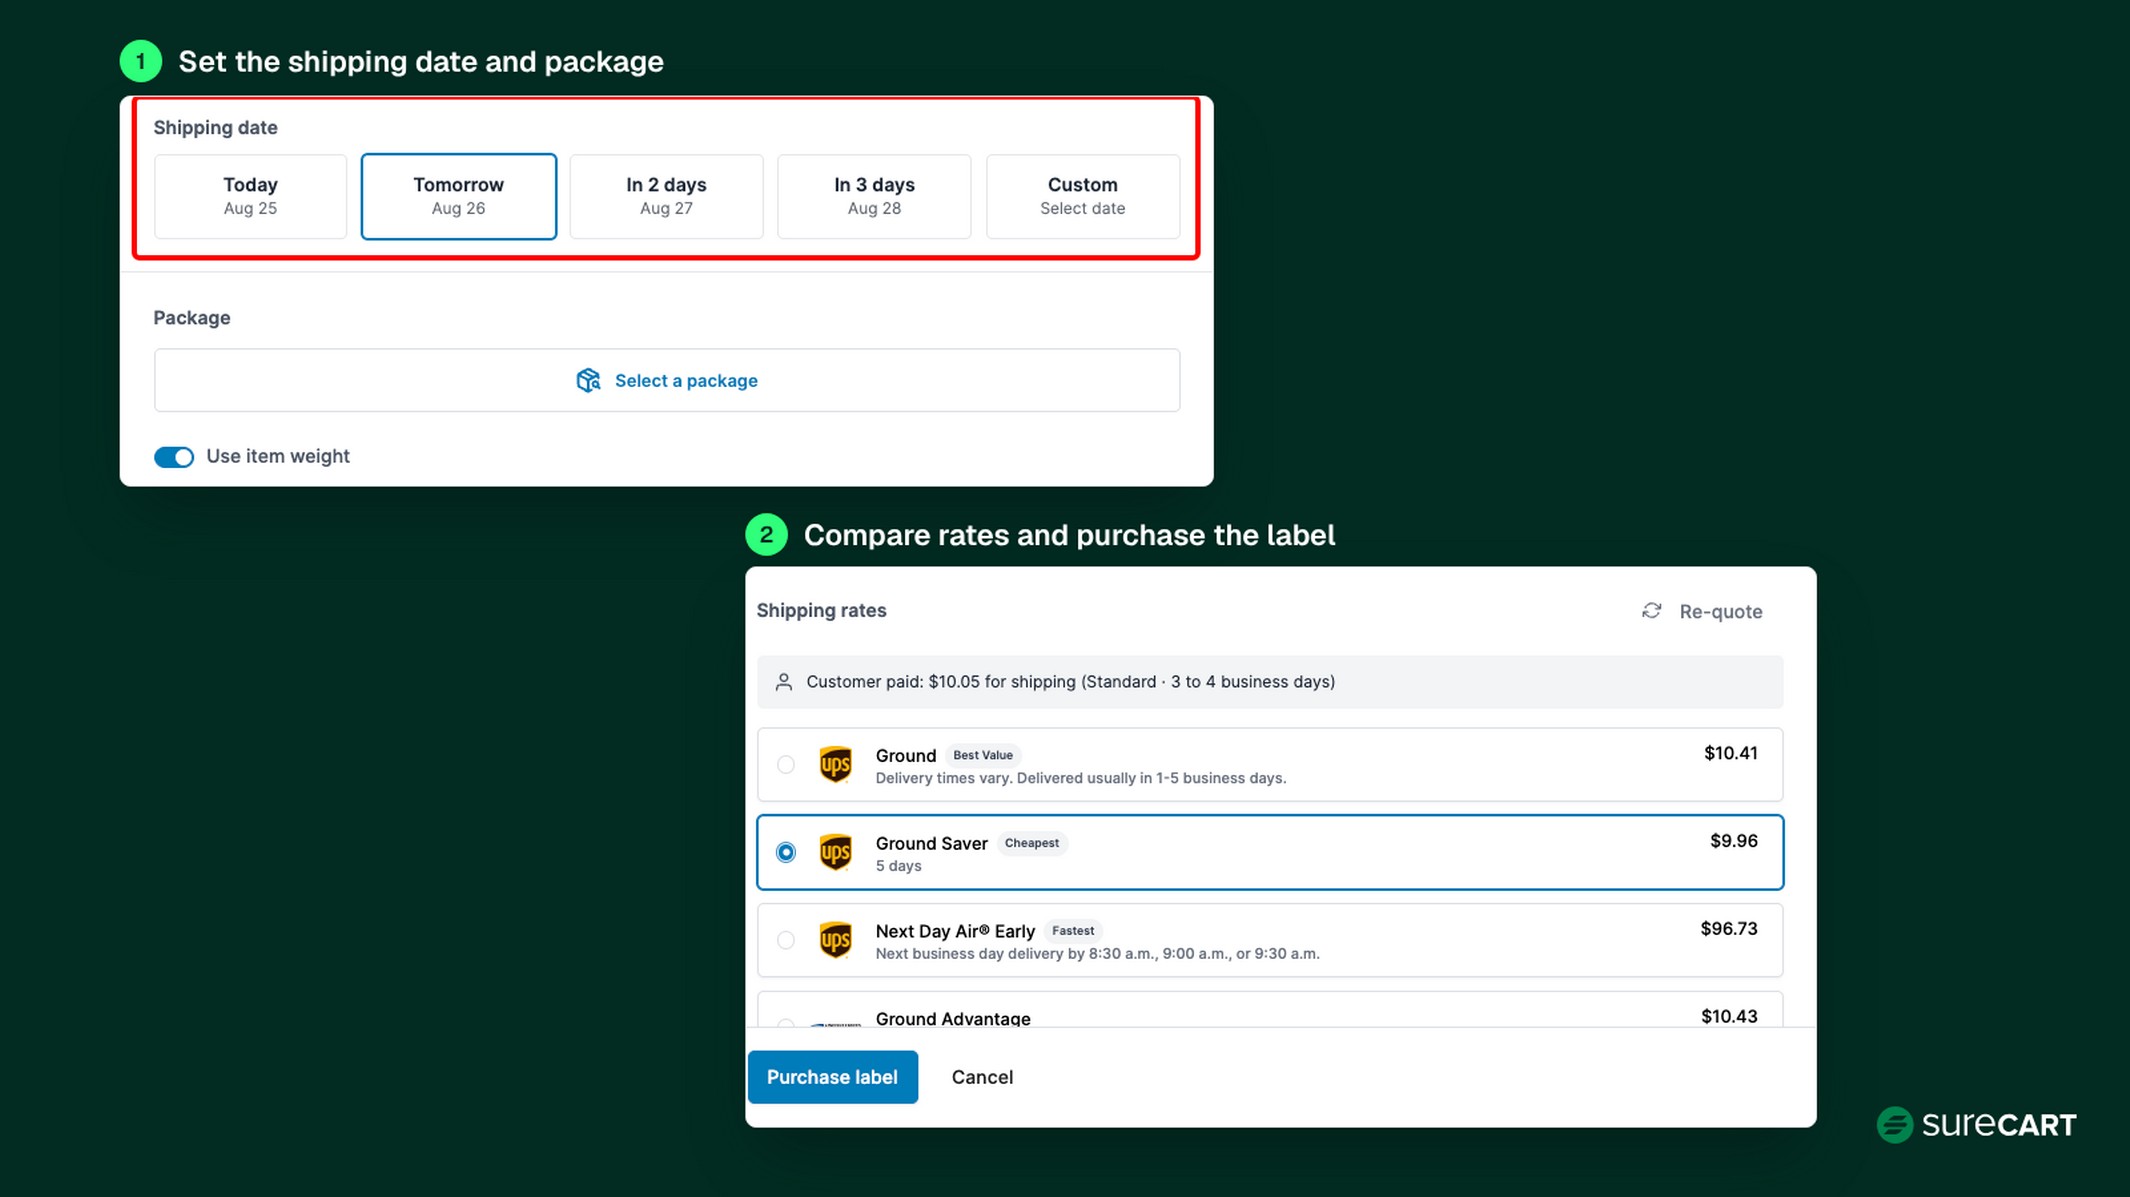
If you change the package or an address after quoting, click Re-quote so the rates match what you’re actually sending. The full walkthrough is in the guide to purchasing shipping labels.
Two features help you keep label spend in check. Fulfillment Progress shows your total label spend next to what the customer paid for shipping. Partial fulfillment lets you ship part of an order now and the rest later.
Say one of Megan’s customers orders two candles and one isn’t poured yet. Megan ships the first candle today and the second next week, and each shipment gets its own label and tracking number. Rates for a partial shipment aren’t a proportional slice of the original shipping charge, so she checks Fulfillment Progress after the second label.
For packages you ship outside Shippo, you can still add a tracking number manually.
See How SureCart Handles Shipping Live rates at checkout, plus label purchase, partial shipments, and customer tracking from the order screen. Explore shipping features
Step 4: How to Print Shipping Labels That Fit Your Printer
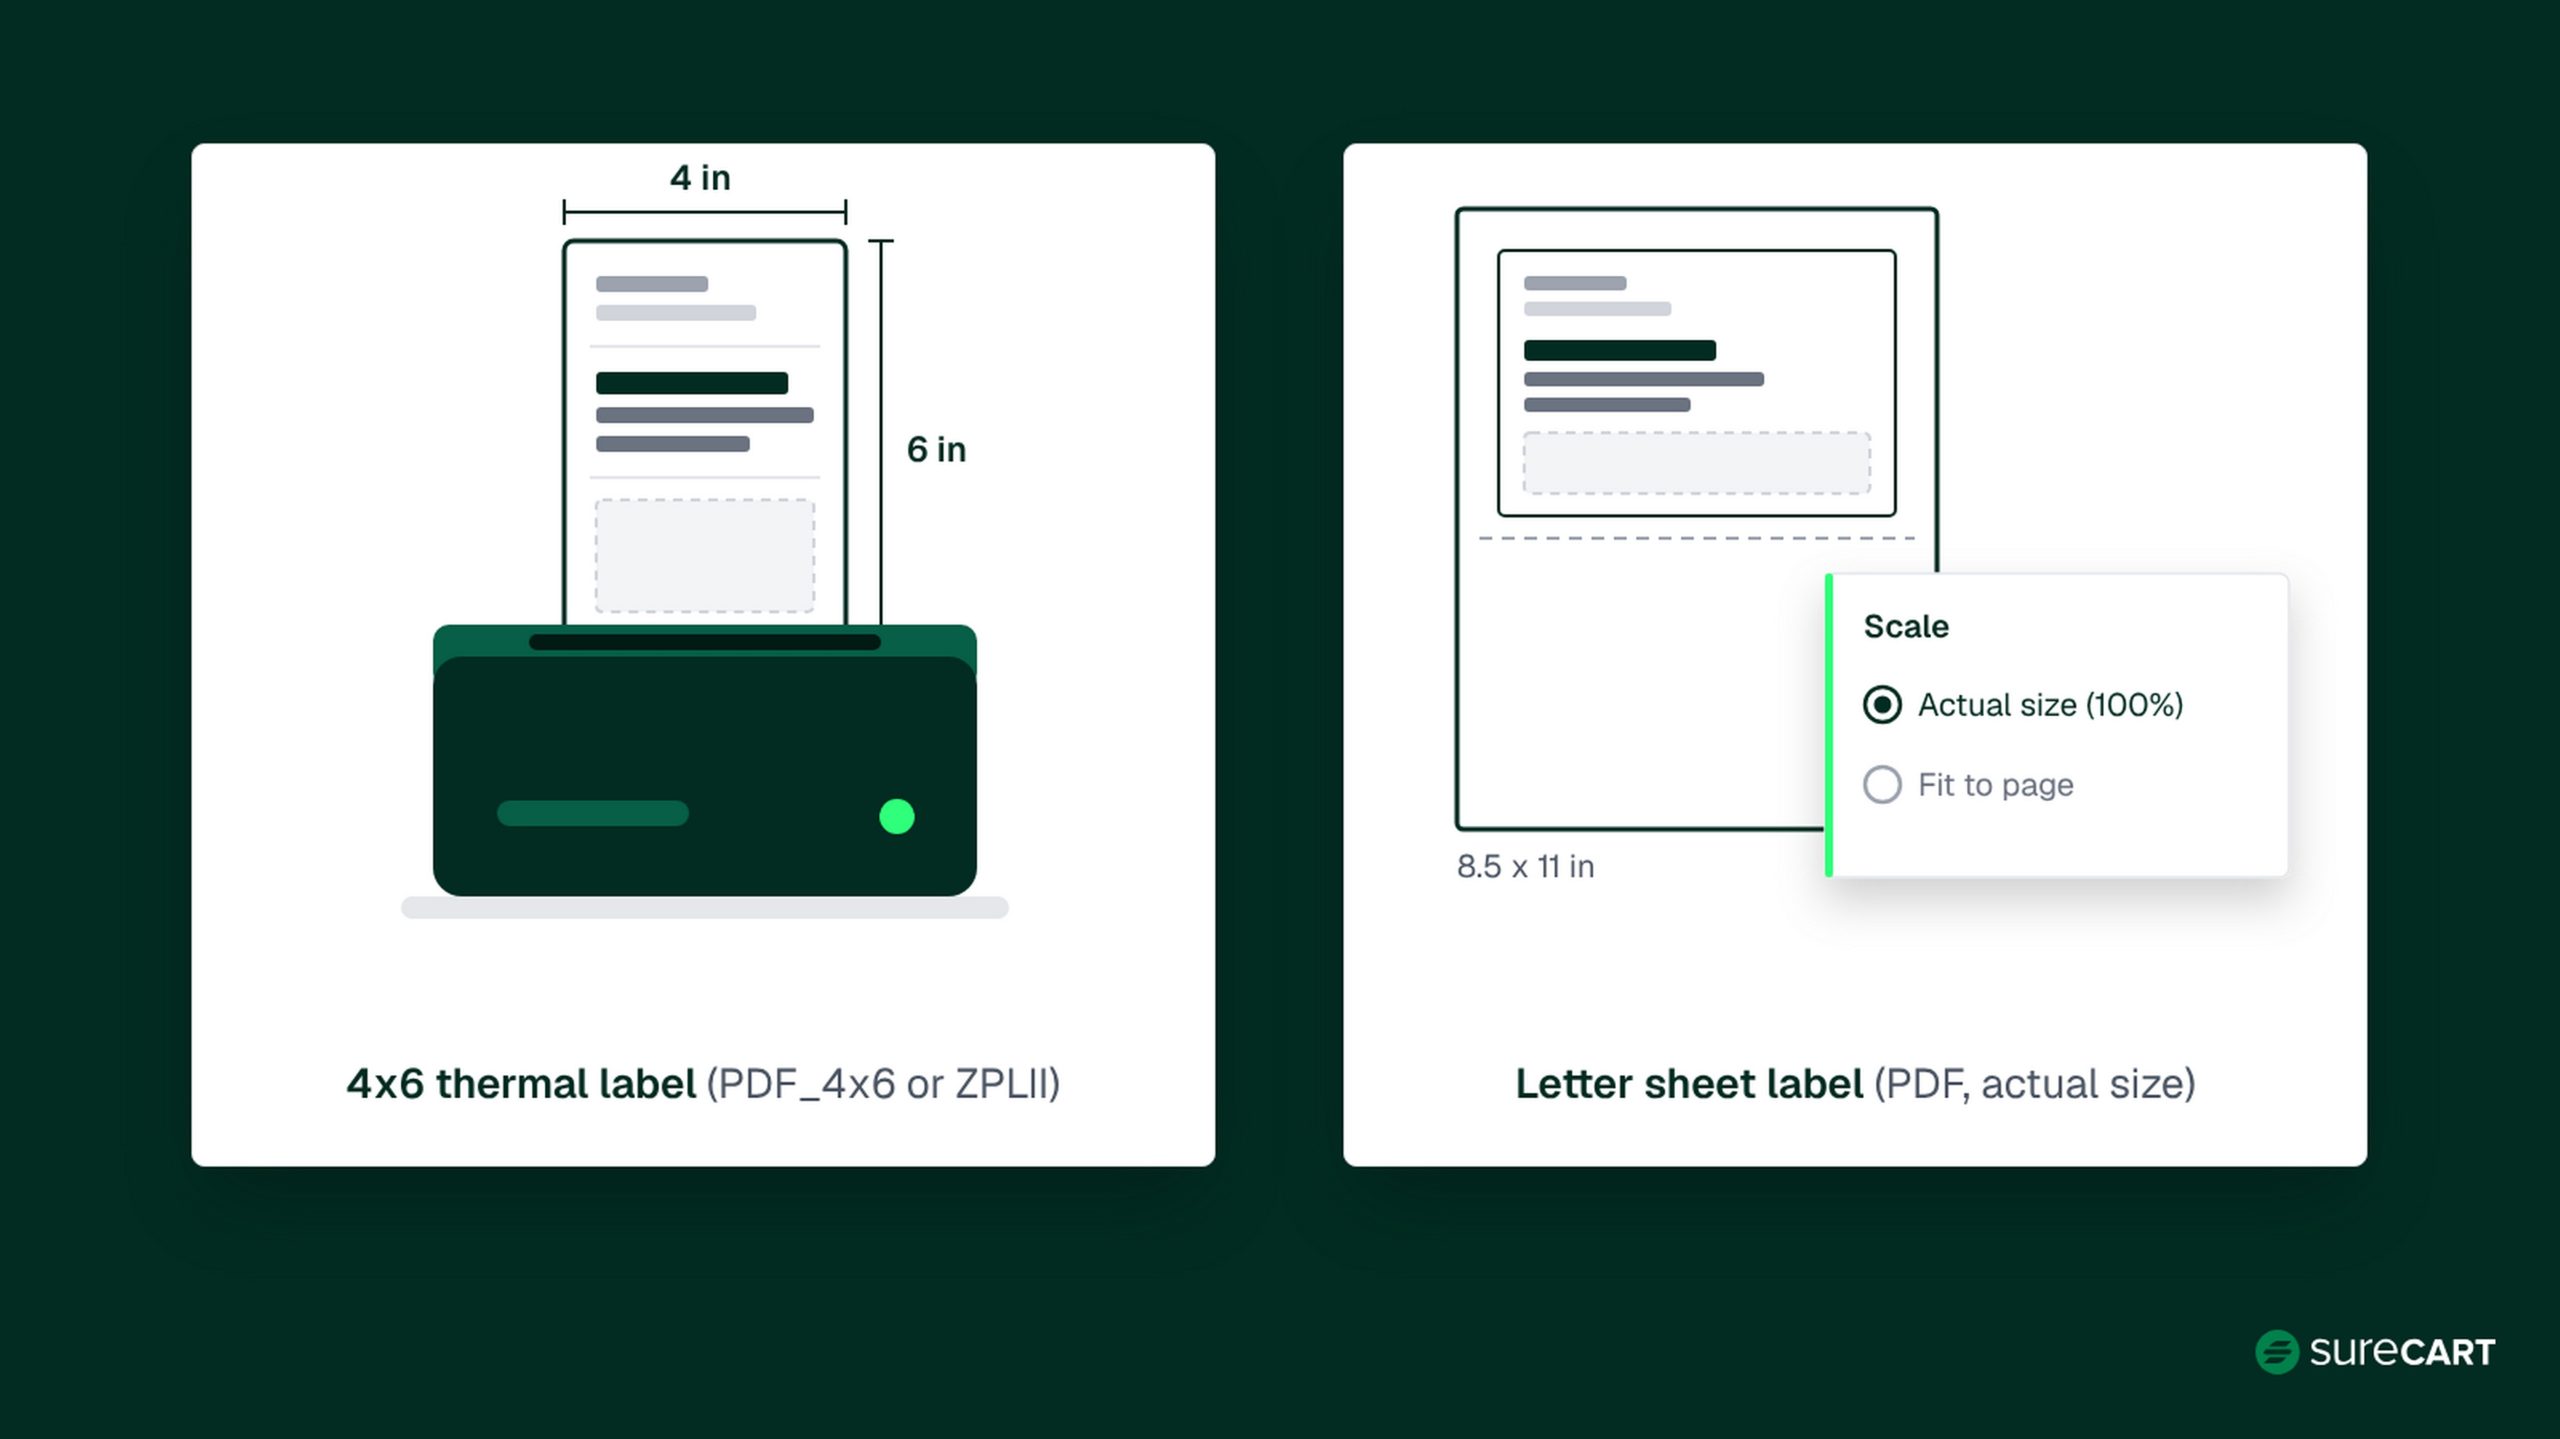
A label prints correctly when three things match: the label format you buy, the paper or label stock in your printer, and your print settings. Once you get them right, every label after that prints the same way.
Pick Your Printing Setup
Two printing setups are common:
- A thermal label printer with 4×6 label stock. Labels print onto adhesive label stock, ready to peel and attach.
- A regular laser or inkjet printer with US Letter or A4 paper. The label prints on a full sheet, which you trim and tape to the box or print onto adhesive sheets.
Choose the Label Format Before You Buy
Pick the label format before you buy, because it decides whether the label prints at the right size. A label file type describes the label’s size or the printer language it uses. It doesn’t promise that your printer will handle it. The table below lists common configurations. None of them is a recommendation for a particular printer.
Common printer setups and label file types
| Printer setup | Label file type | Label size | What to check |
|---|---|---|---|
| 4×6 thermal label printer with a PDF driver | PDF_4x6 | 4 x 6 inch | Your printer’s driver accepts 4×6 PDF output (not every thermal printer does) and is set to 4×6 stock |
| Thermal printer that uses ZPL (Zebra-style) | ZPLII | Not a page size; a printer language | Your printer accepts ZPL, and your carrier and Shippo return ZPL labels for the service you use |
| Regular laser or inkjet, US Letter paper | 8.5 x 11 inch | Letter paper selected, printed at actual size | |
| Regular printer, A4 paper | PDF_A4 | 8.3 x 11.7 inch | A4 paper selected, printed at actual size |
| 4×8 label stock | PDF_4x8 | 4 x 8 inch | Your carrier supports this size |
| A6 label stock | PDF_A6 | 4.1 x 5.8 inch | Your carrier supports this size |
This list covers common setups and isn’t exhaustive. The label format, carrier support, printer driver, paper size, and print scaling all have to match for a label to print correctly. Sizes come from Shippo’s label size reference, and the file type values from SureCart’s shipments API reference.
In SureCart, set the Label file type in the fulfillment panel before you click Purchase label, or use Label format on the Shipping Labels screen to set it for a whole batch. Once a format works with your printer, use it every time.
One note for older installs: before version 4.9.0, SureCart could ignore the selected file type unless you clicked Re-quote first. That bug was fixed in version 4.9.0.
How to Print Shipping Labels Step by Step
- Open or download the label. For a batch, click Open all labels or Download on the Purchase completed screen (see Step 2). For a single order, or to reprint later, open the order and click Print Label on its shipment.
- Open the print dialog. Open the PDF in your browser or a PDF reader and press Ctrl+P (Cmd+P on a Mac). ZPLII files are printer commands, not documents, so send them to the printer with software or a driver that supports ZPL instead of a PDF viewer.
- Select your printer and paper size. Choose the printer you’re using, then set the paper size to match the label file: 4 x 6 inches for a PDF_4x6 label, Letter for a standard PDF label, or A4 for a PDF_A4 label. On a thermal printer, set the same label size in the printer’s driver settings so the printer and the print dialog agree.
- Print at 100% scale. Set Scale to Actual size or 100%, and turn off Fit to page, Shrink to fit, or any similar option. Automatic scaling changes the label’s dimensions and can make the barcode harder to scan.
- Test before you use label stock. For your first label, print on plain paper and measure it, or hold it over a blank label, to confirm the size is right. Then switch to label stock.
Check the Printed Label Before You Attach It
Take a few seconds with each label before it goes on the box:
- Nothing is cut off. The full label printed, including its edges, barcode, and addresses.
- The barcode is clean. Lines are sharp and unbroken, with no smudges, streaks, or faded patches.
- It’s the right order. The recipient name and address match the order you’re packing.
- The size is right. A 4×6 label should measure 4 x 6 inches.
Stick the label flat on the largest side of the box, away from seams and edges. If you tape over it, use clear tape and smooth it flat so the barcode stays readable. If you reuse boxes, remove or cover old labels and barcodes so the carrier scans the right one.
If a label prints wrong, fix your settings and reprint the same label from the order with Print Label. You don’t need to buy a new one.
Step 5: How to Void, Refund, and Replace Shipping Labels
Before you void anything, work out what went wrong. A printing problem and a wrong shipment need different fixes, and choosing the wrong one can mean paying for a label you didn’t need.
If Only the Printout Is Wrong, Reprint the Label
If the address, package, and service on the label are correct but the print came out cut off, smudged, or the wrong size, keep the label you already bought. Fix your print settings (see Step 4), then open the order and click Print Label on the shipment to print it again. Voiding it and buying another means paying for a second label while you wait for the first one’s refund.
If the Shipment Details Are Wrong, Void and Replace the Label
A wrong address, box, weight, or service means the label itself is wrong. Before you void it, check the rules for the carrier and the account the label was bought with. Voiding sends a refund request, not an instant refund. You may pay for the replacement label before the original is credited, and a label the carrier has already scanned can’t be refunded. Shippo also notes that a refund request can’t be undone, and that using a label after requesting its refund risks the package being lost, confiscated, or marked as fraudulent. Only void a label you’re sure you won’t ship with.
In SureCart, replacing a wrong label takes three moves:
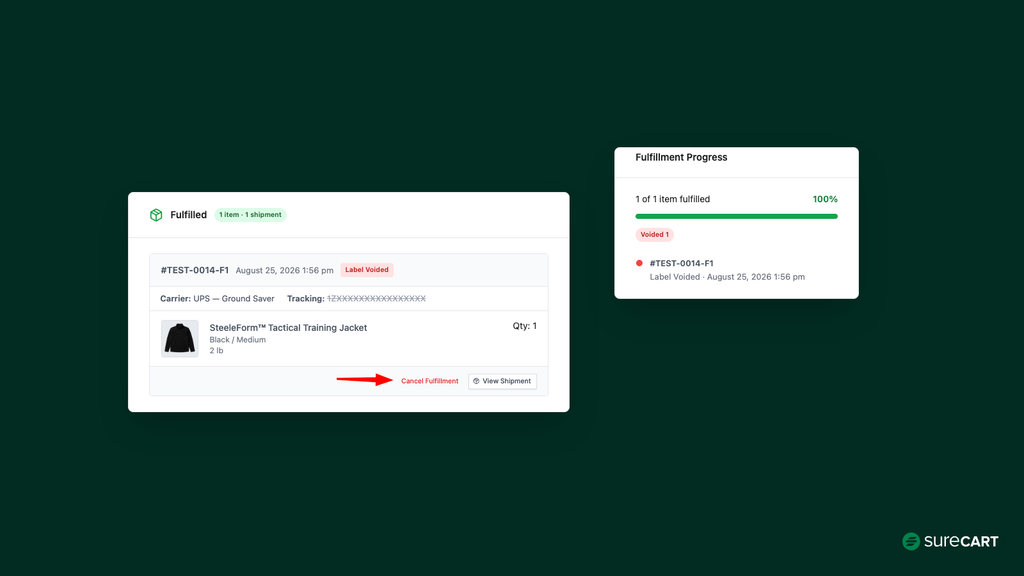
- On the order page, click Void Label on the shipment and confirm. This sends a refund request for the label cost to the carrier through Shippo. The shipment is marked as Label Voided in SureCart, and the label should not be used to ship the package.
- Click Cancel Fulfillment. The items go back to Awaiting Fulfillment.
- Create a new fulfillment and buy a new label. You can’t add a new label to an existing fulfillment, which is why the cancel step comes first. Canceling also removes the fulfillment and its voided label record from the order, though the label record stays visible in the Shippo portal.
If SureCart already emailed the customer about the shipment, that message can’t be recalled. Send them the replacement tracking number yourself.
When You Get the Money Back
How a refund works depends on whose carrier account the label was bought with.
For labels bought with Shippo’s carrier accounts, Shippo’s refund rules have three separate parts:
- Validity: a USPS label must be used within 30 days of purchase.
- Refund request window: you have 90 days from purchase to request a refund on an unused label. That’s a deadline for asking, not extra time to use the label.
- Processing: Shippo processes eligible requests within 14 business days and credits them on your next invoice. If the carrier has scanned or used the label, Shippo rejects the request.
If you connect your own carrier account, the carrier handles postage, not Shippo:
- Your own UPS account: UPS bills you directly for postage, so contact UPS for a postage refund.
- Your own FedEx account: FedEx bills postage only when it scans a label, so an unused FedEx label doesn’t need a postage refund.
- Other carrier accounts you connect yourself: Shippo doesn’t bill postage on these, so contact the carrier for a postage refund.
If you added insurance to a label you didn’t use, Shippo handles that insurance refund even when the label was bought on your own carrier account.
How Much Does Shippo Charge for Shipping Labels?
SureCart connects to Shippo through its API, and SureCart’s setup guide suggests Shippo’s API plan for this integration. On the free API Starter plan, the first 30 labels each month carry no label fee, and each additional label costs $0.07 (USD).
The table below shows only Shippo’s API Starter per-label fees. It is not your total shipping cost. Postage, rate-generation requests, tracking requests, address validation, insurance, SureCart fees, and payment processor fees are all charged separately. The figures also assume API Starter pricing applies for the whole month and that each shipment uses one purchased label.
Illustrative monthly Shippo per-label fees on API Starter (per-label fees only; postage and other charges not included)
| Monthly labels | Billable labels (after 30 free) | Shippo per-label fees (USD) |
|---|---|---|
| 100 | 70 | $4.90 |
| 400 | 370 | $25.90 |
| 1,000 | 970 | $67.90 |
The 400-label row is Megan’s month, and the other two show a lighter and a heavier month. The volumes count labels, and a split order needs one label per shipment, so labels can outnumber orders.
Postage is a separate charge, set by the carrier on every label. On API Starter, Shippo also lists fees for API calls that aren’t tied to a Shippo label: 1 cent per rate generation, 2 cents per tracking request, and 2 cents per US address validation (8 cents for non-US addresses). How many of those your store generates depends on your setup, so check your Shippo invoice rather than estimating.
SureCart’s pricing page lists a 2.9% transaction fee for the free Launch plan. Pro for one store is $199 per year with no SureCart transaction fee, and the page currently shows an introductory price of $159 for the first year. Payment processor fees apply separately to both plans, as SureCart’s guide to ecommerce fees explains, and the pricing page lists no separate label charge.
Why SureCart Fits This Label Workflow
We built SureCart, so weigh this section with that in mind. The practical benefit is that you can manage individual label purchases and voids from the order workflow, while customers can view shipment status and tracking in their accounts, which can save you a few “where’s my order?” emails. You can buy labels through your connected Shippo account without exporting orders to another tool, and on busy days, the Shipping Labels screen lets you buy labels for a whole batch of orders in one purchase.
When an order ships in pieces, partial fulfillment gives each shipment its own label and tracking number. When a label is wrong, Void Label and Cancel Fulfillment sit on the order page.
Frequently Asked Questions
Can I print shipping labels on a regular printer?
Yes, provided your carrier and shipping integration support a sheet-sized label format. For US Letter paper, choose PDF; for A4 paper, choose PDF_A4. Print at 100% scale rather than using “Fit to page,” then trim or attach the label to the package. A 4×6 thermal printer can save time if its driver, the label format, and your carrier’s output are all compatible, but it isn’t essential.
Do shipping labels expire?
It depends on the carrier and the account. A USPS label bought with Shippo’s carrier account has to be used within 30 days of purchase. Shippo separately gives you 90 days from purchase to ask for a refund on a label you never used, but that longer window doesn’t extend how long the label works. For other carriers, check their own guidance, such as FedEx’s shipping label FAQ.
Can I void a shipping label in SureCart?
Yes. Open the order and click Void Label on the shipment. SureCart sends a refund request for the label cost to the carrier through Shippo, and whether you get the money back depends on the carrier and account. For labels bought with Shippo’s carrier accounts, Shippo rejects refund requests if the carrier has already scanned or used the label. SureCart marks the shipment as Label Voided, and that label shouldn’t be used to ship the package. To ship again, cancel the fulfillment first, then buy a fresh label. If the label details are right and it only printed badly, reprint it from the order with Print Label instead of voiding it.
Can I buy labels for several orders at once in SureCart?
Yes. Go to Orders > Shipping Labels, tick the orders you want to ship, and click Ship selected. You can apply one package, weight, ship date, label format, or warehouse to every order, compare rates, buy all the labels in one purchase, and then open or download them for printing. The screen was added in SureCart version 4.9.0.
Can I ship part of an order now and the rest later?
Yes. In the fulfillment panel, select only the items that are ready, or lower the quantity, and buy a label for that shipment. Each shipment gets its own label and tracking number. The rate for a partial shipment isn’t a share of what the customer paid, so keep an eye on your label spend.
Conclusion
Printing one shipping label is simple. Handling labels efficiently as orders grow takes a repeatable process. Five habits make that process easier: save your addresses and boxes, batch purchases, quote on the actual package, match the label format to your printer, and reprint before you void, checking the carrier’s refund rules when a label really needs replacing. Start with setup, then add the other habits as your order volume grows.
Shipping Label Checklist
Run through this list before you process your first batch, and again whenever something in your setup changes:
- Product weights: every shippable product has a current weight in its settings, since SureCart builds the shipment weight from them.
- Warehouse: your ship-from address is saved as a warehouse, includes a phone number, and is set as the Default Warehouse.
- Parcel templates: the boxes and mailers you actually use are saved, and your most common one is set as the default.
- Shippo live connection: a live-mode Shippo connection with your live API token is added under SureCart > Settings > Shipping, and the provider is enabled.
- Carrier activation: every carrier you plan to use is activated in Shippo, with any pending terms accepted. Otherwise, rates still show but label purchases fail.
- Printer format: your Label file type matches your printer and paper, and you’ve printed one test label at 100% scale.
- Tracking setup: a live Shippo webhook with the Track Updated event is in place, so tracking updates reach SureCart and your customers.
Start Selling for Free, No Credit Card Run your products, checkout, and shipping from WordPress with SureCart.
Launch is free to start. Get started