Forty percent of shoppers who abandon a cart for a reason other than “just browsing” do it because the final cost surprised them, mostly shipping, tax, or fees added at checkout, according to Baymard Institute’s checkout research. Guess a shipping rate wrong, and you either eat the loss yourself or lose the sale entirely.
SureCart just closed that gap. SureCart connects directly to Shippo, so instead of charging one flat rate and hoping it’s close enough, you can show customers a carrier-calculated rate at checkout without installing a separate plugin or building a custom integration.
Flat Rate vs. Live Carrier Rates: What’s Actually Different
Live carrier rate shipping is a checkout shipping method where the price shown to the customer is calculated in real time by the carrier itself – based on the package’s actual weight, dimensions, origin, and destination – instead of a fixed amount set by the store. The customer sees a carrier-calculated rate for that specific order.
Here’s what that means in practice. Flat-rate shipping charges the same amount for every order in a shipping method, regardless of weight, distance, or which carrier would actually be cheapest. Live carrier rate shipping calculates the rate at checkout, pulled directly from the carriers you’ve connected.
The practical difference shows up in your margins. A flat $10 rate might overcharge a customer three states away and undercharge one across the country. Live rates reduce that guesswork because the price shown is a carrier-calculated rate for that specific package to that specific address.
SureCart already supported flat rates before this. Live rates are the only one that requires connecting an outside service (Shippo) to work.
How to Connect Shippo to Your SureCart Store
Turning this on takes a connected Shippo account, a matching tracking webhook, at least one warehouse, a parcel template, a shipping zone with a Live carrier rates rate, and shipping weights on your physical products.
Here’s the step-by-step guide:
Step 1: Create a Shippo account. Go to Shippo, sign up, choose the API plan for an API-based integration, and complete the signup process.
Step 2: Generate a test API token. In Shippo, go to API configuration → Developer keys. Under Test keys, select Create new test key, then copy the token. Test mode lets you configure the integration without buying real labels or incurring label charges.
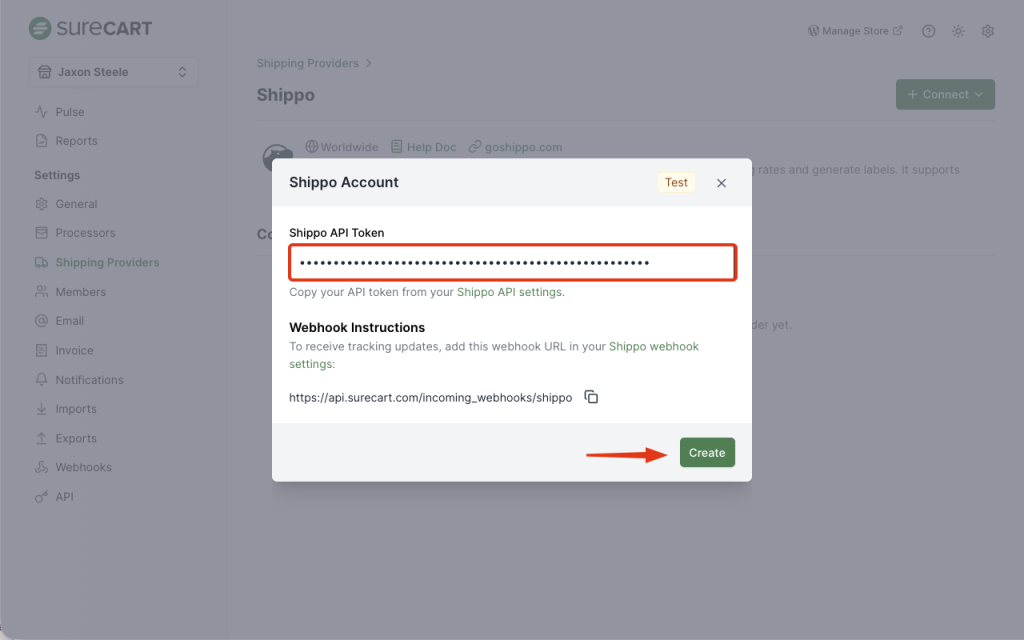
Step 3: Connect Shippo in SureCart. Go to WordPress Dashboard → SureCart → Settings → Shipping. Under Shipping Providers, select Shippo, then choose + Connect → Test Mode. Paste the token into the Shippo API Token and select Create.
Step 4: Add the tracking webhook. Copy the webhook URL shown in the Shippo Account modal. In Shippo, go to API configuration → Webhooks → Create webhook, set Event Type to Track Updated, choose the environment that matches your SureCart connection, paste the URL, and create the webhook.
Test mode returns simulated checkout rates, and tracking events are not simulated. When you’re ready for real labels and tracking, connect a live key and create the webhook in the matching live environment. On Shippo’s API plan, live keys must be requested directly from Shippo. SureCart supports one Shippo connection per mode.
Setting Up Parcel Templates
Second: parcel templates. A parcel template is a saved package preset: a box or envelope with a set length, width, height, and weight. Instead of entering dimensions every time you ship something, you pick a template.
Step 1: In your shipping settings, create a new parcel template.
Step 2: Choose a type, box or envelope, and enter its dimensions and weight
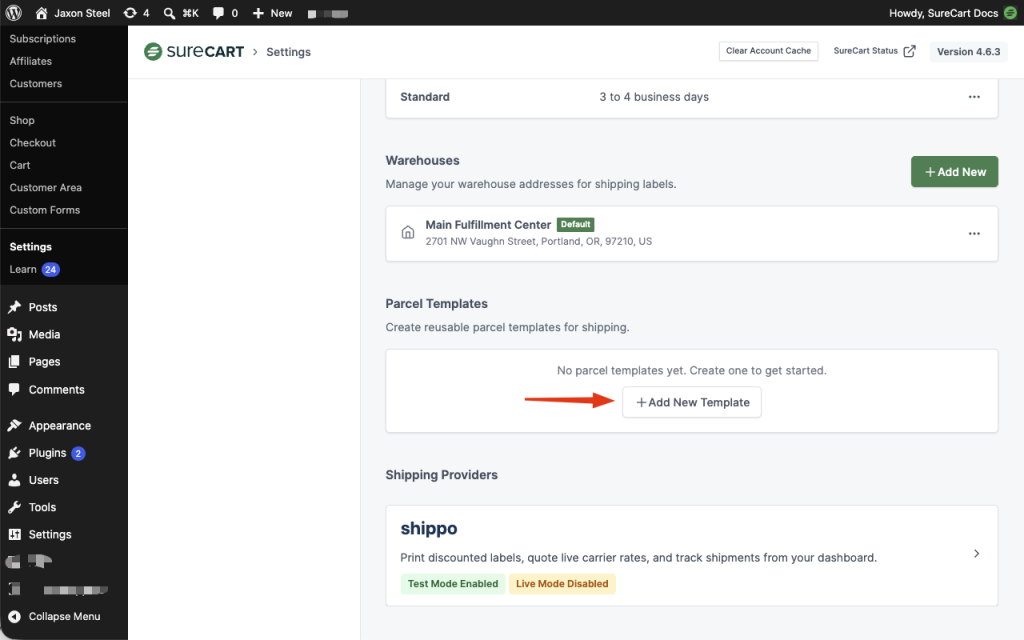
Step 3: Name it something you’ll recognize later, like “Small Box” or “Medium Box, 3kg.”
Step 4: Mark one as your default if most of your orders ship in the same size package.
Say Renee sells ceramic mugs. Most orders are one or two mugs, so she creates a “Small Box” template sized for that, and a “Medium Box” template for orders of four or more. She sets Small Box as her default since it covers most of her orders.
Pro Tip: Start with two or three templates, not ten. You can add more as real order patterns show up. A template library nobody uses just adds noise to the dropdown when you’re fulfilling an order.
Setting Up Warehouses
Third: warehouses. A warehouse in SureCart is your ship-from address, not a literal warehouse. It’s the address a package leaves from, as opposed to the customer’s address, which is where it’s going.
Step 1: In your shipping settings, add a warehouse.
Step 2: Enter a label, contact name, email address, and the full address the packages ship from.
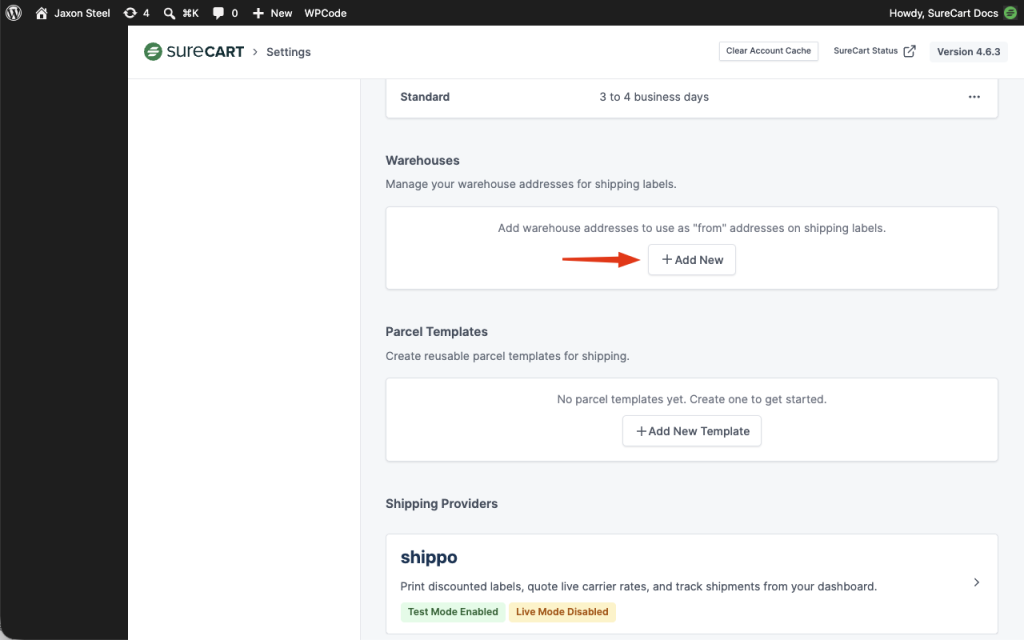
Step 3: Enable Default Warehouse if this should be preselected, then select Add Warehouse. You can add more than one warehouse if you ship from multiple locations.
The address needs to be real and working, even while you’re testing. Live rates are calculated from an actual origin point to an actual destination, so a fake or incomplete address will produce wrong rates or fail outright.
Add Live Carrier Rates to a Shipping Zone
Shippo is connected, and your parcel templates and warehouses are ready. Now configure what customers see at checkout under Shipping Zones & Rates. A shipping zone defines the destination countries covered by its rates.
Open an existing zone or select + Create Zone, name it, choose the countries it covers, and save it. Then open the zone and select + Add Rate.
Step 1: Select the shipping method this rate belongs to, then set Rate type to Live carrier rates.
Step 2: Under Carrier services, choose the connected carriers and services you want SureCart to quote for that method.
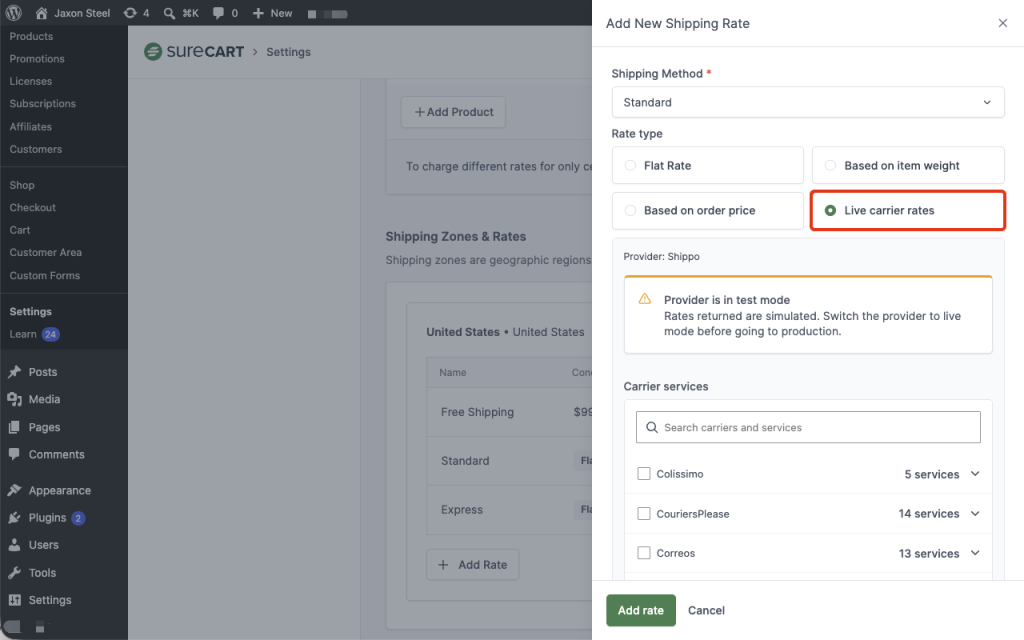
Step 3: Optionally add a flat or percentage handling markup, then select Add rate. Repeat for any other methods you want to offer.
Flat rates and weight-based rates can remain active alongside live carrier rates. When more than one rate is assigned to the same shipping method in the same zone, SureCart shows only the cheapest one for that method at checkout.
While Shippo is connected in test mode, SureCart labels returned rates as simulated. Also review carrier accounts in Shippo before going live: carriers with pending terms may still return rates, but label purchase fails until those terms are accepted.
WordPress Shipping Setup Options for Live Carrier Rates
If you want carrier-calculated shipping rates as part of your WordPress shipping setup, there are three common paths. It helps to see them side by side before deciding which one fits your store.
| Option | What it takes to set up | Live carrier rates? |
| WooCommerce core | Nothing extra. Flat rate, free shipping, and local pickup are built in. | No |
| WooCommerce plus a shipping extension | A separate extension or carrier/service connection, its own settings screen, and usually an account with the carrier or shipping service. Free and paid options both exist. | Yes, but added through a second system |
| SureCart with Shippo connected | One connection inside SureCart Settings > Shipping. No separate plugin to buy or maintain. | Yes, included in the SureCart shipping setup |
WooCommerce core is free, but its built-in shipping methods are limited to Flat Rate, Free Shipping, and Local Pickup. To show carrier-calculated rates at checkout, WooCommerce stores need a separate live-rate extension or service connection.
That distinction matters because WooCommerce Shipping, Woo’s own free shipping extension, is easy to confuse with checkout live rates. It helps merchants buy and print discounted shipping labels after an order comes in, but it does not show live carrier rates at checkout.
For a broader feature-by-feature breakdown beyond shipping, see our honest SureCart vs WooCommerce comparison.
That is the actual advantage: not that live rates exist, because plenty of tools offer them, but that getting them in SureCart does not require a second plugin or a custom integration in your stack. You connect Shippo once, and live rates show up in the same shipping settings workflow as the rest of your store setup.
Fulfilling Orders and Purchasing Shipping Labels
Once a paid order contains a physical product, SureCart shows it in the Orders section with an Awaiting Fulfillment area. Fulfillment and label purchase happen from the order’s fulfillment drawer.
Step 1: Open the order, select the items and quantities for this shipment, and choose Fulfill Item. Leave everything selected to ship the full order, or select only part of it to create a partial shipment.
Step 2: Choose Shippo to quote rates and buy a label, or Custom to record your own tracking number and link without purchasing a label. On the Shippo tab, review the warehouse From address and the customer’s To address.
Step 3: Set the shipping date, choose a saved parcel template or Custom dimensions, and select the label format.
Step 4: Choose whether to inherit weight from the selected line items. SureCart adds the parcel template’s packaging weight to the product weight.
Step 5: Choose whether to notify the customer, then select Fulfill Item to request current carrier rates.
The rate screen shows the shipping method the customer selected and paid for at checkout, followed by the rates currently available for the shipment. The label price can differ from what the customer paid because rates are recalculated from the actual package, origin, destination, and current carrier pricing
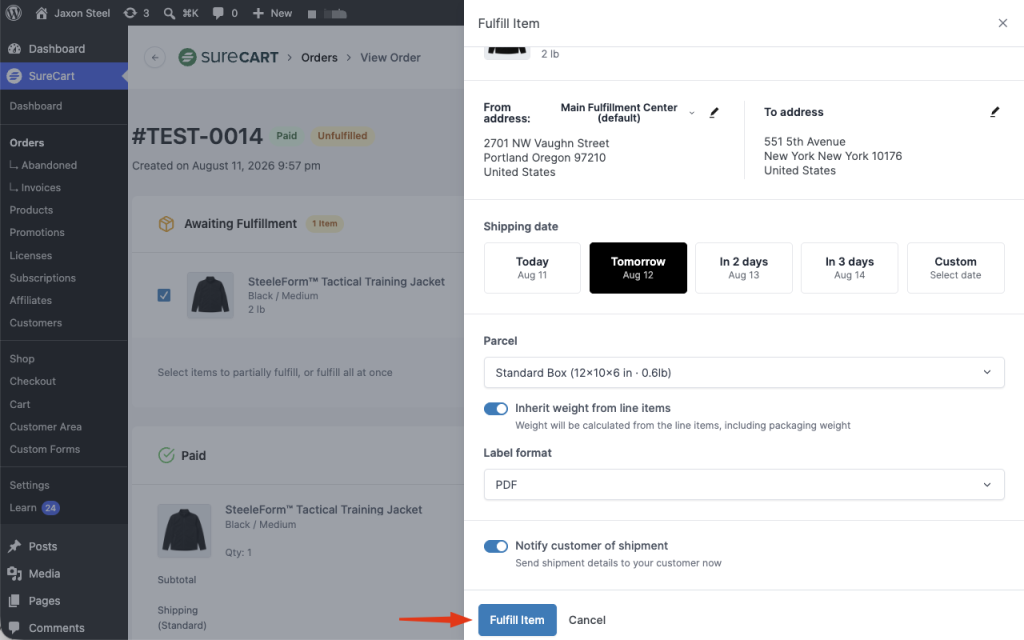
Step 6: Review any carrier issues or informational notes, select an available rate, and choose Purchase Label.
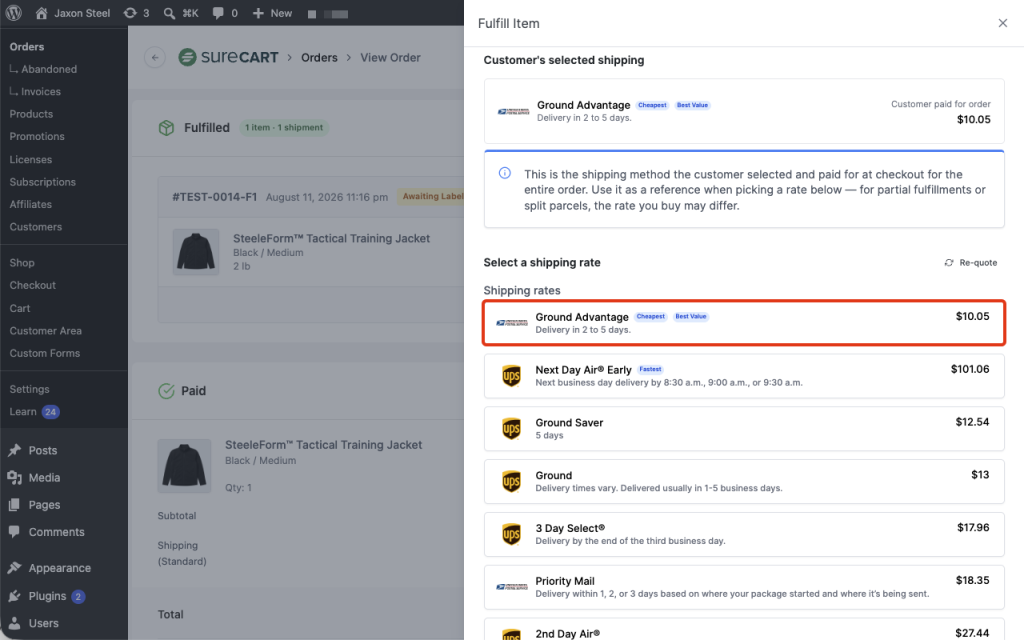
Step 7: Download or print the purchased label, or select View Shipment to review it. SureCart records the carrier, service, and tracking number, and the customer can see shipment status and tracking from their account as soon as the label is purchased.
Conclusion
The difference between a guessed shipping charge and a carrier-calculated rate shows up in your margins order by order. Connecting Shippo replaces that guesswork with a rate calculated for the shipment, without adding another shipping plugin.
From here, the shipping side is live. The next question is whether your checkout as a whole is configured to convert, not just to calculate a rate correctly. How to set up SureCart the right way picks up from there.