UPI has become India’s preferred way to pay online. Whether customers are ordering food, booking a cab, paying bills, or shopping online, chances are they’re reaching for Google Pay, PhonePe, Paytm, BHIM, or another UPI app.
They expect the same experience when they buy from your WordPress store.
If your checkout doesn’t offer UPI, you’re adding unnecessary friction to what should be a fast, familiar payment experience. On mobile devices especially, where most UPI payments happen, asking customers to switch to card payments or another method can hurt checkout conversion.
The good news is that adding UPI to a WordPress store is surprisingly straightforward. With SureCart and Razorpay, you can start accepting UPI payments in just a few minutes while also giving customers access to cards, netbanking, wallets, and more through the same checkout.
In this guide, we’ll show you exactly how to set up UPI payments on WordPress. Everything covered from connecting Razorpay to SureCart and testing your first payment to enabling recurring subscription payments through UPI Autopay.
Why UPI is Non-Negotiable for Stores Selling in India
In May 2026 alone, UPI processed 23.2 billion transactions worth ₹29.9 lakh crore, according to NPCI data — an all-time high, in a streak of months that keep breaking the previous record. India’s real-time payment rails now handle close to half of all real-time digital transactions happening anywhere in the world.
That’s not a trend. That’s the default behavior of your customers.
And there’s a reason UPI won:
- No card needed: Customers don’t have to enter card details or even keep a credit or debit card handy. They can pay directly from their bank account using the UPI app they already use every day.
- No friction: No 16-digit number to type, no CVV, no waiting for an OTP that arrives after the payment window expires. Open app, scan or tap, approve. Done in seconds.
- Instant trust: When customers see the familiar UPI payment flow, they immediately know what to expect. That familiarity helps reduce hesitation at checkout.
To be clear, UPI isn’t the only method that matters. Cards still carry higher-ticket orders, and netbanking has loyal users. But UPI is the floor, not the ceiling. It’s the minimum payment option most Indian customers expect to see at checkout.
What You Need to Accept UPI Payments on WordPress
WordPress itself doesn’t process payments. Neither does any theme or page builder. To accept UPI, you need two things working together:
- A payment gateway that speaks UPI: The licensed service that actually moves money from your customer’s bank account to yours.
- An eCommerce plugin that speaks WordPress: The layer that handles your products, checkout pages, orders, and subscriptions.
For Indian stores, the stack we recommend is SureCart + Razorpay:
- Razorpay is an RBI-licensed payment aggregator built for India. It processes UPI, cards, netbanking, and wallets through a single integration.
- SureCart is the eCommerce engine on the WordPress side — products, checkout, coupons, subscriptions, and customer dashboards — with Razorpay built in natively. No connector plugins, no API keys to copy-paste.
The explosion of UPI has completely redefined consumer expectations in India, shifting the focus from traditional card transactions to instant, mobile-first payments,” says Sam Meenasian, Operations Director of USA Business Insurance.
“For WordPress store owners, integrating UPI isn’t just about adding another payment gateway – it’s about removing the final friction point at checkout to deliver a seamless, localized experience that directly boosts conversion rates.
At checkout, your customer simply chooses UPI and pays using the app they already have – Google Pay, PhonePe, Paytm, BHIM, or their bank’s own UPI app. One Razorpay integration gives you access to all of them.
Before you start, make sure you have:
- A Razorpay account with KYC completed: If you haven’t set one up yet, our complete Razorpay guide for WordPress walks through account creation, the exact KYC documents you’ll need, and how long approval takes.
- The SureCart plugin installed: The free plan is all you need to start accepting UPI.
- Your store currency set to INR: UPI is an Indian payment method, and it will only appear at checkout when the purchase is in Indian Rupees.
- For subscriptions only: The Recurring Payments feature enabled on your Razorpay account. This is a Razorpay-side setting. If you don’t see it in your dashboard, you can request Razorpay support to enable it.
Setting Up UPI Payments on WordPress with SureCart + Razorpay
Once everything is ready, you’re just a few steps away from accepting UPI payments on your WordPress store.
Step 1 — Connect Razorpay to SureCart
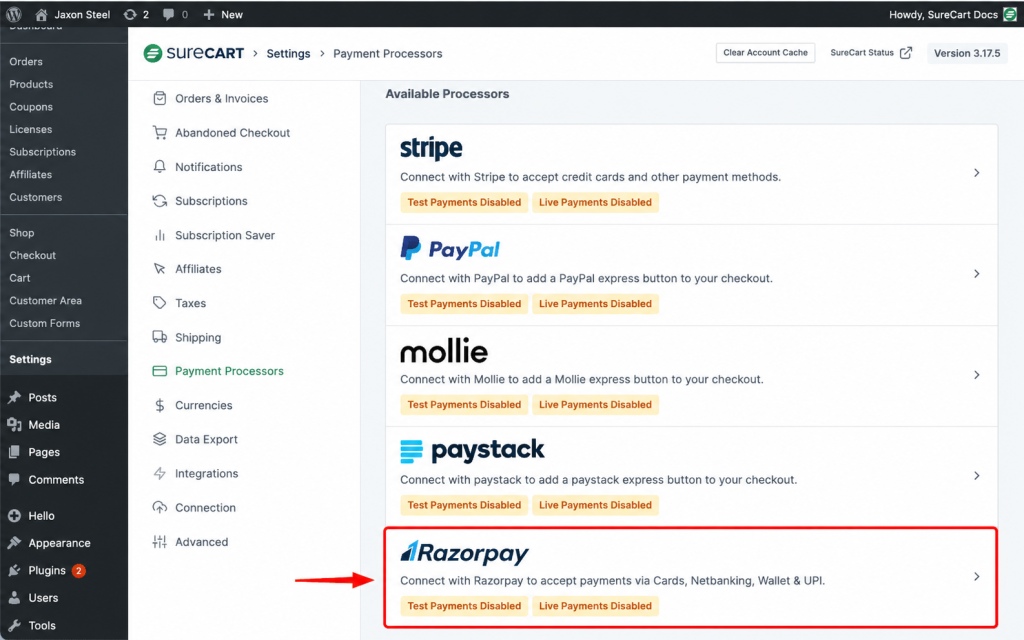
In your WordPress dashboard, go to SureCart → Settings → Processors. You’ll see Razorpay listed alongside Stripe, PayPal, and Mollie.
Click Connect, and choose whether you’re connecting in Test Mode or Live Mode. If you’re setting up for the first time, start with Test Mode — you’ll be able to simulate payments without real money moving.
SureCart uses a secure OAuth connection, which means no hunting for API keys. You’re taken to Razorpay’s authorization page, you approve the connection, and you’re sent back to WordPress with everything wired up. Make sure you’re already logged into your Razorpay account in the same browser before clicking Connect, so the authorization page recognizes you.
The full walkthrough with screenshots is in our Razorpay connection doc.
Step 2 — Confirm Your Checkout is in INR
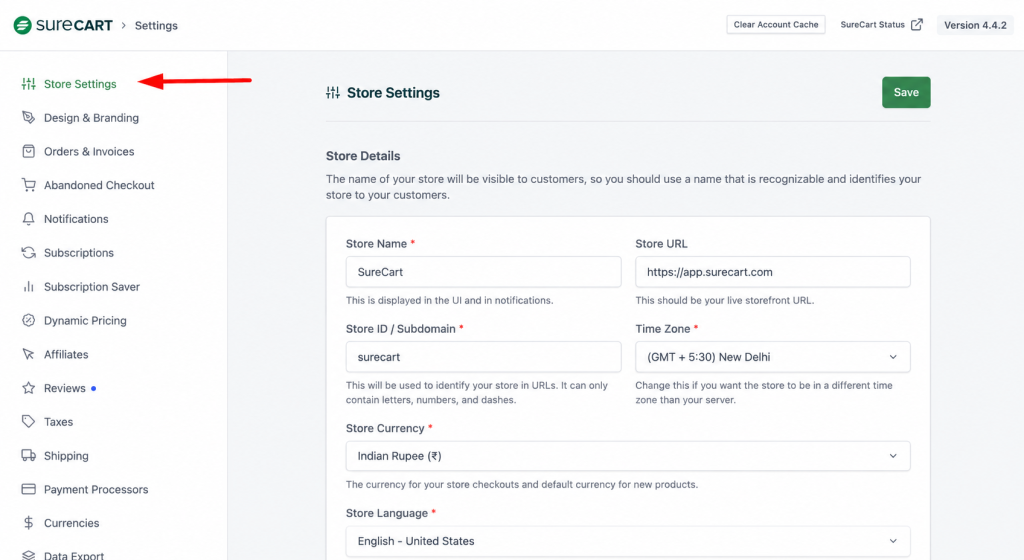
UPI only works for payments in Indian Rupees. Check that your store currency is set to INR in SureCart → Settings → Store, and that your product prices are in rupees. If a customer lands on a checkout in USD or EUR, Razorpay (and UPI with it) won’t be offered as a payment option by design, not by bug.
Step 3 — Test a UPI Payment
While connected in Test Mode, place an order on your own store. Razorpay’s test environment simulates the payment experience with mock success and failure screens. No real money moves.
Two things to check while you’re there:
- The phone number field: Razorpay requires a customer phone number for every payment, so SureCart automatically adds this field to your checkout when Razorpay is active. You don’t need to configure anything.
- The order status: After a successful test payment, confirm the order shows as paid in your SureCart dashboard and the confirmation email goes out.
Step 4 — Go Live
Once your tests pass, switch your Razorpay connection to Live Mode. Before you do, log into your Razorpay dashboard and make sure your business website URL is added and verified and that it matches the domain where your checkout actually lives.
This is the single most common go-live snag: if the URL is missing or doesn’t match, customers see a “Payment blocked as website does not match registered website(s)” error at checkout. Thirty seconds of verification in the Razorpay dashboard saves you from finding out through a support ticket.
Once everything is verified, your WordPress store is ready to accept UPI payments through Razorpay.
Limited-time offer: zero SureCart fees on Razorpay
Pay only Razorpay’s standard 2% + GST.
SureCart’s built-in engine saves you Razorpay’s extra 0.99% subscription fee.
Earn more on every one-time or subscription sale.
Enjoy this limited-time zero-fee perk on the Free plan! Want zero platform fees forever? That’s a Pro benefit. Check our pricing page to see what fits you best.
UPI Autopay: Accept Subscriptions Through UPI
If you sell memberships, courses, SaaS, or any other recurring product, there’s one more advantage worth knowing about.
Recurring payments through UPI have historically been a hard problem on WordPress. Most setups could take a one-time UPI payment, but renewals meant chasing customers manually every month. That’s changing across the ecosystem, and SureCart supports it natively: UPI Autopay for subscriptions, built into the same Razorpay integration.
Here’s what the experience looks like for your customer:
- At checkout, your customer subscribes and approves a payment mandate in their UPI app (a one-time authorization).
- From then on, renewals charge automatically. For successful mandate renewals, payments are charged automatically without asking customers to return and pay again each month.
For many businesses in India, this removes one of the biggest barriers to recurring billing by letting customers subscribe with the payment method they already use every day.
A couple of limits worth knowing upfront:
- Mandates are capped at ₹15,000 per charge. This is an RBI rule that applies to UPI Autopay everywhere, not a SureCart or Razorpay limitation. For higher-value recurring billing, cards are the better fit.
- INR only. Like all UPI payments, Autopay works for Indian Rupee transactions.
Within those bounds, the use cases are exactly the businesses growing fastest on WordPress in India: membership sites with monthly access, course creators offering installment plans instead of one large payment, and SaaS products billing Indian customers in INR.
UPI, Cards, Wallets, and More with One Integration
Although this guide focuses on UPI, the same Razorpay integration gives you access to several other payment methods.
The same Razorpay connection also enables credit and debit cards (Visa, Mastercard, RuPay), netbanking, and popular wallets at your checkout without extra plugins or additional configuration. Your customer chooses how they want to pay; Razorpay handles whichever method they pick.
And if you sell beyond India, SureCart lets you run multiple payment processors on the same checkout — Razorpay for your Indian customers, Stripe or PayPal for international buyers. (We’ve covered how to combine gateways in our guide to payment gateways for WordPress in India.)
Whether your customers are in India or overseas, SureCart lets you offer the payment methods they expect from a single WordPress store.
If your Razorpay KYC is already done, you’re about fifteen minutes away from accepting the payment method your customers reach for first. Install SureCart, connect Razorpay, run a test payment, and go live.